

When it comes to planning family dinners during vacations, I always think of meals that are both vibrant and easy to prepare.
Picture plates filled with fresh, colorful ingredients that are simple enough to make in a cozy rental kitchen or over a campfire.
Grilled chicken skewers under the summer sun and the refreshing scent of lime and cilantro are some of my favorites.
If you’re looking for recipes that bring joy and simplicity to your travels, let’s explore some delightful options together.
One-Pan Lemon Garlic Shrimp and Asparagus
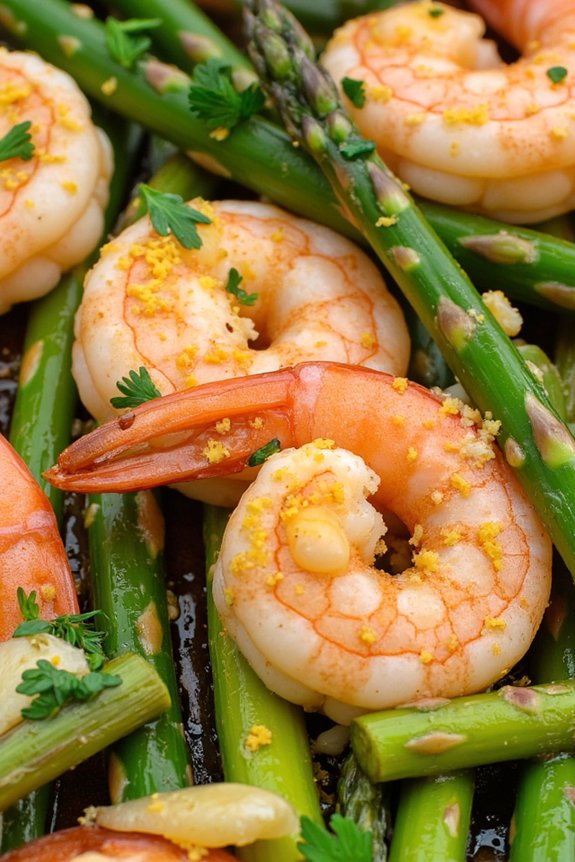
One-Pan Lemon Garlic Shrimp and Asparagus is a delightful dish that combines fresh shrimp, crisp asparagus, and a zesty lemon garlic sauce all cooked together in one pan for an easy and quick family dinner.
This recipe is perfect for busy weeknights or a casual weekend meal, offering a harmonious blend of flavors and textures. The shrimp brings a tender and juicy element, while the asparagus adds a satisfying crunch, all enveloped in a tangy, savory sauce that ties the dish together.
This recipe emphasizes minimal cleanup, as everything is cooked in a single pan, reducing the time spent washing dishes and allowing you to focus on enjoying the meal with your family. The combination of lemon and garlic elevates the natural flavors of the shrimp and asparagus, making this dish not only delicious but also healthy.
It’s a perfect meal for 4-6 people, guaranteeing there’s enough for everyone to enjoy.
Ingredients (Serves 4-6):
- 1 1/2 pounds large shrimp, peeled and deveined
- 1 bunch of asparagus, trimmed and cut into 2-inch pieces
- 3 tablespoons olive oil
- 4 cloves garlic, minced
- 1 lemon, juiced and zest grated
- 1 teaspoon salt
- 1/2 teaspoon black pepper
- 1/2 teaspoon red pepper flakes (optional)
- 2 tablespoons fresh parsley, chopped
Cooking Instructions:
- Preheat the oven: Start by preheating your oven to 400°F (200°C). This temperature guarantees the shrimp and asparagus bake evenly without overcooking.
- Prepare the shrimp and asparagus: In a large baking pan, combine the shrimp and asparagus. Confirm the asparagus is trimmed and cut into uniform pieces for even cooking.
- Make the sauce: In a small bowl, whisk together the olive oil, minced garlic, lemon juice, lemon zest, salt, black pepper, and red pepper flakes (if using). This mixture will serve as a marinade and cooking sauce for the shrimp and asparagus.
- Combine and coat: Pour the lemon garlic sauce over the shrimp and asparagus in the pan. Toss everything together until the shrimp and asparagus are well coated in the sauce.
- Bake the dish: Spread the shrimp and asparagus out in an even layer in the pan, ensuring they aren’t overcrowded. Bake in the preheated oven for 12-15 minutes or until the shrimp are pink and opaque, and the asparagus is tender yet crisp.
- Garnish and serve: Once done, remove the pan from the oven and sprinkle with chopped fresh parsley for a burst of color and flavor. Serve the dish hot with your choice of sides such as rice, quinoa, or crusty bread.
Extra Tips:
To guarantee the shrimp cooks evenly, try to use shrimp of similar size. If you’re using frozen shrimp, make sure they’re fully thawed before cooking.
For an extra flavor boost, consider adding a pinch of smoked paprika or cumin to the sauce. If you prefer a more citrusy flavor, you can add an extra tablespoon of lemon juice.
To make this dish even more filling, you can toss in some cherry tomatoes or sliced bell peppers with the shrimp and asparagus.
Grilled Chicken and Veggie Skewers
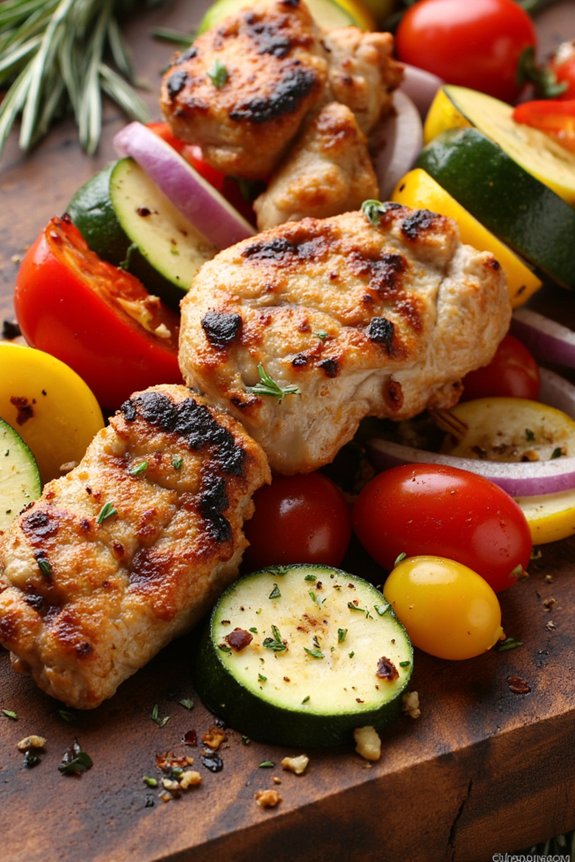
Grilled Chicken and Veggie Skewers are a delightful and colorful addition to any family dinner. With the vibrant mix of vegetables and the savory flavor of marinated chicken, these skewers not only look appealing but also offer a wholesome and satisfying meal. The skewers are perfect for outdoor grilling during warm weather gatherings, and they can also be prepared indoors using a grill pan for those cozy family nights in.
The combination of tender chicken and crisp vegetables creates a dish that’s both nutritious and delicious, making it a favorite for all ages. These skewers are versatile and can be customized according to your family’s preferences. The marinade enhances the flavor of the chicken, keeping it juicy and flavorful, while the veggies add a burst of color and nutrition.
You can easily swap out the vegetables based on what you have on hand or what’s in season. Serve these skewers with a side of rice, a fresh salad, or some warm pita bread to round out the meal. This recipe serves 4-6 people, making it ideal for a family dinner or a small gathering with friends.
Ingredients:
- 2 lbs boneless, skinless chicken breasts
- 2 red bell peppers
- 2 green bell peppers
- 1 large red onion
- 1 zucchini
- 1 yellow squash
- 1 cup cherry tomatoes
- 1/4 cup olive oil
- 3 tablespoons lemon juice
- 3 cloves garlic, minced
- 1 teaspoon dried oregano
- Salt and pepper to taste
- Wooden or metal skewers (about 12-15)
Cooking Instructions:
- Prepare the Marinade: In a bowl, whisk together the olive oil, lemon juice, minced garlic, dried oregano, salt, and pepper. This mixture will be used to marinate the chicken and coat the vegetables.
- Marinate the Chicken: Cut the chicken breasts into 1-inch cubes and place them in a resealable plastic bag or a shallow dish. Pour half of the marinade over the chicken, ensuring all pieces are well coated. Seal the bag or cover the dish and refrigerate for at least 30 minutes, or up to 2 hours for more flavor.
- Prep the Vegetables: While the chicken is marinating, wash and cut the bell peppers into 1-inch pieces. Peel and cut the red onion into similar-sized chunks. Slice the zucchini and yellow squash into thick rounds. Leave the cherry tomatoes whole.
- Assemble the Skewers: Thread the marinated chicken and vegetables alternately onto the skewers. Aim for a colorful mix on each skewer, such as chicken, red pepper, onion, zucchini, yellow squash, and cherry tomato. Repeat the pattern until all ingredients are used.
- Preheat the Grill: Heat your outdoor grill or indoor grill pan to medium-high heat. If using an outdoor grill, lightly oil the grates to prevent sticking.
- Grill the Skewers: Place the skewers on the grill and cook for 10-15 minutes, turning occasionally, until the chicken is cooked through and has nice grill marks. The internal temperature of the chicken should reach 165°F (75°C).
- Serve and Enjoy: Remove the skewers from the grill and let them rest for a few minutes before serving. Serve hot with your choice of side dishes.
Extra Tips:
For best results, soak the wooden skewers in water for at least 30 minutes before threading the chicken and vegetables. This will prevent them from burning on the grill. If you prefer more flavor, consider adding some fresh herbs like rosemary or thyme to the marinade.
You can also experiment with different vegetables, such as mushrooms or eggplant, to suit your family’s tastes. Remember, the key to perfectly cooked skewers is to cut all ingredients to a similar size for even cooking. Enjoy your meal, and don’t forget to have fun experimenting with flavors!
Easy Caprese Pasta Salad
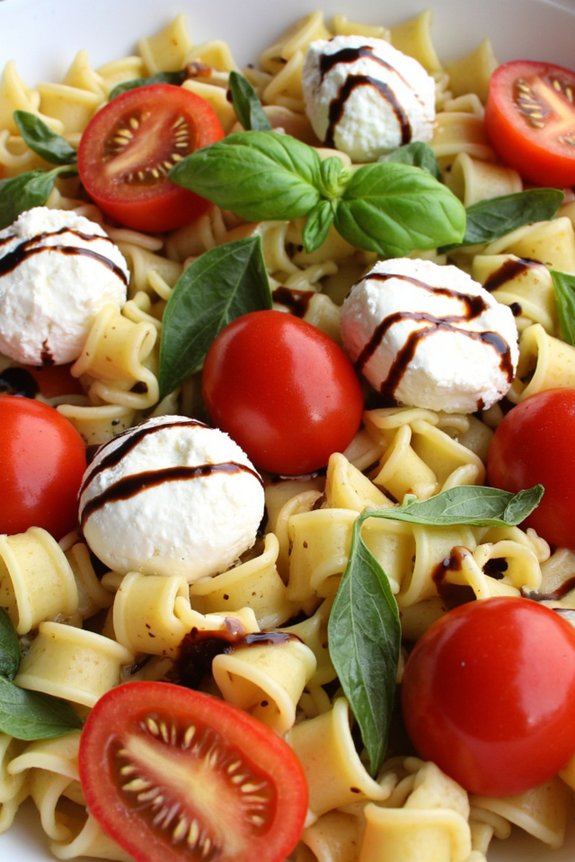
Easy Caprese Pasta Salad is a delightful and invigorating dish that’s perfect for family dinners, especially during the warmer months. This salad combines the classic flavors of a Caprese salad — fresh tomatoes, mozzarella, and basil — with pasta to create a satisfying meal that’s both light and fulfilling.
Whether you’re serving it as a main course or a side dish, this pasta salad is sure to be a hit with its vibrant colors and fresh taste. The beauty of this Easy Caprese Pasta Salad lies in its simplicity and the quality of its ingredients. By using fresh, ripe tomatoes, creamy mozzarella, and fragrant basil, this dish captures the essence of summer in every bite.
Tossed with a tangy balsamic glaze, the salad has a perfect balance of flavors and is ideal for any casual family gathering or potluck.
Ingredients (Serves 4-6):
- 12 ounces of pasta (such as rotini or fusilli)
- 2 cups cherry tomatoes, halved
- 8 ounces fresh mozzarella balls (bocconcini), halved
- 1 cup fresh basil leaves, torn into pieces
- 1/4 cup olive oil
- 3 tablespoons balsamic glaze
- Salt and pepper to taste
Instructions:
- Cook the Pasta: Begin by cooking the pasta according to the package instructions in a large pot of salted boiling water until it’s al dente. Drain the pasta and rinse it under cold water to stop the cooking process. Set aside to cool completely.
- Prepare the Ingredients: While the pasta is cooling, halve the cherry tomatoes and mozzarella balls. Tear the basil leaves into smaller pieces to release their aromatic oils.
- Combine the Ingredients: In a large mixing bowl, combine the cooled pasta, cherry tomatoes, mozzarella balls, and basil leaves.
- Dress the Salad: Drizzle the olive oil and balsamic glaze over the salad. Season with salt and pepper to suit your taste.
- Toss the Salad: Gently toss all the ingredients together until everything is well-coated in the dressing. Be careful not to break the mozzarella balls.
- Chill and Serve: Allow the salad to chill in the refrigerator for at least 30 minutes before serving, which helps the flavors meld together. Serve the salad cold or at room temperature.
Extra Tips:
For the best flavor, use high-quality ingredients, especially the olive oil and balsamic glaze. If fresh basil isn’t available, you can substitute it with a few teaspoons of dried basil, though fresh is always preferred.
Feel free to add other ingredients like sliced olives or grilled chicken for a heartier meal. This salad can be made a few hours in advance and stored in the refrigerator, making it a convenient option for prepping ahead of time. Just give it a quick toss before serving to redistribute the dressing.
Sheet Pan Sausage and Peppers
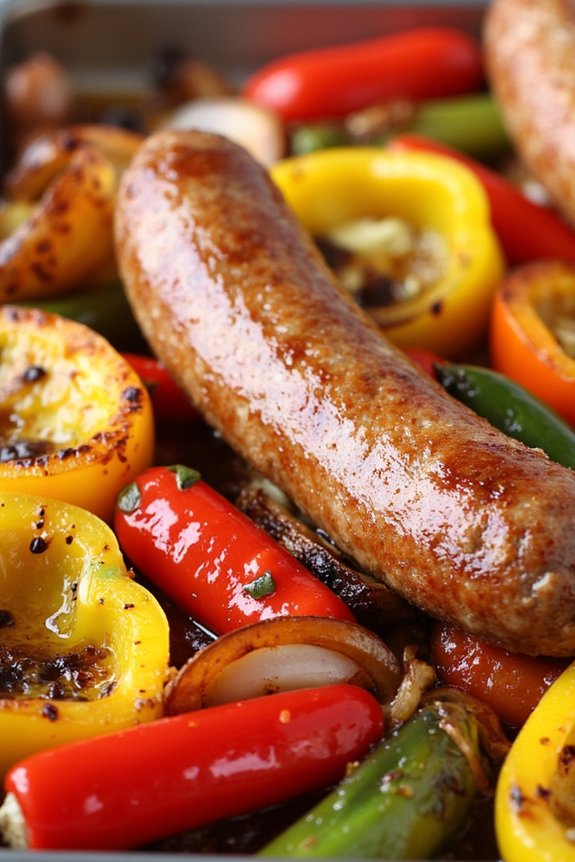
Sheet Pan Sausage and Peppers is a delightful and easy-to-make dish that’s perfect for a family dinner. This recipe combines the savory flavors of Italian sausage with the sweetness of colorful bell peppers and onions, all roasted to perfection on a single sheet pan. The result is a hearty, flavorful meal that requires minimal cleanup, making it an ideal choice for a busy weeknight or a casual weekend gathering.
This dish isn’t only delicious but also versatile. You can customize it to suit your family’s tastes by choosing your favorite type of sausage, such as mild or spicy Italian, or even a chicken or turkey sausage for a lighter option. The bell peppers and onions add a vibrant touch to the dish, and you can easily add other vegetables like zucchini or cherry tomatoes for added nutrition and color.
Serve it with crusty bread, over a bed of rice, or alongside a fresh green salad for a complete and satisfying meal.
Ingredients (Serves 4-6):
- 1 1/2 pounds Italian sausage links
- 3 bell peppers (red, yellow, and green), sliced
- 1 large red onion, sliced
- 3 tablespoons olive oil
- 1 teaspoon dried oregano
- 1 teaspoon garlic powder
- Salt and pepper to taste
- 1 tablespoon balsamic vinegar
- Fresh basil or parsley for garnish (optional)
Cooking Instructions:
- Preheat the Oven: Preheat your oven to 400°F (200°C) to make sure it’s hot and ready for roasting.
- Prepare the Ingredients: Slice the bell peppers and red onion into thin strips. If your sausages are linked together, separate them.
- Season the Vegetables: In a large mixing bowl, combine the sliced bell peppers and red onion. Drizzle with olive oil, then sprinkle with oregano, garlic powder, salt, and pepper. Toss until the vegetables are evenly coated with the seasoning.
- Arrange on the Sheet Pan: Spread the seasoned vegetables evenly on a large sheet pan. Place the sausage links on top of the vegetables, spacing them apart for even cooking.
- Roast the Dish: Place the sheet pan in the preheated oven and roast for 25-30 minutes. Halfway through, use tongs to turn the sausages and stir the vegetables for even cooking.
- Add Balsamic Vinegar: After 30 minutes, remove the sheet pan from the oven and drizzle the balsamic vinegar over the sausages and vegetables. Return the pan to the oven for an additional 5-10 minutes until the sausages are browned and cooked through, and the vegetables are tender and caramelized.
- Garnish and Serve: Once cooked, remove from the oven and let it rest for a few minutes. Garnish with fresh basil or parsley if desired before serving.
Extra Tips: For even more flavor, consider marinating the sausages in a bit of olive oil, garlic, and herbs for a few hours or overnight before cooking. If using pre-cooked sausages, reduce the roasting time as needed.
To make sure the vegetables cook evenly, cut them into similar-sized pieces. This dish pairs wonderfully with a side of crusty bread, and you can use the roasted vegetables and sausages as a filling for a sandwich or wrap.
Quick Veggie Stir-Fry With Tofu
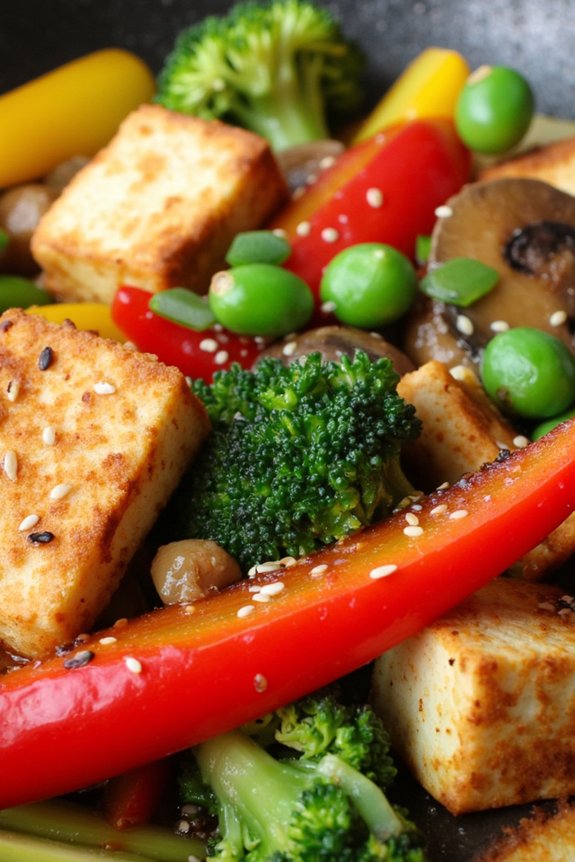
If you’re looking for a delicious and healthy dinner option that comes together in a flash, this Quick Veggie Stir-Fry With Tofu is just the ticket. Perfect for a family dinner, this dish combines the nutritional benefits of fresh vegetables and protein-rich tofu, all tossed in a savory sauce that’s sure to satisfy your taste buds.
Whether you’re catering to vegetarians or simply trying to incorporate more plant-based meals into your diet, this stir-fry is a versatile and flavorful choice.
The beauty of a stir-fry lies in its flexibility and speed. In just under 30 minutes, you’ll have a colorful and nutritious meal on the table, making it ideal for busy weeknights or when you’re short on time. The key is to prepare all your ingredients before you start cooking, ensuring that the process is seamless and stress-free.
This recipe serves 4-6 people, providing generous portions for everyone at the table.
Ingredients:
- 1 block (14 oz) firm tofu
- 3 tablespoons soy sauce
- 2 tablespoons sesame oil
- 1 tablespoon cooking oil
- 2 cloves garlic, minced
- 1 inch ginger, minced
- 1 red bell pepper, sliced
- 1 yellow bell pepper, sliced
- 1 cup broccoli florets
- 1 cup snap peas
- 1 cup sliced mushrooms
- 2 green onions, chopped
- 1 tablespoon rice vinegar
- 1 tablespoon honey or maple syrup
- 1 teaspoon cornstarch
- 1 tablespoon water
- Sesame seeds for garnish (optional)
Cooking Instructions:
- Prepare the Tofu: Drain the tofu and press it between paper towels to remove excess moisture. Cut it into 1-inch cubes.
- Marinate the Tofu: In a bowl, combine the tofu cubes with 1 tablespoon of soy sauce and 1 tablespoon of sesame oil. Let it marinate for at least 10 minutes while you prepare the vegetables.
- Mix the Sauce: In a small bowl, mix the remaining soy sauce, rice vinegar, honey or maple syrup, and cornstarch dissolved in water. Set aside.
- Cook the Tofu: Heat 1 tablespoon of cooking oil in a large skillet or wok over medium-high heat. Add the marinated tofu and cook until golden brown on all sides, about 6-8 minutes. Remove from the skillet and set aside.
- Stir-Fry the Vegetables: In the same skillet, add the remaining sesame oil. Add the minced garlic and ginger and sauté until fragrant, about 30 seconds. Add the sliced bell peppers, broccoli, snap peas, and mushrooms. Stir-fry for 3-4 minutes until the vegetables are vibrant and slightly tender.
- Combine and Serve: Return the tofu to the skillet and pour the prepared sauce over the tofu and veggies. Stir well to combine and let it cook for another 2-3 minutes until the sauce thickens and coats everything evenly. Top with chopped green onions and sesame seeds, if desired.
- Serve Immediately: Serve the stir-fry hot, either on its own or over a bed of steamed rice or noodles.
Extra Tips:
When preparing this Quick Veggie Stir-Fry With Tofu, be sure to have all your ingredients prepped and ready to go, as stir-frying is a fast process.
Adjust the vegetables used based on what’s in season or what you have on hand. For a bit of heat, consider adding a pinch of red pepper flakes or a splash of sriracha to the sauce.
Finally, be mindful of the salt content in the soy sauce and adjust to taste, especially if you’re watching your sodium intake. Enjoy your flavorful and nutritious meal!
Campfire Foil Packet Tacos
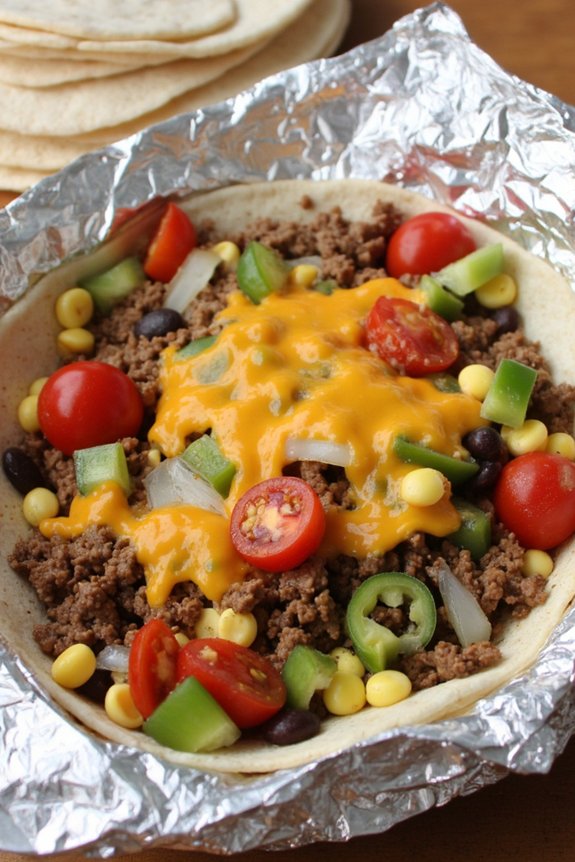
Campfire Foil Packet Tacos are a delightful and convenient meal option for those who enjoy the great outdoors or want to bring a taste of adventure to their home kitchen. This recipe combines the flavors of traditional tacos with the ease of foil packet cooking, making it perfect for a family dinner that requires minimal cleanup.
Whether you’re camping under the stars or simply looking to simplify your dinner routine, these foil packet tacos offer a fun, hands-on dining experience that everyone will enjoy.
The beauty of Campfire Foil Packet Tacos lies in their versatility and simplicity. Each family member can customize their own packet to suit their taste preferences, making this meal both interactive and satisfying.
The process involves filling aluminum foil packets with seasoned ground beef, vegetables, and cheese, then cooking them over a campfire or grill until everything is perfectly melded together. Once cooked, these packets can be opened to reveal a delicious, steaming mixture ready to be topped with your favorite taco fixings.
Ingredients for 4-6 people:
- 1.5 pounds ground beef
- 1 packet taco seasoning
- 1 cup shredded cheddar cheese
- 1 medium onion, diced
- 1 bell pepper, diced
- 2 cups cherry tomatoes, halved
- 1 can (15 oz) black beans, drained and rinsed
- 1 cup corn kernels (fresh, canned, or frozen)
- 12 small flour tortillas
- Aluminum foil sheets
- Optional toppings: sour cream, guacamole, salsa, chopped cilantro, lime wedges
Cooking Instructions:
- Prepare the Foil Packets: Tear off six large sheets of aluminum foil, each approximately 12×18 inches. Lay them flat on a clean surface.
- Cook the Ground Beef: In a large skillet over medium heat, cook the ground beef until browned, breaking it apart with a spatula. Drain any excess fat. Add the taco seasoning and a splash of water, stirring until the beef is well-coated and the seasoning is evenly distributed.
- Assemble the Packets: Evenly divide the seasoned beef among the foil sheets. Top each portion with diced onion, bell pepper, cherry tomatoes, black beans, corn, and a generous sprinkle of shredded cheese.
- Seal the Packets: Fold each side of the foil over the filling to create a packet, making sure to leave a little space inside for steam to circulate. Seal the edges tightly to prevent any juices from escaping.
- Cook the Packets: Place the foil packets on a grill over medium heat, or on a campfire grate. Cook for about 15-20 minutes or until the vegetables are tender and the cheese is melted. Carefully open one packet to check for doneness.
- Assemble the Tacos: Carefully open each packet (watch out for steam!) and slide the contents onto a small flour tortilla. Add any additional toppings as desired.
Extra Tips:
When preparing Campfire Foil Packet Tacos, consider using heavy-duty aluminum foil to prevent tearing and promote even cooking.
If you’re cooking over a campfire, place the packets on a grill grate or directly on the coals, but be sure to turn them occasionally to prevent burning.
Feel free to experiment with different fillings and toppings to suit your family’s preferences. Adding a squeeze of lime juice or a dollop of guacamole can elevate the flavors.
Finally, remember that these packets can also be cooked in an oven at 400°F (200°C) if you prefer an indoor cooking method.
Simple Pesto and Tomato Flatbread

If you’re looking for a quick and delicious family dinner option, the Simple Pesto and Tomato Flatbread is a fantastic choice. This recipe combines the rich flavors of fresh basil pesto, juicy tomatoes, and creamy mozzarella cheese on a crisp flatbread base. It’s perfect for a weeknight meal or a casual weekend gathering.
Plus, it’s easy to make and can be customized with your favorite toppings to suit everyone’s taste. Not only is this flatbread recipe straightforward, but it also brings a burst of vibrant colors and flavors to your table. The combination of fresh ingredients guarantees that every bite is satisfying and full of flavor.
Whether you have a few fresh tomatoes from your garden or a jar of store-bought pesto, this dish is versatile and can be prepared in under 30 minutes, making it ideal for those busy days when you want something homemade without the fuss.
Ingredients (Serves 4-6):
- 2 large flatbreads or naan
- 1 cup of fresh basil pesto
- 2 cups of cherry tomatoes, halved
- 2 cups of shredded mozzarella cheese
- 1/4 cup of grated Parmesan cheese
- 2 tablespoons of olive oil
- Salt and pepper to taste
- Optional: fresh basil leaves for garnish
Cooking Instructions:
- Preheat the Oven: Preheat your oven to 400°F (200°C). This will guarantee your flatbreads bake evenly and become perfectly crispy.
- Prepare the Flatbreads: Lay the flatbreads on a large baking sheet. Brush each one lightly with olive oil to help crisp them up while baking.
- Spread the Pesto: Evenly spread the basil pesto over each flatbread, ensuring you cover the entire surface. This will serve as the flavor base for your flatbreads.
- Add the Cheese: Sprinkle the shredded mozzarella cheese evenly over the pesto-covered flatbreads. The cheese will melt and create a gooey, delicious layer.
- Top with Tomatoes: Distribute the halved cherry tomatoes over the cheese. Try to spread them out evenly to guarantee every slice has a bit of tomato goodness.
- Sprinkle Parmesan and Season: Sprinkle the grated Parmesan cheese over the top, then season with a pinch of salt and a dash of pepper.
- Bake the Flatbreads: Place the baking sheet in the preheated oven and bake for about 12-15 minutes or until the cheese is melted and bubbly, and the edges of the flatbreads are golden brown.
- Garnish and Serve: Once baked, remove the flatbreads from the oven. Garnish with fresh basil leaves if desired, slice into pieces, and serve warm.
Extra Tips:
For a crispy flatbread, guarantee your oven is fully preheated before baking. If you prefer a bit of spice, add a pinch of red pepper flakes on top before baking.
You can also experiment with additional toppings such as sliced olives, mushrooms, or red onion for added flavor. To save time, use store-bought flatbreads and pesto, but if you have extra time, homemade versions can enhance the dish’s freshness and taste.
Zesty Lime and Cilantro Rice Bowl
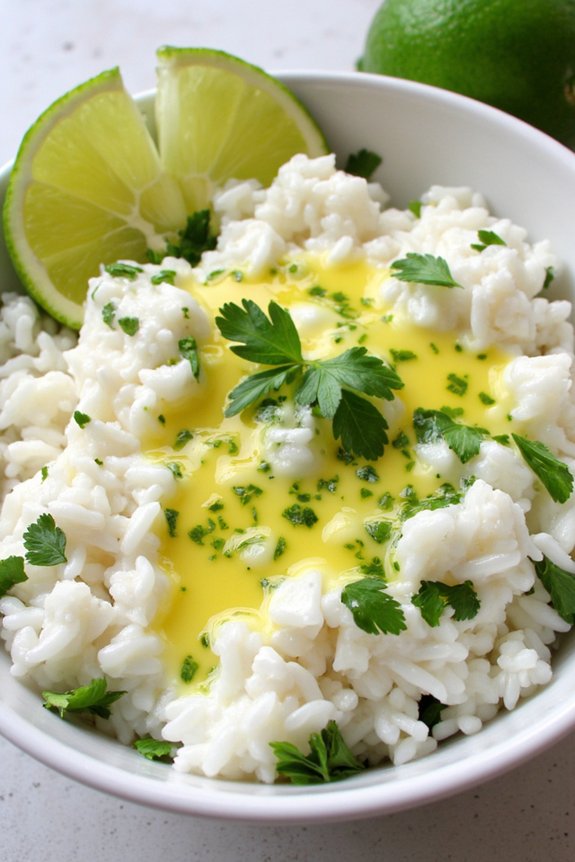
Zesty Lime and Cilantro Rice Bowl is a vibrant, flavorful dish that brings a rejuvenating twist to your family dinner table. Perfect for a serving size of 4-6 people, this dish combines the zesty flavor of lime with the aromatic freshness of cilantro, creating a rice bowl that’s both satisfying and delightful.
Whether you’re looking for a side dish to complement your main course or a light main dish, this recipe is versatile enough to suit any occasion. It’s an easy-to-prepare recipe that’s sure to become a family favorite, offering a quick yet delicious meal option that can be whipped up in no time.
The Zesty Lime and Cilantro Rice Bowl isn’t only bursting with flavor but also packed with nutrients. The combination of jasmine rice, fresh cilantro, and lime juice provides a balance of carbohydrates, vitamins, and minerals, making it a healthy choice for everyone at the table.
The preparation involves simple ingredients, yet the dish delivers complex flavors that are sure to impress your family and guests. Follow the recipe below to create this delectable dish that brings a taste of summer to your dining experience.
Ingredients for 4-6 people:
- 2 cups jasmine rice
- 4 cups water or chicken broth
- 1 tablespoon olive oil
- 1 teaspoon salt
- 1/4 cup fresh lime juice (about 2 limes)
- Zest of 1 lime
- 1 cup fresh cilantro, chopped
- 1/2 teaspoon ground cumin
- Optional: 1 avocado, sliced for garnish
- Optional: Lime wedges for serving
Instructions:
- Rinse the Rice: Start by rinsing the jasmine rice under cold water until the water runs clear. This helps remove excess starch, preventing the rice from becoming too sticky.
- Cook the Rice: In a medium saucepan, combine the rinsed rice, water or chicken broth, olive oil, and salt. Bring the mixture to a boil over medium-high heat. Once boiling, reduce the heat to low, cover the saucepan, and let it simmer for about 15-18 minutes, or until the rice is fully cooked and all the liquid is absorbed.
- Fluff the Rice: Once the rice is cooked, remove it from heat and let it sit, covered, for about 5 minutes. This allows the rice to steam gently and finish cooking. Afterward, use a fork to fluff the rice, separating the grains.
- Mix in the Flavors: Add the lime juice, lime zest, chopped cilantro, and ground cumin to the fluffed rice. Stir gently to combine all the ingredients, ensuring the rice is evenly coated with the zesty lime and aromatic cilantro.
- Serve and Garnish: Transfer the rice to a serving bowl. If desired, garnish with sliced avocado and lime wedges for an extra burst of flavor. Serve warm and enjoy!
Extra Tips:
When preparing the Zesty Lime and Cilantro Rice Bowl, it’s important to use fresh lime juice and cilantro for the best flavor. If you prefer a more intense lime taste, feel free to add extra lime zest.
For a heartier version, consider adding grilled chicken or shrimp on top of the rice bowl. Additionally, using chicken broth instead of water will enhance the overall flavor of the dish. Remember to taste and adjust the seasoning before serving, as the saltiness can vary depending on whether you use broth or water.
Quick Mediterranean Quinoa Salad
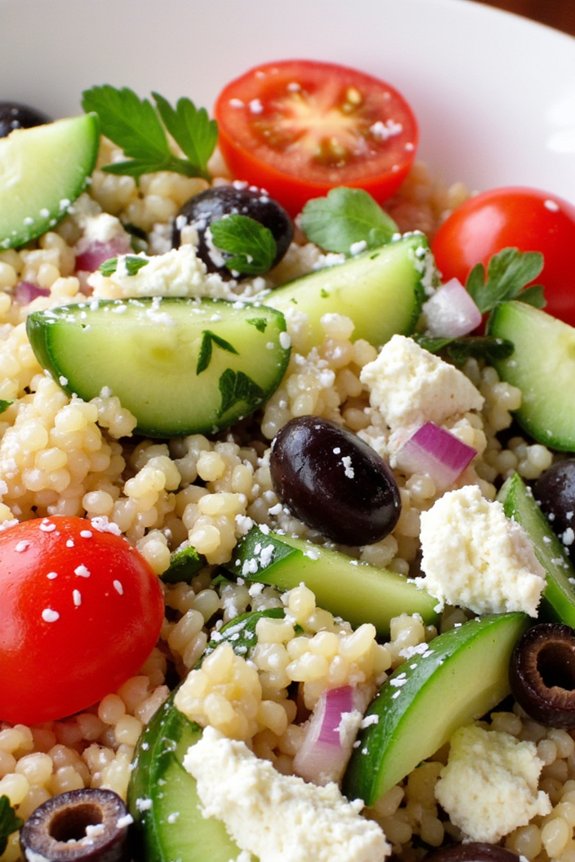
The Quick Mediterranean Quinoa Salad is a vibrant and nutritious dish that combines the rich flavors of the Mediterranean with the wholesome goodness of quinoa. This salad is perfect for a family dinner, as it’s both hearty and invigorating.
The nutty flavor of quinoa pairs beautifully with the tangy feta, crisp cucumbers, and sweet cherry tomatoes, creating a well-balanced and delicious meal. It’s an ideal choice for those busy weeknights when you want to serve something healthy and satisfying without spending hours in the kitchen.
This salad isn’t only quick to prepare but also packed with protein, fiber, and essential vitamins, making it a great option for those seeking a nutritious meal. The addition of olives, red onions, and fresh herbs like parsley and mint adds depth to the dish, making it a true palate pleaser.
With its vibrant colors and enticing flavors, the Quick Mediterranean Quinoa Salad is sure to delight your family and leave them asking for seconds. This recipe serves 4-6 people, making it perfect for a family gathering or a casual dinner party.
Ingredients:
- 1 cup quinoa
- 2 cups water
- 1/4 cup olive oil
- 2 tablespoons lemon juice
- 1 teaspoon sea salt
- 1/2 teaspoon freshly ground black pepper
- 1 cup cherry tomatoes, halved
- 1 cucumber, diced
- 1/2 cup pitted Kalamata olives, sliced
- 1/2 red onion, finely chopped
- 1/4 cup fresh parsley, chopped
- 1/4 cup fresh mint, chopped
- 1/2 cup feta cheese, crumbled
Instructions:
- Cook the Quinoa: Rinse the quinoa under cold water using a fine mesh strainer. In a medium saucepan, combine the quinoa and water. Bring to a boil over medium-high heat, then reduce the heat to low, cover, and simmer for about 15 minutes or until the quinoa is tender and the water is absorbed. Remove from heat and let it sit, covered, for 5 minutes. Fluff with a fork and let it cool.
- Prepare the Dressing: In a small bowl, whisk together the olive oil, lemon juice, sea salt, and black pepper. Adjust seasoning to taste and set aside.
- Assemble the Salad: In a large mixing bowl, combine the cooked quinoa, cherry tomatoes, cucumber, olives, red onion, parsley, and mint. Pour the dressing over the salad and gently toss to guarantee all ingredients are well coated.
- Add the Feta Cheese: Gently fold in the crumbled feta cheese, being careful not to break it up too much. Give the salad a final toss to guarantee even distribution of all ingredients.
- Chill and Serve: Transfer the salad to a serving dish and refrigerate for at least 30 minutes to allow the flavors to meld. Serve chilled or at room temperature.
Extra Tips:
For a more robust flavor, consider adding a pinch of dried oregano or basil to the dressing. If you prefer a creamier texture, you can add a dollop of Greek yogurt to the dressing.
This salad can be made a day in advance, allowing the flavors to deepen overnight. If you’re planning to make it ahead, add the feta cheese just before serving to keep it from becoming too soft.
Feel free to customize this recipe with additional vegetables like bell peppers or artichoke hearts for extra variety.
No-Bake Black Bean and Corn Tostadas
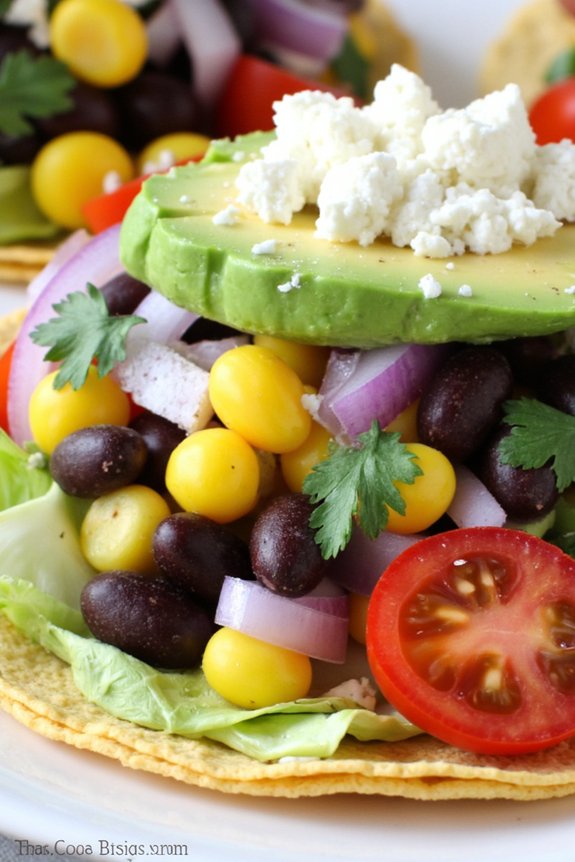
No-Bake Black Bean and Corn Tostadas are a delightful, easy-to-make meal perfect for family dinners. These tostadas require no baking, making them an excellent choice for a quick weeknight dinner or a leisurely weekend lunch.
Combining the hearty flavors of black beans with the fresh taste of corn and avocado, these tostadas bring a burst of flavor and color to your table. They’re perfect for feeding a group of 4-6 people and can be easily adjusted to suit individual preferences.
These tostadas aren’t only delicious but also nutritious, offering a good mix of protein, fiber, and healthy fats. The dish is incredibly versatile, allowing you to swap out ingredients or add your favorite toppings.
Whether you’re serving vegetarians or simply want to enjoy a meat-free meal, these No-Bake Black Bean and Corn Tostadas are sure to be a hit with everyone. With minimal cooking involved, you can focus on spending quality time with your family while enjoying a wholesome meal together.
Ingredients (Serves 4-6):
- 8-10 tostada shells
- 2 cups canned black beans, drained and rinsed
- 1 cup fresh corn kernels (or canned, drained)
- 1 cup cherry tomatoes, quartered
- 1 ripe avocado, diced
- 1/4 cup red onion, finely chopped
- 1/4 cup fresh cilantro, chopped
- 1 lime, juiced
- 1/2 teaspoon ground cumin
- Salt and pepper to taste
- 1 cup shredded lettuce
- 1/2 cup crumbled feta cheese or cotija cheese
- Optional: hot sauce or salsa for serving
Cooking Instructions:
- Prepare the Black Bean Mixture: In a medium bowl, combine the black beans, corn, cherry tomatoes, avocado, red onion, and cilantro. Stir gently to mix the ingredients together, being careful not to mash the avocado.
- Season the Mixture: Add the lime juice, ground cumin, salt, and pepper to the black bean mixture. Stir well to confirm that the seasonings are evenly distributed. Taste and adjust the seasoning if necessary.
- Assemble the Tostadas: Lay the tostada shells on a large serving platter or individual plates. Evenly distribute the shredded lettuce over each shell.
- Top with Black Bean Mixture: Spoon a generous amount of the black bean and corn mixture onto each tostada shell, spreading it evenly over the lettuce.
- Add Cheese and Serve: Sprinkle the crumbled feta or cotija cheese over the top of each tostada. Serve immediately with hot sauce or salsa on the side for those who enjoy a little extra spice.
Extra Tips: When making these tostadas, feel free to customize them to your liking by adding or substituting ingredients. For example, you can add sliced jalapeños for extra heat or swap the feta for a vegan cheese alternative.
If you prefer a bit of crunch, consider adding some toasted pumpkin seeds or crushed tortilla chips as a topping. To keep the avocado from browning, prepare it just before serving. Enjoy these tostadas fresh for the best taste and texture.