

I’m so excited to share some fantastic dinner ideas that are both budget-friendly and packed with protein to keep your family satisfied. Picture the comforting scent of a lentil and vegetable soup simmering on the stove. Or the vibrant colors of black bean and quinoa stuffed peppers fresh from the oven. Each recipe is a delightful mix of flavors and nutrients. Ready to effortlessly whip up these meals?
Black Bean and Quinoa Stuffed Peppers
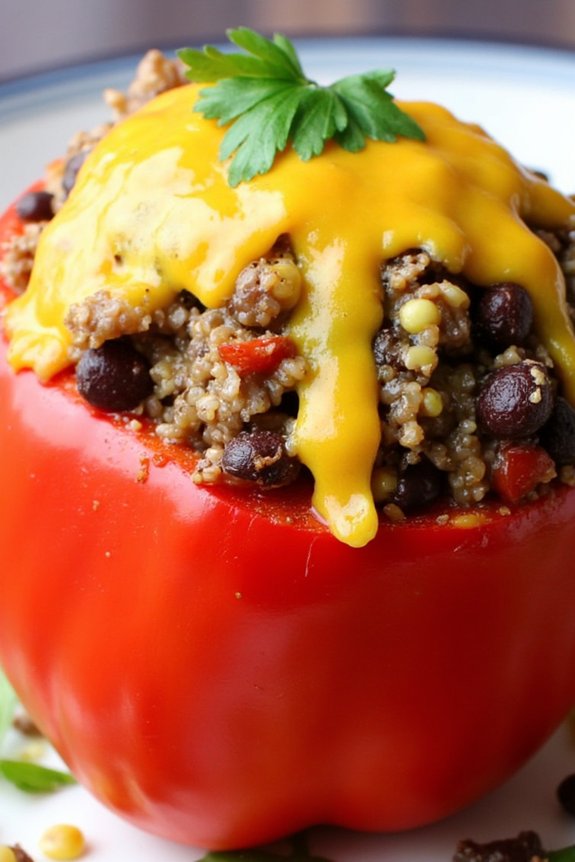
Looking for a delicious, protein-packed dinner that satisfies both vegetarians and meat-lovers alike? Black Bean and Quinoa Stuffed Peppers are the perfect choice. This vibrant dish combines nutrient-rich quinoa and hearty black beans, offering a complete protein source that’s both filling and flavorful. The dish is further enhanced with aromatic spices and colorful bell peppers, making it not only a feast for the palate but also a visual delight.
Whether you’re hosting a dinner party or simply looking for a wholesome family meal, these stuffed peppers are bound to impress.
The beauty of this dish lies in its simplicity and versatility. You can easily customize the stuffing by adding your favorite vegetables or spices. The combination of quinoa and black beans provides a robust base, while the addition of corn, onions, and tomatoes brings a burst of freshness. Topped with melted cheese and baked to perfection, these Black Bean and Quinoa Stuffed Peppers are a nutritious and satisfying meal that can be served as a main dish or alongside a fresh salad.
Ingredients (Serves 4-6):
- 6 large bell peppers (any color)
- 1 cup quinoa, rinsed
- 2 cups vegetable broth
- 1 can (15 oz) black beans, drained and rinsed
- 1 cup corn kernels (fresh, frozen, or canned)
- 1 medium onion, diced
- 2 cloves garlic, minced
- 1 can (14.5 oz) diced tomatoes, drained
- 1 teaspoon cumin
- 1 teaspoon chili powder
- 1 cup shredded cheese (cheddar or Monterey Jack)
- Salt and pepper to taste
- Olive oil for cooking
- Fresh cilantro for garnish (optional)
Cooking Instructions:
- Preheat the Oven: Begin by preheating your oven to 375°F (190°C).
- Prepare the Peppers: Cut the tops off the bell peppers and remove the seeds and membranes. Lightly brush the outsides with olive oil and place them in a baking dish upright.
- Cook the Quinoa: In a medium saucepan, bring the quinoa and vegetable broth to a boil. Reduce the heat, cover, and let it simmer for about 15 minutes, or until the liquid is absorbed and the quinoa is fluffy.
- Sauté the Vegetables: In a large skillet, heat a tablespoon of olive oil over medium heat. Add the diced onion and garlic, sautéing until the onion is translucent. Stir in the corn and diced tomatoes, cooking for another 2-3 minutes.
- Combine Ingredients: In a large bowl, mix the cooked quinoa, black beans, sautéed vegetables, cumin, chili powder, salt, and pepper. Stir until well combined.
- Stuff the Peppers: Generously fill each bell pepper with the quinoa mixture, pressing down to pack them tightly. Top with shredded cheese.
- Bake: Cover the baking dish with foil and bake for 30 minutes. Remove the foil and bake for an additional 10-15 minutes, or until the cheese is bubbly and golden.
- Garnish and Serve: Remove from the oven and let them cool slightly. Garnish with fresh cilantro before serving.
Extra Tips:
When preparing Black Bean and Quinoa Stuffed Peppers, choosing peppers of similar size guarantees even cooking. You can adjust the spice level by adding more or less chili powder, or even mixing in some diced jalapeños for an extra kick.
If you’re preparing this dish in advance, you can stuff the peppers and refrigerate them for up to a day before baking. Just remember to bring them to room temperature before placing them in the oven. Additionally, for a vegan version, simply omit the cheese or replace it with a plant-based alternative. Enjoy your healthy and delicious meal!
Chickpea and Spinach Curry
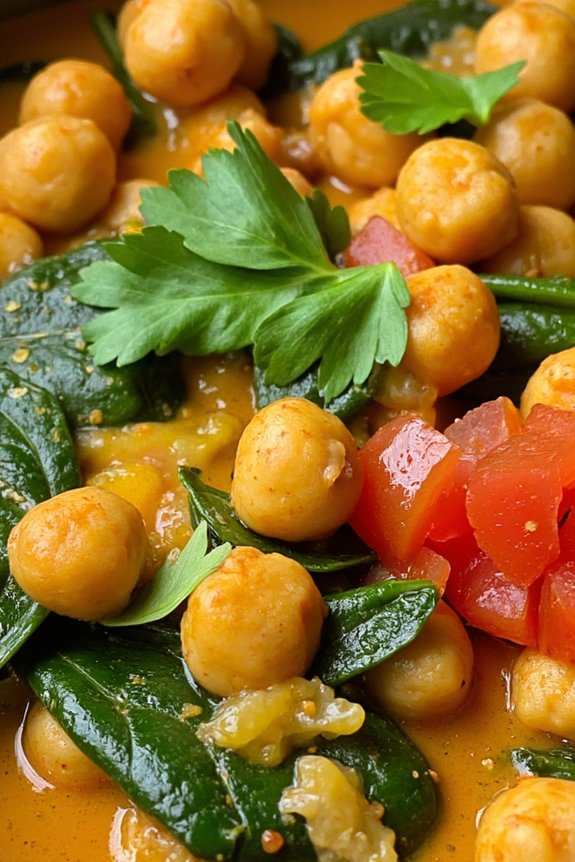
Chickpea and Spinach Curry is a delicious and nutritious dish that’s perfect for a protein-packed dinner. This flavorful curry combines tender chickpeas with fresh spinach, creating a hearty meal that’s both satisfying and healthy. The spices used in this dish provide a warm and aromatic flavor, making it a delightful option for those who enjoy a bit of heat in their meals.
The creamy texture of the coconut milk balances the spices, resulting in a well-rounded dish that’s guaranteed to please everyone at the dinner table. This recipe isn’t only easy to prepare but also quick to cook, making it a great option for busy weeknights.
With a serving size of 4-6 people, it’s perfect for family dinners or meal prepping for the week ahead. The combination of chickpeas and spinach assures a good source of protein and iron, essential for maintaining energy levels and overall health. Paired with steamed rice or warm naan bread, Chickpea and Spinach Curry makes for a wholesome and satisfying meal.
Ingredients for 4-6 servings:
- 2 tablespoons vegetable oil
- 1 large onion, finely chopped
- 3 garlic cloves, minced
- 1-inch piece of ginger, grated
- 1 teaspoon ground cumin
- 1 teaspoon ground coriander
- 1 teaspoon turmeric
- 1 teaspoon garam masala
- 1/2 teaspoon cayenne pepper (optional)
- 2 cans (15 oz each) chickpeas, drained and rinsed
- 1 can (14 oz) coconut milk
- 1 can (14 oz) diced tomatoes
- 6 cups fresh spinach, roughly chopped
- Salt and pepper to taste
- Juice of 1 lemon
- Fresh cilantro, chopped, for garnish
Cooking Instructions:
- Heat the Oil: In a large pan over medium heat, add the vegetable oil. Once heated, add the finely chopped onion and sauté until it becomes translucent and slightly golden, about 5-7 minutes.
- Add Aromatics: Stir in the minced garlic and grated ginger, cooking for an additional 1-2 minutes until fragrant. Be careful not to burn the garlic.
- Spice it Up: Add the ground cumin, coriander, turmeric, garam masala, and cayenne pepper (if using). Stir the spices into the onion mixture and cook for about 1 minute, allowing them to release their flavors.
- Incorporate Chickpeas and Tomatoes: Add the drained chickpeas and canned tomatoes to the pan. Stir well to combine and let it simmer for about 5 minutes, allowing the flavors to meld.
- Add Coconut Milk and Spinach: Pour in the coconut milk, stirring to combine. Bring the mixture to a gentle simmer, then add the chopped spinach. Cook until the spinach has wilted and is well incorporated into the curry, about 3-4 minutes.
- Season and Finish: Season the curry with salt and pepper to taste. Stir in the lemon juice just before serving, to add brightness to the dish. Garnish with freshly chopped cilantro.
Extra Tips:
For an even richer flavor, you can toast the spices in a dry pan before adding them to the onions. This can enhance their aromatic qualities.
If you prefer a thicker curry, you can reduce the amount of coconut milk or let the curry simmer longer to thicken. Adjust the cayenne pepper to suit your spice tolerance, or omit it entirely for a milder version.
Finally, this curry pairs beautifully with basmati rice or naan, which can help soak up the delicious sauce. Enjoy your meal!
Turkey and Vegetable Stir-Fry
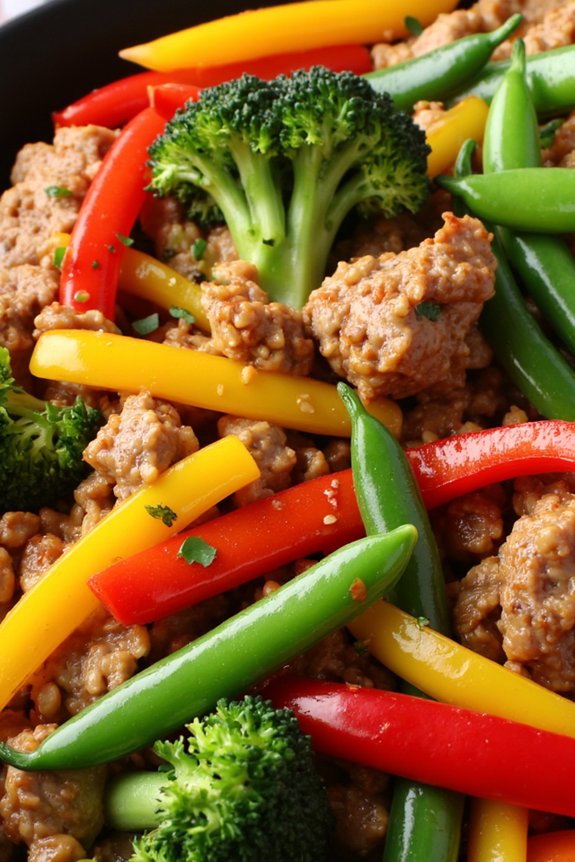
If you’re on the hunt for a delicious and protein-packed dinner that’s both quick and easy to prepare, search no more than this Turkey and Vegetable Stir-Fry. This dish combines lean ground turkey with a vibrant mix of vegetables, delivering a flavorful and nutritious meal that’s perfect for any weeknight dinner.
The combination of garlic, ginger, and soy sauce infuses the stir-fry with a savory umami taste, while the colorful array of vegetables adds crunch and freshness.
The beauty of this Turkey and Vegetable Stir-Fry lies not only in its taste but also in its versatility. You can customize the vegetables based on what’s in season or what you have on hand, making it an ideal dish for using up those odds and ends in your fridge.
Plus, it comes together in under 30 minutes, saving you time without sacrificing flavor. Serve it over cooked rice or noodles for a complete meal that will leave everyone satisfied and coming back for seconds.
Ingredients for 4-6 servings:
- 1 1/2 pounds ground turkey
- 2 tablespoons vegetable oil
- 1 large onion, sliced
- 2 cloves garlic, minced
- 1 tablespoon fresh ginger, grated
- 1 red bell pepper, sliced
- 1 yellow bell pepper, sliced
- 1 cup broccoli florets
- 1 cup snap peas
- 3 tablespoons soy sauce
- 1 tablespoon oyster sauce
- 1 teaspoon sesame oil
- 2 teaspoons cornstarch
- 1/4 cup water
- Salt and pepper to taste
- Cooked rice or noodles, for serving
Instructions:
- Prepare the Sauce: In a small bowl, mix together the soy sauce, oyster sauce, sesame oil, cornstarch, and water until smooth. Set this sauce mixture aside for later use.
- Cook the Turkey: Heat 1 tablespoon of vegetable oil in a large skillet or wok over medium-high heat. Add the ground turkey and season with salt and pepper. Cook, breaking it apart with a spoon, until browned and cooked through, about 5-7 minutes. Remove the turkey from the skillet and set aside.
- Sauté Aromatics: In the same skillet, add the remaining tablespoon of oil. Add the sliced onion, minced garlic, and grated ginger. Sauté for 2-3 minutes, or until the onion becomes translucent and the garlic is fragrant.
- Add Vegetables: Add the sliced red and yellow bell peppers, broccoli florets, and snap peas to the skillet. Stir-fry the vegetables for about 5 minutes, or until they’re tender-crisp.
- Combine Ingredients: Return the cooked turkey to the skillet with the vegetables. Pour the prepared sauce over the turkey and vegetables. Stir well to coat everything evenly with the sauce.
- Thicken the Sauce: Allow the stir-fry to cook for an additional 2-3 minutes, or until the sauce has thickened slightly and the vegetables are cooked to your desired level of doneness.
- Serve: Serve the turkey and vegetable stir-fry hot over a bed of cooked rice or noodles.
Extra Tips:
When making this stir-fry, be sure to cut your vegetables into similar-sized pieces to guarantee even cooking.
If you prefer a bit of heat, consider adding a pinch of red pepper flakes or a splash of sriracha to the sauce.
Additionally, avoid overcrowding the pan to guarantee that the vegetables stir-fry rather than steam.
This dish is highly adaptable, so feel free to swap in your favorite vegetables or add extra spices to suit your taste preferences.
Lentil and Vegetable Soup

Lentil and Vegetable Soup is a hearty and nutritious dish perfect for a protein-packed dinner. This soup combines the earthy flavors of lentils with an array of vibrant vegetables, creating a wholesome meal that’s both satisfying and healthy. The combination of legumes and vegetables not only offers a rich source of protein but also a variety of vitamins and minerals, making it an ideal dish for those seeking a balanced diet.
This delightful soup is perfect for a cozy evening in or as a comforting meal on a chilly day. It’s simple to prepare and can be made in one pot, allowing for easy cleanup. The use of aromatic herbs and spices enhances the flavor profile, guaranteeing each spoonful is as delicious as the last. Whether you’re cooking for family or friends, this Lentil and Vegetable Soup is sure to please, serving 4-6 people with generous portions.
Ingredients:
- 1 cup dried lentils, rinsed and drained
- 2 tablespoons olive oil
- 1 large onion, chopped
- 3 cloves garlic, minced
- 2 carrots, diced
- 2 celery stalks, diced
- 1 zucchini, diced
- 1 can (14.5 oz) diced tomatoes, undrained
- 6 cups vegetable broth
- 1 teaspoon dried thyme
- 1 teaspoon dried oregano
- 1 bay leaf
- Salt and pepper to taste
- 2 cups fresh spinach or kale, roughly chopped
- 1 tablespoon lemon juice
- Fresh parsley for garnish (optional)
Instructions:
- Prepare the Ingredients: Before you start cooking, confirm all vegetables are washed and chopped as specified. Rinse the lentils under cold water until the water runs clear.
- Sauté the Aromatics: In a large pot, heat the olive oil over medium heat. Add the chopped onion and garlic, sautéing until the onion is translucent and fragrant, about 3-4 minutes.
- Cook the Vegetables: Add the diced carrots, celery, and zucchini to the pot. Cook for another 5 minutes, stirring occasionally, until the vegetables begin to soften.
- Add Lentils and Tomatoes: Stir in the lentils and the can of diced tomatoes with their juice. Mix well to combine all the ingredients.
- Simmer the Soup: Pour in the vegetable broth and add the thyme, oregano, bay leaf, salt, and pepper. Bring the mixture to a boil, then reduce the heat to low. Cover the pot and let it simmer for about 30-35 minutes, or until the lentils are tender.
- Add Greens and Lemon Juice: Once the lentils are cooked, stir in the chopped spinach or kale. Allow the greens to wilt in the hot soup, which should take about 2-3 minutes. Remove the bay leaf and stir in the lemon juice for a touch of brightness.
- Serve: Taste the soup and adjust the seasoning if necessary. Ladle the soup into bowls, garnishing with fresh parsley if desired. Serve hot.
Extra Tips:
For an even richer flavor, consider toasting the lentils for a couple of minutes in the pot before adding the liquid. If you prefer a thicker soup, you can mash some of the lentils against the side of the pot with a spoon or use an immersion blender to purée a small portion of the soup.
Additionally, this soup can be made ahead of time and stored in the refrigerator for up to 3 days, allowing the flavors to meld and develop further.
Baked Lemon Herb Chicken With Broccoli

The secret to this dish lies in the marinade, which infuses the chicken with vibrant flavors while keeping it moist and succulent during baking. The broccoli is roasted alongside the chicken, absorbing the delicious lemon-herb juices, resulting in a harmonious blend of flavors. This recipe serves 4-6 people, making it perfect for family gatherings or for meal prep to enjoy throughout the week.
Ingredients (Serves 4-6):
- 4 boneless, skinless chicken breasts
- 2 large heads of broccoli, cut into florets
- 3 tablespoons olive oil
- Juice and zest of 2 lemons
- 4 cloves garlic, minced
- 1 tablespoon dried oregano
- 1 tablespoon dried thyme
- Salt and pepper to taste
- Fresh parsley for garnish (optional)
Cooking Instructions:
- Prepare the Marinade: In a large mixing bowl, combine the olive oil, lemon juice, lemon zest, minced garlic, oregano, thyme, salt, and pepper. Whisk the ingredients together until they’re well blended, creating a vibrant and aromatic marinade.
- Marinate the Chicken: Place the chicken breasts in a resealable plastic bag or a shallow dish. Pour the marinade over the chicken, guaranteeing each piece is well coated. Seal the bag or cover the dish, and let the chicken marinate in the refrigerator for at least 30 minutes, or up to 2 hours for a more intense flavor.
- Preheat the Oven: Preheat your oven to 400°F (200°C). While the oven is heating, remove the chicken from the refrigerator and let it sit at room temperature for about 10 minutes.
- Prepare the Broccoli: On a large baking sheet, arrange the broccoli florets. Drizzle a tablespoon of olive oil over the broccoli, and sprinkle with salt and pepper. Toss the broccoli until it’s evenly coated.
- Bake the Chicken and Broccoli: Remove the chicken from the marinade and place it on the same baking sheet as the broccoli. Discard any remaining marinade. Bake the chicken and broccoli in the preheated oven for 20-25 minutes, or until the chicken is cooked through and reaches an internal temperature of 165°F (75°C).
- Rest and Serve: Once baked, remove the chicken from the oven and let it rest for 5 minutes before slicing. This allows the juices to redistribute throughout the meat, guaranteeing each bite is tender and flavorful. Garnish with fresh parsley if desired before serving.
Extra Tips: For added flavor, consider marinating the chicken overnight in the refrigerator. This allows the herbs and lemon to thoroughly penetrate the meat, resulting in an even more flavorful dish.
Confirm you don’t overcrowd the baking sheet to allow even cooking; if necessary, use two baking sheets. Additionally, if you prefer a bit of char on your broccoli, you can broil the dish for the last 2-3 minutes of cooking, keeping a close eye on it to prevent burning.
Tofu and Vegetable Teriyaki

Tofu and Vegetable Teriyaki is a delightful, protein-packed dinner option that brings a taste of Asian cuisine to your dining table. This dish combines the satisfying texture of tofu with a colorful medley of fresh vegetables, all brought together by a savory teriyaki sauce.
It’s not only delicious but also nutritionally balanced, making it perfect for those who want to enjoy a healthy yet flavorful meal. Whether you’re a seasoned cook or a beginner in the kitchen, this recipe is simple to follow and sure to impress your family and friends.
This recipe serves 4-6 people, making it ideal for a family meal or a small gathering. The key to achieving the perfect Tofu and Vegetable Teriyaki is to guarantee that the tofu is well-pressed and the vegetables are fresh and crisp.
The teriyaki sauce, with its sweet and savory notes, beautifully complements the dish, creating a harmonious blend of flavors. Follow the instructions below to prepare this delightful meal that promises to satisfy both your taste buds and nutritional needs.
Ingredients (Serves 4-6):
- 2 blocks (14 oz each) of firm tofu
- 1/4 cup soy sauce
- 1/4 cup mirin
- 2 tablespoons honey or maple syrup
- 1 tablespoon sesame oil
- 2 tablespoons vegetable oil
- 3 cloves garlic, minced
- 1 tablespoon ginger, minced
- 1 red bell pepper, sliced
- 1 yellow bell pepper, sliced
- 1 cup broccoli florets
- 1 cup sugar snap peas
- 1 carrot, julienned
- 4 green onions, sliced
- 2 tablespoons sesame seeds
- Cooked rice, for serving
Instructions:
- Prepare the Tofu:
- Press the tofu blocks to remove excess water. Wrap them in paper towels and place a heavy object, like a skillet, on top for about 20 minutes.
- Make the Teriyaki Sauce:
- In a small bowl, combine soy sauce, mirin, honey (or maple syrup), and sesame oil. Mix well and set aside.
- Cook the Tofu:
- Cut the pressed tofu into bite-sized cubes. Heat 1 tablespoon of vegetable oil in a large non-stick skillet over medium-high heat. Add the tofu cubes and cook until golden brown on all sides, about 8-10 minutes. Remove tofu from the skillet and set aside.
- Sauté the Vegetables:
- In the same skillet, add the remaining tablespoon of vegetable oil. Add minced garlic and ginger, and sauté for about 1 minute until fragrant. Add the bell peppers, broccoli, sugar snap peas, and carrot. Stir-fry for 5-7 minutes until the vegetables are tender-crisp.
- Combine Tofu and Vegetables:
- Return the tofu to the skillet with the vegetables. Pour the teriyaki sauce over the mixture and stir to coat everything evenly. Cook for an additional 3-4 minutes until the sauce thickens slightly.
- Garnish and Serve:
- Remove from heat and sprinkle with sesame seeds and sliced green onions. Serve hot over cooked rice.
Extra Tips:
For the best texture, guarantee that the tofu is adequately pressed to remove as much moisture as possible before cooking.
Feel free to swap out any vegetables based on personal preference or seasonal availability. If you prefer a spicier dish, consider adding a dash of red pepper flakes or a drizzle of sriracha sauce.
Additionally, using a non-stick skillet or a well-seasoned cast-iron pan can help achieve a nice golden crust on the tofu cubes. Enjoy your meal with a side of pickled ginger or a light Asian-inspired salad for a complete dining experience.
Greek Yogurt Chicken Salad

Greek Yogurt Chicken Salad is a delicious and protein-packed meal that’s perfect for lunch or dinner. This dish combines tender chicken breast with creamy Greek yogurt, crunchy vegetables, and a hint of lemon for a revitalizing and satisfying salad that’s both healthy and flavorful. The Greek yogurt not only adds a tangy taste but also serves as a healthier alternative to mayonnaise, making this salad lighter without sacrificing creaminess.
This recipe is perfect for those looking to add more protein to their diet while enjoying a meal that’s quick to prepare and full of texture and flavor. It’s versatile enough to serve on its own, in a sandwich, or even as a filling for wraps. Whether you’re preparing a family dinner or a meal prep for the week, Greek Yogurt Chicken Salad is a versatile dish that’s sure to become a staple in your meal rotation.
Ingredients (Serves 4-6):
- 4 boneless, skinless chicken breasts
- 1 cup plain Greek yogurt
- 2 tablespoons Dijon mustard
- 1 tablespoon lemon juice
- 1 cup diced celery
- 1 cup diced red bell pepper
- 1/2 cup chopped red onion
- 1/4 cup chopped fresh parsley
- Salt and pepper to taste
- Optional: 1/4 cup slivered almonds or chopped walnuts for added crunch
Cooking Instructions:
- Prepare the Chicken: Start by preheating your oven to 375°F (190°C). Place the chicken breasts on a baking sheet lined with parchment paper. Season them with salt and pepper, then bake for 20-25 minutes or until fully cooked and no longer pink in the center. Remove from the oven and let them cool slightly.
- Shred the Chicken: Once the chicken breasts are cool enough to handle, use two forks to shred them into bite-sized pieces. Alternatively, you can dice the chicken if you prefer a chunkier texture.
- Mix the Dressing: In a large mixing bowl, combine the Greek yogurt, Dijon mustard, and lemon juice. Stir until smooth and well combined.
- Combine Ingredients: Add the shredded chicken, diced celery, red bell pepper, chopped red onion, and parsley to the bowl with the dressing. Mix everything together until the chicken and vegetables are evenly coated with the yogurt mixture.
- Season to Taste: Add salt and pepper to the salad, adjusting to your taste preference. If desired, mix in slivered almonds or walnuts for extra texture and flavor.
- Chill and Serve: Cover the bowl with plastic wrap and refrigerate the salad for at least 30 minutes to allow the flavors to meld. Serve the Greek Yogurt Chicken Salad chilled, either on its own, in a sandwich, or as a wrap filling.
Extra Tips: For added convenience, you can use rotisserie chicken instead of baking your own, which will save time and add depth of flavor. If you’re looking for more variety, consider adding other vegetables like chopped cucumbers or halved cherry tomatoes.
Additionally, if you prefer a spicier kick, a dash of hot sauce or a sprinkle of cayenne pepper can enhance the overall flavor profile. Remember that the salad will keep well in the refrigerator for up to three days, making it an excellent option for meal prepping.
Beef and Bean Chili
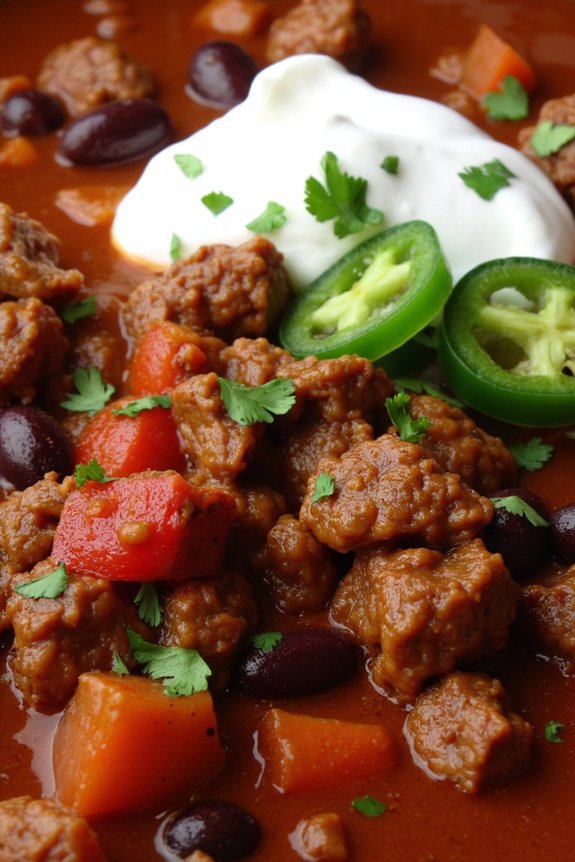
Beef and Bean Chili is a hearty and flavorful dish that’s perfect for those looking to enjoy a protein-packed meal. This chili is the ultimate comfort food, combining tender beef with a robust blend of beans simmered in a rich and spicy tomato-based sauce. It’s an ideal dish for colder days or any time you need a filling and satisfying dinner.
The combination of beef and beans not only provides a great source of protein but also adds a delightful texture to the dish, making it a perfect choice for a family meal or a gathering with friends.
This Beef and Bean Chili recipe is designed to serve 4-6 people, making it a great option for a small group or for leftovers that can be enjoyed throughout the week. The recipe is straightforward and involves minimal prep work, allowing you to focus on the flavors and enjoy the cooking process.
Whether you’re an experienced cook or a beginner, this recipe is easy to follow and guarantees a delicious result. Serve it with your favorite toppings like shredded cheese, sour cream, or sliced jalapeños for an extra kick.
Ingredients:
- 1 lb ground beef
- 1 can (15 oz) kidney beans, drained and rinsed
- 1 can (15 oz) black beans, drained and rinsed
- 1 can (15 oz) diced tomatoes
- 1 small onion, chopped
- 2 cloves garlic, minced
- 1 cup beef broth
- 2 tablespoons chili powder
- 1 teaspoon cumin
- 1 teaspoon paprika
- Salt and pepper to taste
- 2 tablespoons olive oil
- Optional toppings: shredded cheese, sour cream, sliced jalapeños, chopped cilantro
Instructions:
- Prepare the Ingredients: Begin by gathering all your ingredients. Drain and rinse the kidney and black beans, chop the onion, and mince the garlic. This will facilitate a smooth cooking process.
- Cook the Beef: In a large pot or Dutch oven, heat the olive oil over medium-high heat. Add the ground beef and cook until browned, breaking it apart with a spoon as it cooks. This should take about 5-7 minutes.
- Sauté the Vegetables: Add the chopped onion and minced garlic to the beef. Cook for another 3-4 minutes until the onion is translucent and fragrant.
- Season the Mixture: Stir in the chili powder, cumin, and paprika. Cook for another minute to allow the spices to release their flavors.
- Add Tomatoes and Broth: Pour in the diced tomatoes (with their juices) and beef broth. Stir the mixture well, making sure that all ingredients are evenly distributed.
- Add Beans and Simmer: Add the drained kidney and black beans to the pot. Season with salt and pepper to taste. Bring the mixture to a boil, then reduce the heat to low and let it simmer uncovered for 20-30 minutes, stirring occasionally.
- Adjust Seasoning: Taste and adjust the seasoning if necessary. If the chili is too thick, you can add a bit more beef broth to reach your desired consistency.
- Serve and Garnish: Once the chili is done, serve it hot. Top it with your choice of optional toppings like shredded cheese, sour cream, sliced jalapeños, or chopped cilantro.
Extra Tips:
When making Beef and Bean Chili, feel free to customize the spice level to your preference by adjusting the amount of chili powder or adding a pinch of cayenne pepper.
For those who prefer a smokier flavor, consider adding a teaspoon of smoked paprika. If you have the time, letting the chili simmer for longer can deepen the flavors even more.
Leftovers can be stored in an airtight container in the refrigerator for up to 3 days or frozen for later use. Reheat gently on the stove, adding a bit of broth if needed to maintain consistency.
Egg and Veggie Frittata

A frittata is the perfect way to incorporate protein-rich eggs and a variety of vegetables into a satisfying meal. This Italian-style omelet is versatile and can be adjusted to suit your taste preferences or the ingredients you have on hand.
The Egg and Veggie Frittata is an excellent choice for a nutritious dinner, packed with protein and vitamins, making it ideal for a balanced diet. With a combination of fresh vegetables and creamy eggs, this dish delivers a rich, savory flavor that will have everyone at the table asking for seconds.
Preparing a frittata is also incredibly simple, requiring minimal preparation and cooking time. It’s a one-pan meal that can be enjoyed both warm and at room temperature, making it suitable for busy weeknights or a casual weekend brunch.
The following recipe serves 4-6 people, providing everyone with a hearty portion that can be paired with a crisp side salad or crusty bread for a complete meal. Let’s plunge into this delicious recipe and make a frittata that will impress even the pickiest of eaters.
Ingredients for 4-6 servings:
- 10 large eggs
- 1/2 cup milk
- 1/2 cup grated Parmesan cheese
- Salt and pepper to taste
- 2 tablespoons olive oil
- 1 small onion, diced
- 1 red bell pepper, diced
- 1 zucchini, sliced
- 1 cup cherry tomatoes, halved
- 2 cups fresh spinach
- 1/4 cup fresh basil, chopped
Cooking Instructions:
- Preheat Oven: Begin by preheating your oven to 375°F (190°C). This will guarantee that your frittata cooks evenly and develops a nice, golden crust.
- Prepare the Egg Mixture: In a large bowl, whisk together the eggs, milk, and Parmesan cheese until well combined. Season with salt and pepper to taste. Set aside.
- Sauté Vegetables: In a large ovenproof skillet, heat the olive oil over medium heat. Add the diced onion and cook until translucent, about 3-4 minutes. Stir in the red bell pepper and zucchini, cooking for another 5 minutes until they begin to soften.
- Add Tomatoes and Spinach: Add the cherry tomatoes to the skillet and cook for 2 minutes. Stir in the fresh spinach and cook until wilted, about 2 more minutes.
- Combine with Eggs: Pour the egg mixture over the sautéed vegetables in the skillet. Gently stir to distribute the vegetables evenly throughout the eggs.
- Cook on Stovetop: Allow the frittata to cook on the stovetop over medium heat for about 5 minutes, or until the edges start to set while the center remains slightly runny.
- Bake in Oven: Transfer the skillet to the preheated oven. Bake for 10-15 minutes, or until the frittata is puffed and the center is just set. A toothpick inserted into the center should come out clean.
- Garnish and Serve: Remove from the oven and let cool for a few minutes. Garnish with fresh basil before slicing into wedges. Serve warm or at room temperature.
Extra Tips:
When making a frittata, feel free to experiment with different vegetables, cheeses, or herbs to create your own unique flavor combination.
If you don’t have an ovenproof skillet, you can transfer the sautéed vegetables and egg mixture to a greased baking dish before placing it in the oven. Additionally, make sure not to overcook the frittata; it should be slightly creamy in the center when done.
If desired, you can add cooked bacon or sausage for an extra protein boost. Enjoy your meal with a side of mixed greens or roasted potatoes for a complete and satisfying dinner.
Peanut Butter and Chickpea Stew

Peanut Butter and Chickpea Stew is a nourishing, flavorful dish that combines the creamy richness of peanut butter with the hearty texture of chickpeas. This protein-packed stew is perfect for those looking to enjoy a plant-based meal that doesn’t skimp on taste or heartiness.
The stew is infused with a blend of spices and vegetables, offering a wonderful balance of sweet, savory, and spicy flavors. It’s a comforting dish that can be enjoyed on its own or served alongside rice or crusty bread for a complete meal.
This recipe is perfect for a family dinner, providing enough to serve 4-6 people. The chickpeas are the main source of protein, supplemented by the peanut butter which adds both flavor and creaminess. With a variety of vegetables included, this dish not only fills you up but also provides a good serving of essential nutrients.
Whether you’re a seasoned cook or a beginner, this recipe is simple to follow and can be adapted to suit your personal taste preferences.
Ingredients (Serves 4-6):
- 2 tablespoons olive oil
- 1 large onion, chopped
- 3 cloves garlic, minced
- 1 tablespoon fresh ginger, minced
- 1 teaspoon ground cumin
- 1 teaspoon ground coriander
- 1/2 teaspoon cayenne pepper (optional for heat)
- 2 cups vegetable broth
- 1 can (14 oz) diced tomatoes
- 1 can (14 oz) coconut milk
- 1/2 cup creamy peanut butter
- 2 cans (15 oz each) chickpeas, drained and rinsed
- 2 cups kale or spinach, chopped
- Salt and pepper to taste
- Juice of 1 lime
- Fresh cilantro for garnish
Cooking Instructions:
- Sauté the Aromatics: Heat the olive oil in a large pot over medium heat. Add the chopped onion and sauté until translucent, about 5 minutes. Stir in the minced garlic and ginger, cooking for another 2 minutes until fragrant.
- Add Spices: Sprinkle the cumin, coriander, and cayenne pepper (if using) into the pot. Stir for about 1 minute to toast the spices and enhance their flavors.
- Incorporate Liquids: Pour in the vegetable broth, diced tomatoes (with their juice), and coconut milk. Stir well to combine all the ingredients.
- Add Peanut Butter and Chickpeas: Mix in the peanut butter until it’s fully dissolved into the liquid. Add the chickpeas, stirring them into the stew. Bring the mixture to a simmer.
- Cook the Stew: Allow the stew to simmer for about 20 minutes, stirring occasionally. This allows the flavors to meld together and the chickpeas to absorb the delicious broth.
- Add Greens: Stir in the chopped kale or spinach and cook for another 5-10 minutes, until the greens are wilted and tender.
- Season and Serve: Season the stew with salt, pepper, and the juice of one lime. Taste and adjust the seasoning as needed. Serve hot, garnished with fresh cilantro.
Extra Tips:
For added depth of flavor, consider roasting the chickpeas in the oven with a bit of olive oil and salt before adding them to the stew. This will give them a slightly crispy texture.
If you prefer a thicker stew, you can mash some of the chickpeas with a fork or potato masher before adding them to the pot. Additionally, feel free to customize the level of spice by adjusting the amount of cayenne pepper or adding a diced chili pepper if you like it hotter.
This stew can be stored in the refrigerator for up to three days, and it often tastes even better the next day after the flavors have had more time to develop.
Spicy Tuna Patties

Spicy Tuna Patties are a delicious and protein-packed option for dinner that’s sure to satisfy your taste buds. These patties combine the rich flavor of tuna with the zesty kick of spices, making them a perfect meal for those who enjoy a little heat.
They’re versatile and can be served on a bun as a burger, or with a side salad for a lighter option. Made with simple ingredients, these patties aren’t only tasty but also quick to prepare, making them an ideal choice for busy weeknights or meal prepping.
The key to these Spicy Tuna Patties lies in balancing the flavors and guaranteeing the right texture. Fresh ingredients like cilantro, green onions, and lime juice add freshness, while breadcrumbs help bind the mixture, giving the patties a satisfying crunch.
Adjust the spice level to your preference by altering the amount of red pepper flakes or adding a dash of hot sauce. Whether you’re a fan of seafood or looking for a new way to incorporate more protein into your diet, these patties are a delightful solution.
Ingredients (Serves 4-6)
- 3 cans (5 oz each) of tuna, drained
- 1/2 cup breadcrumbs
- 2 large eggs
- 1/4 cup mayonnaise
- 2 tablespoons Dijon mustard
- 1 tablespoon lime juice
- 2 green onions, finely chopped
- 1/4 cup cilantro, chopped
- 1 teaspoon garlic powder
- 1 teaspoon onion powder
- 1/2 teaspoon red pepper flakes
- Salt and pepper to taste
- 2 tablespoons olive oil (for frying)
Cooking Instructions
- Prepare the Tuna Mixture: In a large mixing bowl, combine the drained tuna, breadcrumbs, eggs, mayonnaise, and Dijon mustard. Mix these ingredients until they’re well combined.
- Add Fresh Ingredients and Seasonings: Stir in the lime juice, green onions, cilantro, garlic powder, onion powder, and red pepper flakes. Season the mixture with salt and pepper according to your taste. Guarantee everything is mixed evenly to distribute the flavors.
- Shape the Patties: Divide the tuna mixture into 8-10 equal portions, depending on the size of patties you prefer. With your hands, shape each portion into a patty, making sure they’re compact to prevent them from falling apart during cooking.
- Heat the Oil: In a large skillet, heat the olive oil over medium heat. Make sure the oil is hot before adding the patties to prevent sticking.
- Cook the Patties: Carefully place the patties into the skillet. Cook for about 3-4 minutes on each side, or until they’re golden brown and heated through. Adjust the heat as necessary to avoid burning.
- Serve and Enjoy: Once cooked, remove the patties from the skillet and place them on a paper towel-lined plate to drain any excess oil. Serve hot with your choice of sides or as a sandwich.
Extra Tips
For a crispier texture, you can coat the formed patties lightly with additional breadcrumbs before frying. If you’re looking to reduce calories, consider baking the patties at 400°F (200°C) for about 15-20 minutes, flipping halfway through.
Be creative with your toppings and sauces; adding avocado slices, a dollop of Greek yogurt, or a squeeze of extra lime juice can enhance the dish’s flavor profile. Finally, guarantee your tuna is well-drained to prevent the mixture from becoming too wet and difficult to shape into patties.
Slow Cooker Chicken and Pinto Beans
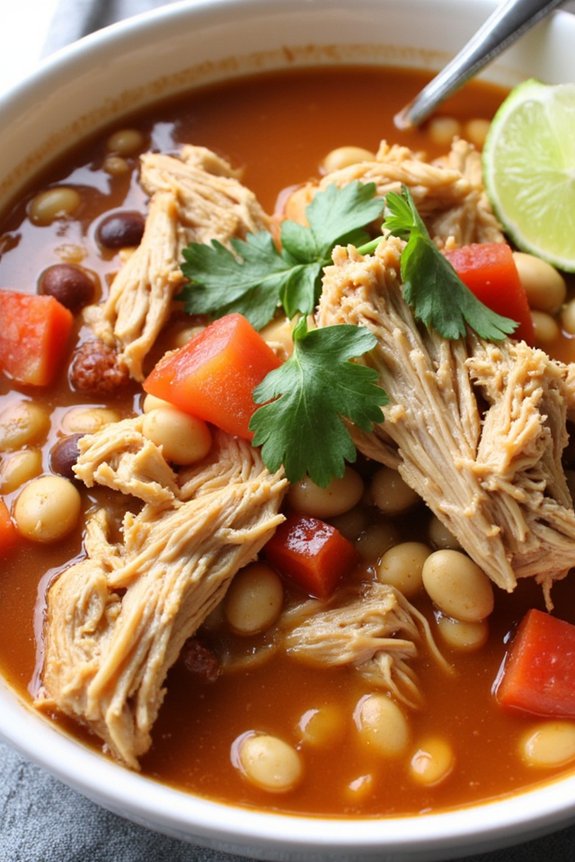
Searching for a hearty, protein-packed dinner that practically cooks itself? Search no more than this delicious Slow Cooker Chicken and Pinto Beans recipe. This dish combines tender chicken and creamy pinto beans with a medley of spices and vegetables for a meal that’s as nutritious as it’s satisfying.
Perfect for busy weeknights or lazy weekends, this recipe allows you to prepare a flavorful dinner with minimal effort and maximum taste. The beauty of this slow cooker recipe lies in its simplicity. With just a few minutes of prep time, you can set everything in the slow cooker and let it work its magic while you go about your day.
By dinner time, you’ll have a warm, comforting meal ready to serve your family or guests. This recipe serves 4-6 people, making it ideal for family dinners or small gatherings.
Ingredients (Serves 4-6):
- 2 pounds boneless, skinless chicken breasts
- 1 1/2 cups dried pinto beans, rinsed and soaked overnight
- 1 can (14.5 oz) diced tomatoes, undrained
- 1 large onion, chopped
- 3 cloves garlic, minced
- 1 red bell pepper, diced
- 1 teaspoon ground cumin
- 1 teaspoon chili powder
- 1 teaspoon smoked paprika
- 4 cups chicken broth
- 1 tablespoon olive oil
- Salt and pepper to taste
- Fresh cilantro, for garnish (optional)
- Lime wedges, for serving (optional)
Cooking Instructions:
- Prep the Ingredients: Begin by rinsing and soaking the pinto beans overnight in a large bowl of water. After soaking, drain and rinse the beans again before adding them to the slow cooker.
- Sauté Vegetables: In a medium skillet, heat the olive oil over medium heat. Add the chopped onion, red bell pepper, and minced garlic. Sauté until the vegetables are softened and fragrant, about 5 minutes.
- Combine in Slow Cooker: Place the chicken breasts at the bottom of the slow cooker. Add the sautéed vegetables on top, followed by the soaked pinto beans.
- Add Remaining Ingredients: Pour the diced tomatoes (with juice) and chicken broth into the slow cooker. Sprinkle in the cumin, chili powder, smoked paprika, and season with salt and pepper. Stir to combine all the ingredients.
- Cook: Cover the slow cooker with its lid and cook on low for 6-8 hours, or on high for 3-4 hours. The chicken should be fully cooked and easily shredded, and the beans should be tender.
- Shred the Chicken: Once cooked, remove the chicken breasts from the slow cooker and shred them with two forks. Return the shredded chicken to the slow cooker and stir everything together.
- Serve: Taste and adjust the seasoning if necessary. Serve the chicken and beans hot, garnished with fresh cilantro and lime wedges if desired.
Extra Tips:
For best results, verify the pinto beans are thoroughly soaked and rinsed before cooking, as this helps them cook evenly and reduces cooking time.
If you prefer a thicker consistency, you can mash some of the beans after cooking. Additionally, feel free to customize the spice level by adjusting the amount of chili powder or adding a pinch of cayenne pepper for an extra kick.
This dish pairs wonderfully with a side of steamed rice or warm tortillas, making it a versatile addition to your meal rotation. Enjoy your flavorful and nutritious slow cooker creation!
Cottage Cheese Pancakes

Cottage cheese pancakes are a delightful and nutritious option for a protein-packed dinner. These pancakes aren’t only quick to prepare but also provide a unique twist on traditional pancakes by incorporating cottage cheese, which is rich in protein and calcium. The result is a fluffy, savory pancake that pairs well with a variety of toppings or side dishes. Perfect for a light yet satisfying dinner, these pancakes are destined to become a favorite for both adults and kids alike.
The mild flavor of cottage cheese blends seamlessly with the other ingredients, resulting in a tender pancake with a slightly tangy note. You can enjoy these pancakes on their own or enhance them with toppings like smoked salmon, fresh herbs, or a dollop of Greek yogurt. Whether you’re looking to add more protein to your meal or simply want a delicious and easy dish, these cottage cheese pancakes are guaranteed to hit the spot.
Ingredients (Serves 4-6):
- 2 cups cottage cheese
- 4 large eggs
- 1 cup all-purpose flour
- 1/2 teaspoon baking powder
- 1/4 teaspoon salt
- 2 tablespoons sugar
- 1 teaspoon vanilla extract
- Butter or oil for cooking
Cooking Instructions:
- Prepare the Batter: In a large mixing bowl, combine the cottage cheese and eggs. Whisk them together until smooth and well incorporated. This mixture will serve as the base for your pancake batter.
- Mix Dry Ingredients: In a separate bowl, sift together the flour, baking powder, salt, and sugar. This guarantees that the dry ingredients are evenly distributed throughout the batter.
- Combine Wet and Dry Ingredients: Gradually add the dry ingredients to the cottage cheese and egg mixture. Stir gently with a spatula or whisk until just combined. Be careful not to over-mix, as this can make the pancakes tough.
- Add Flavoring: Stir in the vanilla extract to the batter. This adds a subtle sweetness and aroma to the pancakes.
- Preheat the Pan: Heat a large non-stick skillet or griddle over medium heat. Add a small amount of butter or oil to coat the surface. Allow it to heat until it’s sizzling, indicating that it’s ready for cooking.
- Cook the Pancakes: Pour approximately 1/4 cup of batter for each pancake onto the skillet. Cook until bubbles form on the surface and the edges appear set, about 2-3 minutes. Flip and cook for another 2 minutes until golden brown and cooked through.
- Serve: Remove the pancakes from the skillet and keep them warm by placing them on a plate covered with a clean kitchen towel. Repeat with the remaining batter, adding more butter or oil to the skillet as needed.
Extra Tips:
For the best results, use full-fat cottage cheese, as it provides a richer flavor and better texture to the pancakes. If you prefer a smoother texture, you can blend the cottage cheese in a food processor before mixing it with the eggs.
Additionally, these pancakes can be made ahead of time and stored in the refrigerator for up to two days. Simply reheat in a skillet or microwave before serving. To elevate the dish, consider adding fresh herbs like dill or chives to the batter for an added burst of flavor.
Pork Tenderloin With Cabbage Slaw

Pork tenderloin is a lean, flavorful cut of meat that pairs beautifully with a crunchy cabbage slaw. This dish isn’t only protein-packed but also bursting with vibrant flavors and colors. The tenderloin is seasoned and seared to perfection, creating a delicious crust on the outside while keeping the inside juicy and tender. The cabbage slaw adds a revitalizing crunch and a tangy element that complements the richness of the pork, making it a well-balanced meal perfect for family dinners or special occasions.
The beauty of this recipe lies in its simplicity and the use of fresh ingredients. The pork tenderloin is marinated with a blend of spices before being seared and roasted, allowing the flavors to develop and penetrate the meat. Meanwhile, the cabbage slaw is a mix of shredded red and green cabbage, carrots, and a zesty dressing that brings everything together. This dish serves 4-6 people, making it a great choice for a family meal or a gathering with friends.
Ingredients (Serves 4-6):
- 2 pork tenderloins (about 1 pound each)
- 2 tablespoons olive oil
- 1 tablespoon paprika
- 1 teaspoon garlic powder
- 1 teaspoon onion powder
- 1 teaspoon salt
- 1/2 teaspoon black pepper
- 1/4 teaspoon cayenne pepper (optional)
- 2 cups shredded red cabbage
- 2 cups shredded green cabbage
- 1 large carrot, grated
- 1/4 cup mayonnaise
- 2 tablespoons apple cider vinegar
- 1 tablespoon honey
- Salt and pepper to taste
- Fresh parsley for garnish
Cooking Instructions:
- Preheat the Oven: Preheat your oven to 400°F (200°C) to prepare for roasting the pork tenderloin.
- Prepare the Pork Marinade: In a small bowl, mix together paprika, garlic powder, onion powder, salt, black pepper, and cayenne pepper. Rub the pork tenderloins with olive oil and then generously coat them with the spice mixture. Let them sit for at least 15 minutes to absorb the flavors.
- Sear the Pork: Heat a large oven-safe skillet over medium-high heat. Add a little olive oil to the pan and sear the pork tenderloins on all sides until they’re browned, about 3-4 minutes per side.
- Roast the Pork: Transfer the skillet to the preheated oven and roast the pork for about 15-20 minutes, or until the internal temperature reaches 145°F (63°C). Remove from the oven and let the pork rest for 5-10 minutes before slicing.
- Prepare the Cabbage Slaw: While the pork is roasting, prepare the slaw. In a large bowl, combine shredded red and green cabbage, grated carrot, mayonnaise, apple cider vinegar, honey, salt, and pepper. Toss everything together until well combined.
- Serve: Slice the rested pork tenderloin into medallions and serve alongside the cabbage slaw. Garnish with fresh parsley and enjoy a delicious, protein-packed meal.
Extra Tips:
When cooking pork tenderloin, it’s important to not overcook it, as it can become dry. Using a meat thermometer is highly recommended to confirm it reaches the perfect internal temperature.
Additionally, allowing the pork to rest after roasting helps the juices redistribute throughout the meat, ensuring every bite is tender and moist.
For the slaw, feel free to adjust the level of sweetness and acidity to your preference by tweaking the amount of honey and vinegar. If you prefer a creamier slaw, you can add more mayonnaise.
Enjoy this dish with a side of roasted potatoes or a light, crusty bread for a complete meal.
Shrimp and Avocado Tacos
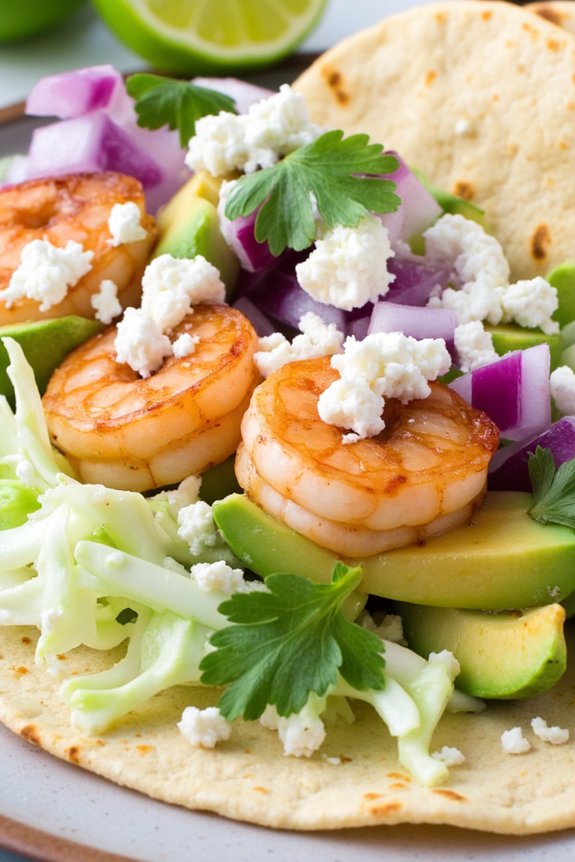
Shrimp and Avocado Tacos are a delightful fusion of flavors and textures that make for a satisfying and protein-packed meal. The combination of succulent shrimp, creamy avocado, and fresh toppings wrapped in a soft tortilla makes this dish a favorite for both casual dinners and special occasions.
Whether you’re a seafood lover or just looking to try something new, these tacos are sure to impress with their vibrant appearance and delicious taste. Perfect for a serving size of 4-6 people, this recipe is easy to prepare and can be made in under 30 minutes, making it ideal for busy weeknights.
The key to a successful Shrimp and Avocado Taco lies in fresh ingredients and well-balanced seasoning. Let’s plunge into the recipe and discover how to create this mouth-watering dish.
Ingredients:
- 1.5 lbs large shrimp, peeled and deveined
- 2 tablespoons olive oil
- 1 teaspoon chili powder
- 1 teaspoon cumin
- 1 teaspoon garlic powder
- Salt and pepper to taste
- 2 ripe avocados, diced
- Juice of 1 lime
- 1/4 cup chopped fresh cilantro
- 8-10 small corn or flour tortillas
- 1 cup shredded cabbage
- 1/2 cup diced red onion
- 1/2 cup crumbled feta cheese
- Lime wedges for serving
Cooking Instructions:
- Prepare the Shrimp: Rinse the shrimp under cold water and pat dry with a paper towel. In a large bowl, toss the shrimp with olive oil, chili powder, cumin, garlic powder, salt, and pepper until evenly coated.
- Cook the Shrimp: Heat a large skillet over medium-high heat. Add the seasoned shrimp to the skillet in a single layer. Cook for 2-3 minutes on each side, or until the shrimp are pink and opaque. Remove from heat and set aside.
- Prepare the Avocado Mixture: In a medium bowl, combine the diced avocados, lime juice, and chopped cilantro. Mix gently to combine, ensuring the avocados are coated with lime juice to prevent browning.
- Warm the Tortillas: In a dry skillet over medium heat, warm the tortillas for about 30 seconds on each side until they’re pliable and slightly charred. Alternatively, wrap them in a damp paper towel and microwave for 20-30 seconds.
- Assemble the Tacos: Place a few shrimp in the center of each tortilla. Top with a spoonful of the avocado mixture, a handful of shredded cabbage, and a sprinkle of diced red onion. Add a little crumbled feta cheese on top.
- Serve: Arrange the tacos on a serving platter, garnish with lime wedges, and serve immediately. Encourage guests to squeeze fresh lime juice over their tacos for an extra burst of flavor.
Extra Tips:
For the best results, use fresh shrimp and high-quality avocados. If you prefer a spicier kick, consider adding a pinch of cayenne pepper to the shrimp seasoning or serve with a side of hot sauce.
You can also experiment with other toppings, such as sliced jalapeños or a dollop of sour cream, to customize the tacos to your liking. To save time, the shrimp and avocado mixture can be prepared in advance and stored separately in airtight containers in the refrigerator until ready to serve.