

As someone who cherishes the comfort of a home-cooked meal but doesn’t always have the luxury of time, I’ve found my solution in freezer-friendly dinners. Picture a bustling weeknight, but with savory beef stew or creamy chicken casseroles already prepped. These simple ingredients can easily turn into delicious, cost-effective meals. They’re always just a freezer step away from being on your dinner table. Let’s explore these easy recipes that will save you time and stress.
Classic Beef and Vegetable Stew
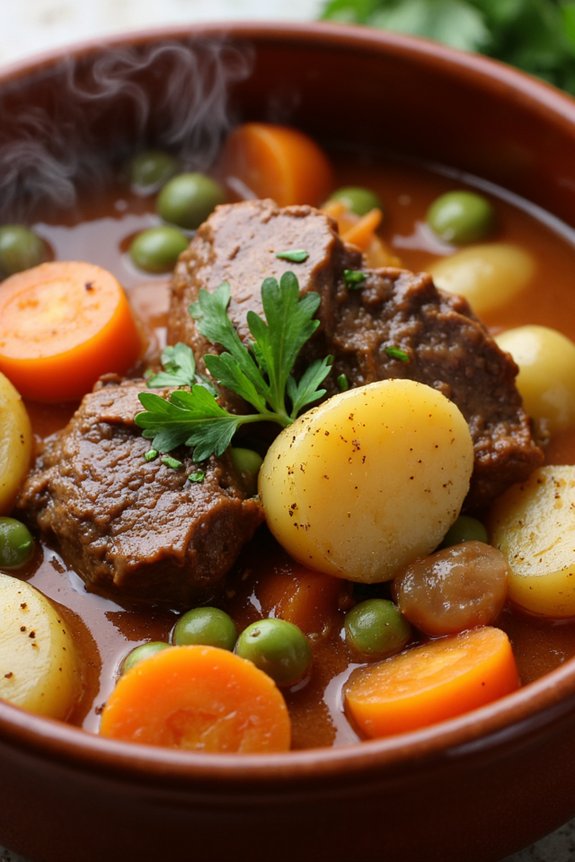
When the cold weather hits, there’s nothing more comforting than a warm bowl of hearty beef and vegetable stew. This classic dish isn’t only satisfying but also packed with nutritious ingredients. The slow-cooked beef becomes so tender that it practically melts in your mouth, while the medley of vegetables adds vibrant flavors and textures.
This stew is perfect for making ahead and freezing, ensuring you have a delicious meal ready to go on those busy weeknights. This recipe is designed to serve 4-6 people and can easily be doubled if you want to have more leftovers to freeze. The stew is rich in flavor thanks to the combination of herbs, stock, and a splash of wine, which enhances the depth of the sauce.
Once cooked, you can portion out any leftovers into freezer-safe containers and store them for up to three months. When you’re ready to enjoy it again, simply thaw and reheat for a quick and comforting meal.
Ingredients for Classic Beef and Vegetable Stew (serving size: 4-6 people):
- 2 pounds beef chuck, cut into 1-inch cubes
- 2 tablespoons olive oil
- 1 large onion, diced
- 3 cloves garlic, minced
- 4 carrots, peeled and sliced
- 3 potatoes, peeled and diced
- 2 stalks celery, sliced
- 1 cup frozen peas
- 2 tablespoons tomato paste
- 1 cup red wine
- 4 cups beef stock
- 2 bay leaves
- 1 teaspoon dried thyme
- Salt and pepper to taste
- 2 tablespoons all-purpose flour
- Fresh parsley, chopped (for garnish)
Cooking Instructions:
- Prepare the Beef: Begin by patting the beef cubes dry with paper towels, which will help them brown better. Season the beef with salt and pepper.
- Brown the Beef: In a large pot or Dutch oven, heat the olive oil over medium-high heat. Add the beef in batches, making sure not to overcrowd the pot, and brown on all sides. Once browned, remove the beef and set aside.
- Sauté the Vegetables: In the same pot, add the diced onion, minced garlic, carrots, and celery. Sauté for about 5 minutes until the onions are translucent and the vegetables start to soften.
- Add Tomato Paste and Flour: Stir in the tomato paste and flour, cooking for another minute to remove the raw flour taste.
- Deglaze the Pot: Pour in the red wine, scraping up any browned bits from the bottom of the pot. Allow the wine to reduce by half.
- Simmer the Stew: Return the beef to the pot, along with the potatoes, beef stock, bay leaves, and thyme. Bring the mixture to a boil, then reduce the heat to low. Cover and let it simmer for about 1.5 to 2 hours, or until the beef is tender.
- Finish with Peas: About 10 minutes before the stew is done, stir in the frozen peas. Adjust seasoning with salt and pepper if needed.
- Garnish and Serve: Once the stew is ready, remove the bay leaves. Ladle the stew into bowls and garnish with fresh parsley before serving.
Extra Tips:
For the best results, choose a well-marbled beef chuck for this stew, as the fat will render down during cooking, enhancing the flavor. If you prefer a gluten-free option, you can replace the all-purpose flour with cornstarch to thicken the sauce.
When freezing, make sure to cool the stew completely before transferring it to airtight containers. Label the containers with the date to keep track of freshness. When reheating, add a splash of beef stock or water if the stew has thickened too much. Enjoy this classic comfort food anytime with just a quick reheat from the freezer!
Cheesy Chicken and Rice Casserole

Cheesy Chicken and Rice Casserole is a comforting, hearty dish that’s perfect for a family meal and can be made ahead of time to freeze for later enjoyment. This casserole combines tender chunks of chicken with creamy rice, all enveloped in a rich, cheesy sauce, making it a delicious and satisfying meal.
It’s ideal for those busy weeknights when you want to have something ready to pop in the oven; just thaw and bake for a homemade meal without the fuss.
This recipe serves 4-6 people, making it great for family dinners or when you’re expecting guests. The ingredients are simple, yet they come together to create a dish that’s both flavorful and filling. The best part? It’s freezer-friendly, so you can double the recipe and have another meal ready for a later date.
Ingredients:
- 2 cups cooked chicken, diced
- 2 cups cooked white rice
- 1 can (10.5 oz) cream of chicken soup
- 1 cup sour cream
- 1 cup cheddar cheese, shredded
- 1/2 cup milk
- 1/2 teaspoon garlic powder
- 1/2 teaspoon onion powder
- 1/2 teaspoon salt
- 1/4 teaspoon black pepper
- 1/4 cup Parmesan cheese, grated
- 1 tablespoon butter
- 1/4 cup bread crumbs
Cooking Instructions:
- Preheat your oven to 350°F (175°C). This guarantees the casserole cooks evenly and the cheese melts to a perfect bubbly consistency.
- In a large mixing bowl, combine the diced chicken, cooked rice, cream of chicken soup, sour cream, cheddar cheese, milk, garlic powder, onion powder, salt, and black pepper. Stir until everything is well mixed and the ingredients are evenly distributed.
- Grease a 9×13 inch baking dish with butter to prevent the casserole from sticking to the sides during baking.
- Pour the chicken and rice mixture into the prepared baking dish, spreading it evenly.
- In a small bowl, mix the bread crumbs with the grated Parmesan cheese. Sprinkle this mixture over the top of the casserole. This will create a crispy, cheesy topping once baked.
- Cover the baking dish with aluminum foil to prevent the top from browning too quickly, and bake in the preheated oven for 20 minutes.
- After 20 minutes, remove the foil and bake for an additional 10-15 minutes, or until the top is golden brown and the cheese is bubbly.
- Allow the casserole to cool for about 5 minutes before serving. This helps it set slightly, making it easier to serve.
Extra Tips:
For a bit of variation, you can add vegetables like broccoli or peas to the casserole for added nutrition and color.
If you want a spicier kick, consider adding a dash of paprika or a sprinkle of red pepper flakes.
When freezing, wrap the casserole tightly in both plastic wrap and aluminum foil to prevent freezer burn.
When ready to use, thaw the casserole in the refrigerator overnight for even cooking.
Reheating leftovers can be easily done in the oven or microwave, but be sure to cover it to keep the moisture locked in.
Savory Lentil and Vegetable Soup
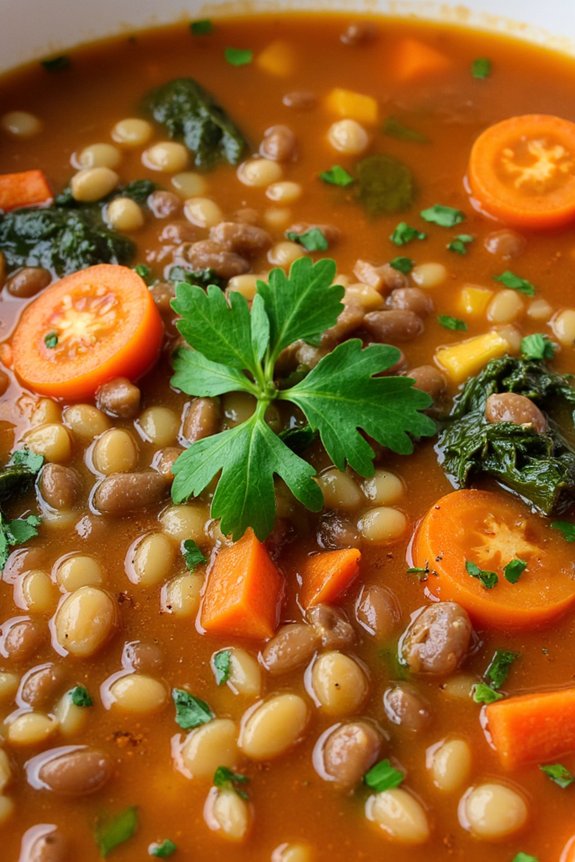
Savory Lentil and Vegetable Soup is a hearty and nutritious dish that makes an excellent dinner option, especially when you need something freezer-friendly. This soup is packed with protein-rich lentils and fresh vegetables, making it both filling and healthy. It’s perfect for chilly evenings or when you want a comforting meal that can quickly be reheated. The combination of spices and herbs adds a depth of flavor, turning simple ingredients into a delicious and satisfying soup.
One of the best aspects of this soup is its versatility; you can easily customize it with your favorite vegetables or whatever you have on hand. It’s an ideal dish for meal prep because it freezes beautifully, allowing you to store portions for future meals. This recipe makes enough for 4-6 servings, ensuring you have plenty to enjoy now and some to save for later.
Ingredients for 4-6 servings:
- 2 tablespoons olive oil
- 1 large onion, chopped
- 3 cloves garlic, minced
- 3 carrots, diced
- 2 celery stalks, diced
- 1 teaspoon ground cumin
- 1 teaspoon ground coriander
- 1/2 teaspoon smoked paprika
- 1/4 teaspoon cayenne pepper (optional)
- 1 cup dried lentils, rinsed
- 1 can (14 oz) diced tomatoes
- 6 cups vegetable broth
- 2 cups chopped kale or spinach
- Salt and pepper to taste
- Juice of 1 lemon
- Fresh parsley for garnish
Cooking Instructions:
- Prepare the Vegetables: Begin by heating the olive oil in a large pot over medium heat. Add the chopped onion and sauté until it becomes translucent, about 5 minutes. Stir in the minced garlic and cook for another minute until fragrant.
- Add the Vegetables: Add the diced carrots and celery to the pot. Stir to combine and cook for another 5 minutes, allowing the vegetables to soften slightly.
- Incorporate Spices and Lentils: Sprinkle in the ground cumin, coriander, smoked paprika, and cayenne pepper if using. Stir the spices into the vegetable mixture and cook for 1 minute to release their flavors. Add the rinsed lentils and stir to coat them with the spices.
- Add Tomatoes and Broth: Pour in the diced tomatoes and vegetable broth. Stir well, increase the heat to high, and bring the mixture to a boil.
- Simmer the Soup: Once boiling, reduce the heat to low and cover the pot. Allow the soup to simmer for 30-35 minutes, or until the lentils are tender.
- Add Greens and Season: Stir in the chopped kale or spinach and let it cook for an additional 5 minutes. Season the soup with salt, pepper, and lemon juice to taste.
- Serve and Garnish: Ladle the soup into bowls, garnish with fresh parsley, and serve warm.
Extra Tips:
For the best flavor, allow the soup to sit for a few hours or overnight before serving, as the flavors continue to develop.
When freezing, let the soup cool completely before transferring it to airtight containers or freezer-safe bags. Label with the date and store in the freezer for up to 3 months.
When ready to eat, thaw in the refrigerator overnight and reheat on the stove over medium heat until warmed through.
Feel free to adjust the spices and vegetables according to your preference or dietary needs.
Spaghetti Bolognese With Hidden Veggies

Spaghetti Bolognese With Hidden Veggies is a comforting and delicious classic that gets a nutritious twist with the addition of hidden vegetables. This recipe is perfect for those who wish to sneak some extra nutrients into their meals without compromising on flavor. By incorporating finely chopped or blended vegetables into the sauce, you not only enhance the nutritional value but also add depth and richness to the traditional Bolognese sauce.
This dish is perfect for making in bulk and freezing for later, making it an excellent choice for busy weeknight dinners or when you’re planning meals ahead of time. The recipe serves 4-6 people and is designed to be freezer-friendly, so you can enjoy the convenience of having a homemade meal ready to go whenever you need it.
The combination of lean ground beef, a variety of veggies, and a rich tomato base provides a satisfying and hearty meal that the whole family will love. Plus, the hidden veggies are finely chopped or blended so that even the pickiest eaters won’t notice them, making this a great dish for families with kids.
Ingredients:
- 2 tablespoons olive oil
- 1 large onion, finely chopped
- 2 carrots, finely chopped
- 2 stalks celery, finely chopped
- 2 cloves garlic, minced
- 1 zucchini, grated
- 1 bell pepper, finely chopped
- 500 grams lean ground beef
- 1 can (400 grams) crushed tomatoes
- 2 tablespoons tomato paste
- 1 teaspoon dried oregano
- 1 teaspoon dried basil
- Salt and pepper to taste
- 1 cup beef broth
- 500 grams spaghetti
- Grated Parmesan cheese (optional, for serving)
Cooking Instructions:
- Prepare the Vegetables: Begin by finely chopping the onion, carrots, and celery, and then set them aside. Grate the zucchini and finely chop the bell pepper. Mince the garlic cloves.
- Cook the Beef: In a large skillet or saucepan, heat the olive oil over medium heat. Add the ground beef and cook until browned, breaking it apart with a spoon as it cooks. Once browned, remove the beef from the pan and set it aside.
- Sauté the Vegetables: Using the same pan, add the chopped onion, carrots, celery, bell pepper, and garlic. Sauté for about 5-7 minutes until the vegetables begin to soften. Add the grated zucchini and cook for an additional 2 minutes.
- Combine Ingredients: Return the browned beef to the skillet with the vegetables. Stir in the crushed tomatoes, tomato paste, oregano, basil, salt, and pepper. Pour in the beef broth and bring the mixture to a simmer.
- Simmer the Sauce: Reduce the heat to low and let the sauce simmer gently for about 30 minutes, stirring occasionally. This allows the flavors to meld together and the sauce to thicken.
- Cook the Spaghetti: While the sauce is simmering, bring a large pot of salted water to a boil. Add the spaghetti and cook according to the package instructions until al dente. Drain the pasta and set it aside.
- Combine and Serve: Once the sauce has thickened to your liking, taste and adjust seasoning if necessary. Combine the sauce with the cooked spaghetti and toss to coat the pasta evenly. Serve hot with grated Parmesan cheese on top, if desired.
Extra Tips: To enhance the flavor of your Spaghetti Bolognese, consider adding a splash of red wine to the sauce during the simmering process. This will add depth and complexity to the sauce.
If you’re planning to freeze the dish, let the sauce cool completely before storing it in airtight containers or freezer bags. Label them with the date, and when ready to serve, simply defrost and reheat.
For a healthier twist, you can substitute whole wheat or gluten-free spaghetti for regular pasta. Additionally, feel free to experiment by adding other vegetables like mushrooms or spinach for even more hidden nutrients!
Creamy Tuna Noodle Bake

Creamy Tuna Noodle Bake is a hearty and satisfying dish, perfect for those nights when you want a comforting meal that can be prepared in advance and stored in the freezer. This classic casserole combines tender noodles, flaky tuna, and a rich, creamy sauce, all topped with a crispy breadcrumb crust.
It’s an ideal meal for busy families, as it can be made ahead of time and simply reheated when needed. Plus, it’s a wonderful way to incorporate pantry staples into a delicious and nutritious dinner.
This freezer-friendly dish is designed to serve 4-6 people, making it a great option for family dinners or gatherings. The dish can be customized to your taste by adding different vegetables or varying the types of cheese used. By following the straightforward steps below, you’ll have a delightful meal ready to enjoy or freeze for later use.
Ingredients (serving size: 4-6 people):
- 12 oz egg noodles
- 2 cans (5 oz each) of tuna, drained
- 1 cup frozen peas
- 1 small onion, chopped
- 2 cloves garlic, minced
- 1 can (10.5 oz) condensed cream of mushroom soup
- 1 cup milk
- 1 cup shredded cheddar cheese
- 1/2 cup grated Parmesan cheese
- 1/2 cup breadcrumbs
- 2 tablespoons butter
- Salt and pepper to taste
- 1 tablespoon olive oil
Cooking Instructions:
1. Preheat and Prepare: Preheat your oven to 350°F (175°C). Grease a 9×13-inch baking dish with a bit of butter or non-stick spray to prevent sticking.
2. Cook the Noodles: Bring a large pot of salted water to a boil. Add the egg noodles and cook until al dente, according to package instructions. Drain the noodles and set them aside.
3. Prepare the Sauce: In a large skillet, heat the olive oil over medium heat. Add the chopped onion and minced garlic, and sauté until the onion is translucent and fragrant.
Stir in the condensed cream of mushroom soup and milk, mixing well until smooth.
4. Combine Ingredients: Add the cooked noodles, drained tuna, frozen peas, and shredded cheddar cheese to the skillet. Stir everything together until the noodles are well coated with the sauce. Season with salt and pepper to taste.
5. Assemble the Casserole: Transfer the mixture into the prepared baking dish, spreading it out evenly. In a small bowl, combine the breadcrumbs and Parmesan cheese. Melt the butter and drizzle it over the breadcrumb mixture, tossing to combine.
Sprinkle the breadcrumb topping evenly over the casserole.
6. Bake the Casserole: Place the baking dish in the preheated oven and bake for 25-30 minutes, or until the top is golden brown and crispy. Remove from the oven and let it cool for a few minutes before serving.
Extra Tips:
For a more colorful and nutritious dish, consider adding other vegetables such as diced bell peppers, mushrooms, or chopped spinach.
If you prefer a bit of a kick, try adding a pinch of red pepper flakes or a dash of hot sauce to the sauce mixture.
When freezing the casserole, verify it’s fully cooled before wrapping it tightly in plastic wrap and aluminum foil to prevent freezer burn. To reheat from frozen, bake at 350°F (175°C) for about 45-50 minutes, or until heated through.
Hearty Shepherd’s Pie
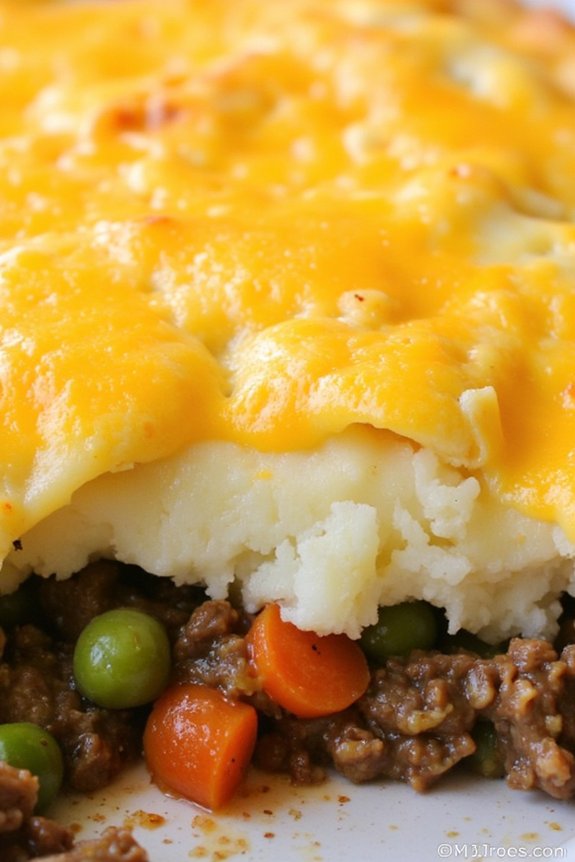
Shepherd’s Pie is a classic comfort food that combines a savory meat filling with a creamy mashed potato topping. This dish is perfect for freezing and reheating, making it a convenient option for busy weeknights. The rich flavors of the beef or lamb, mixed with a medley of vegetables and herbs, create a satisfying meal that pairs wonderfully with the buttery and smooth potatoes.
Whether you’re preparing it for immediate enjoyment or planning ahead for future meals, Shepherd’s Pie is a versatile and hearty dish that the whole family will love.
To prepare a Hearty Shepherd’s Pie that serves 4-6 people, you’ll need a blend of fresh and pantry ingredients. This recipe is easily adaptable, allowing you to substitute ingredients based on dietary preferences or what’s available in your kitchen. The beauty of this dish lies in its simplicity and the way the flavors meld together during cooking, creating a comforting and delicious meal that can be enjoyed fresh or from the freezer.
Ingredients:
- 1 ½ pounds ground beef or lamb
- 1 onion, finely chopped
- 2 cloves garlic, minced
- 2 carrots, diced
- 1 cup frozen peas
- 2 tablespoons tomato paste
- 2 tablespoons all-purpose flour
- 1 cup beef or vegetable broth
- 1 teaspoon Worcestershire sauce
- 1 teaspoon dried thyme
- Salt and pepper to taste
- 4 cups mashed potatoes
- 1 cup shredded cheddar cheese
- 2 tablespoons butter
Cooking Instructions:
- Preheat the Oven: Begin by preheating your oven to 400°F (200°C). This guarantees that it will be at the correct temperature for baking once you have assembled the pie.
- Prepare the Meat Filling: In a large skillet over medium heat, cook the ground beef or lamb until browned, breaking it up with a spoon as it cooks. Drain any excess fat and set the meat aside.
- Sauté the Vegetables: In the same skillet, add the chopped onion and minced garlic. Sauté for about 2-3 minutes until the onion becomes translucent. Add the diced carrots and cook for another 5 minutes, stirring occasionally.
- Combine Ingredients: Return the browned meat to the skillet with the vegetables. Stir in the tomato paste and flour, mixing until everything is well coated. Gradually add the broth, Worcestershire sauce, dried thyme, salt, and pepper. Let the mixture simmer for 10 minutes, allowing the sauce to thicken and the flavors to meld.
- Assemble the Pie: Transfer the meat mixture into a baking dish, spreading it evenly. Top with the frozen peas. Spoon the mashed potatoes over the meat and vegetable layer, smoothing the surface with a spatula. Sprinkle the shredded cheddar cheese over the top.
- Bake: Place the assembled pie in the preheated oven and bake for 25-30 minutes, or until the cheese is melted and golden brown.
- Serve: Allow the Shepherd’s Pie to cool slightly before serving. This helps the layers set, making it easier to portion out.
Extra Tips:
When preparing mashed potatoes for the topping, make sure they’re smooth and creamy for the best texture. You can add a splash of milk or cream while mashing, along with butter, to enhance their richness.
If you plan to freeze the pie, let it cool completely before wrapping tightly in plastic wrap and aluminum foil. Label it with the date for easy reference. To reheat, thaw it in the fridge overnight and bake at 350°F (175°C) until heated through. Enjoy the convenience of having a homemade meal ready to savor at any time.
Easy Chicken and Broccoli Stir-Fry
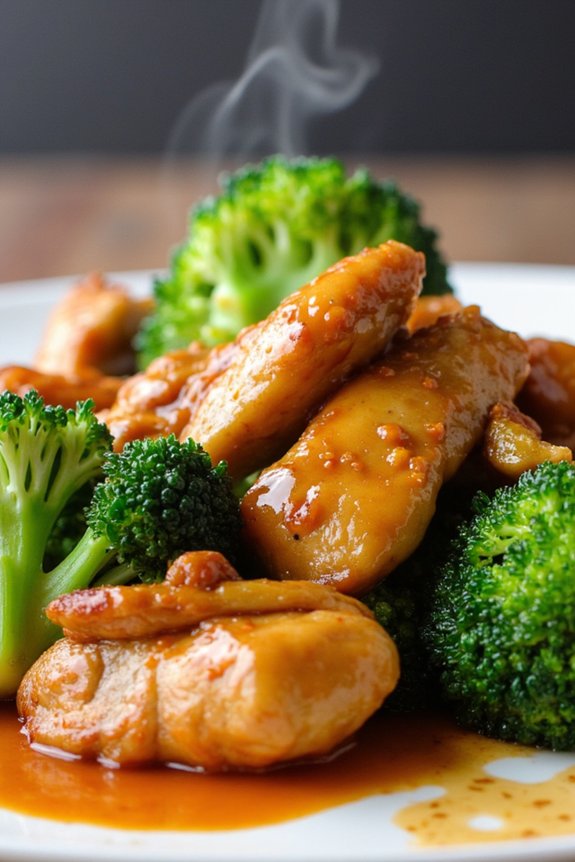
Looking for a quick and delicious meal that you can prepare in advance and freeze for busy nights? This Easy Chicken and Broccoli Stir-Fry is the perfect solution. Not only is it packed with flavor and nutrients, but it’s also incredibly simple to make. The combination of tender chicken, crisp broccoli, and a savory sauce will satisfy your taste buds while keeping your meal prep efforts minimal.
Plus, it freezes beautifully, making it a convenient option for those hectic weeknights when you need something healthy and homemade in a hurry.
This recipe is designed to serve 4-6 people, making it ideal for family dinners or for preparing meals in bulk. The beauty of this dish lies in its versatility—feel free to add your favorite vegetables or adjust the seasoning to suit your preferences.
With just a few ingredients and a bit of prep work, you can have a delicious stir-fry ready in no time. Whether you’re a seasoned cook or a beginner in the kitchen, this freezer-friendly dish will quickly become a staple in your meal rotation.
Ingredients:
- 1.5 pounds boneless, skinless chicken breast, sliced into thin strips
- 4 cups broccoli florets
- 2 tablespoons vegetable oil
- 1 tablespoon sesame oil
- 3 cloves garlic, minced
- 1 tablespoon fresh ginger, grated
- 1/4 cup soy sauce
- 2 tablespoons oyster sauce
- 2 tablespoons cornstarch
- 1/4 cup chicken broth
- 1 tablespoon brown sugar
- Salt and pepper to taste
- Cooked rice, for serving
Instructions:
- Prepare the Ingredients: Begin by slicing the chicken breast into thin strips and cutting the broccoli into bite-sized florets. Mince the garlic and grate the fresh ginger. Set these ingredients aside.
- Make the Sauce: In a small bowl, whisk together the soy sauce, oyster sauce, cornstarch, chicken broth, and brown sugar until smooth. This will be your stir-fry sauce.
- Cook the Chicken: Heat 1 tablespoon of vegetable oil in a large skillet or wok over medium-high heat. Add the chicken strips and season with salt and pepper. Stir-fry the chicken until it’s cooked through and slightly browned, about 5-7 minutes. Remove the chicken from the skillet and set aside.
- Cook the Broccoli: In the same skillet, add the remaining tablespoon of vegetable oil and the sesame oil. Add the minced garlic and grated ginger, sautéing for about 30 seconds until fragrant. Then, add the broccoli florets and stir-fry for 3-4 minutes until they’re crisp-tender.
- Combine Ingredients: Return the cooked chicken to the skillet with the broccoli. Pour the prepared sauce over the chicken and broccoli. Stir well to coat everything in the sauce.
- Thicken the Sauce: Continue to cook the stir-fry for another 2-3 minutes, allowing the sauce to thicken and all ingredients to heat through. Taste and adjust seasoning with additional salt and pepper if needed.
- Serve: Serve the chicken and broccoli stir-fry over cooked rice. Enjoy immediately or allow it to cool before portioning into freezer-safe containers for future meals.
Extra Tips:
When preparing this dish for freezing, make sure to let it cool completely before transferring it to airtight containers or freezer bags. Label the containers with the date and contents for easy identification.
To reheat, simply thaw in the refrigerator overnight and then warm in a skillet over medium heat, adding a splash of water or chicken broth to refresh the sauce if needed. Feel free to experiment with other vegetables like bell peppers, snow peas, or carrots to add variety to your stir-fry.
Black Bean and Corn Enchiladas
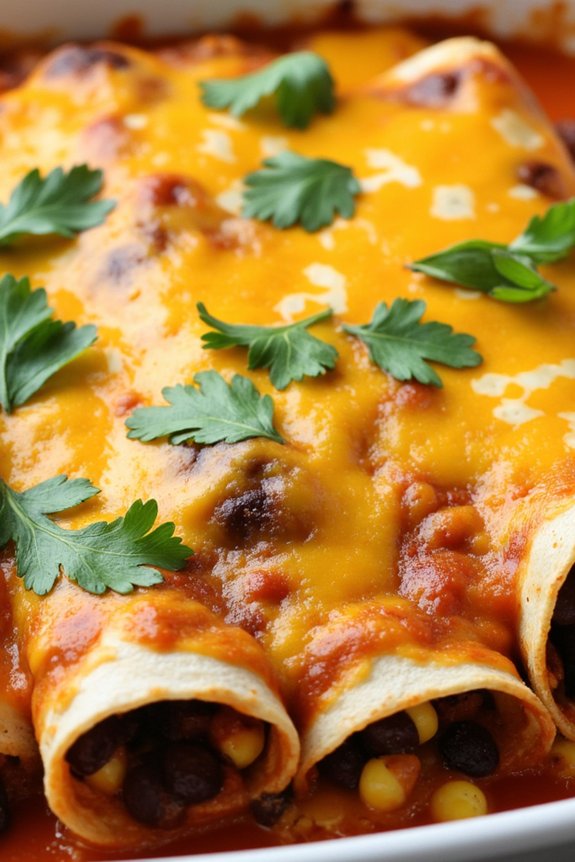
Black Bean and Corn Enchiladas are a delicious and hearty meal that can easily be made ahead of time and stored in the freezer for a convenient weeknight dinner. This dish combines the rich flavors of black beans and sweet corn with a zesty enchilada sauce, all wrapped up in soft tortillas and topped with melted cheese.
It’s a perfect vegetarian option that’s both satisfying and flavorful, making it a great addition to your meal rotation. These enchiladas can be customized with additional ingredients like diced bell peppers, jalapeños, or even shredded chicken for those who prefer a non-vegetarian option.
They’re ideal for serving at family gatherings or potlucks and can be enjoyed fresh out of the oven or reheated straight from the freezer. With simple ingredients and straightforward preparation, Black Bean and Corn Enchiladas are a fantastic choice for anyone looking to enjoy a comforting homemade meal without spending hours in the kitchen.
Ingredients (Serves 4-6):
- 2 tablespoons olive oil
- 1 small onion, diced
- 2 cloves garlic, minced
- 1 teaspoon cumin
- 1 teaspoon chili powder
- 1 can (15 oz) black beans, drained and rinsed
- 1 cup corn kernels (fresh, canned, or frozen)
- 1 can (10 oz) enchilada sauce
- 8-10 corn tortillas
- 2 cups shredded cheese (cheddar or Monterey Jack)
- Salt and pepper to taste
- Optional: diced jalapeños, chopped cilantro, diced bell peppers
Instructions:
- Preheat and Prepare: Preheat your oven to 375°F (190°C). Lightly grease a 9×13 inch baking dish and set aside.
- Sauté Vegetables: In a large skillet, heat the olive oil over medium heat. Add the diced onion and minced garlic, sautéing until the onion is translucent, about 3-4 minutes.
- Add Spices and Beans: Stir in the cumin and chili powder, allowing them to toast for about 30 seconds. Add the black beans and corn, stirring to combine. Cook for another 3-4 minutes, then season with salt and pepper to taste.
- Prepare Tortillas: Spread a thin layer of enchilada sauce over the bottom of the prepared baking dish. Warm the tortillas slightly in the microwave to make them pliable.
- Fill and Roll Enchiladas: Spoon a few tablespoons of the bean and corn mixture onto each tortilla, sprinkle with a little cheese, then roll up tightly and place seam-side down in the baking dish.
- Top with Sauce and Cheese: Pour the remaining enchilada sauce over the rolled tortillas, making sure they’re evenly covered. Sprinkle the remaining cheese on top.
- Bake: Cover the dish with foil and bake in the preheated oven for 20 minutes. Remove the foil and bake for an additional 10 minutes, or until the cheese is bubbly and golden brown.
- Serve: Let the enchiladas cool for a few minutes before serving. Garnish with optional toppings like jalapeños, cilantro, or bell peppers if desired.
Extra Tips:
When assembling the enchiladas, make certain the tortillas are warm to prevent them from cracking as you roll them. For freezing, allow the enchiladas to cool completely after baking, then cover tightly with foil or transfer to an airtight container before placing in the freezer.
When ready to eat, they can be reheated directly from frozen in the oven at 350°F (175°C) for about 25-30 minutes, or until heated through. This dish pairs well with a side of Mexican rice or a fresh green salad for a complete meal.
Mushroom and Spinach Lasagna
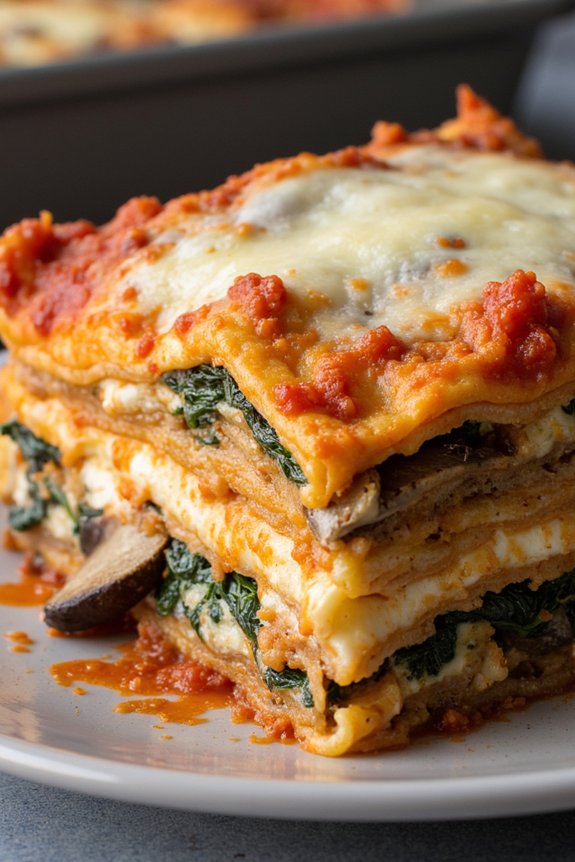
Mushroom and Spinach Lasagna is a delicious and hearty vegetarian dish that can easily become a family favorite. Perfect for a weeknight dinner or a special occasion, this lasagna is layered with rich flavors from creamy ricotta, earthy mushrooms, and fresh spinach.
What makes this dish even more appealing is that it can be prepared in advance and frozen, making it a convenient option for those busy days when time is limited. Simply pop it into the oven straight from the freezer, and enjoy a home-cooked meal without the fuss.
This particular recipe serves 4-6 people and is designed to be freezer-friendly, maintaining its flavor and texture even after being frozen. The combination of savory mushrooms, vibrant spinach, and creamy cheese filling nestled between layers of tender lasagna noodles creates a satisfying meal that will leave everyone asking for seconds.
Whether you’re planning a meal for the week or prepping for a future dinner, Mushroom and Spinach Lasagna is both versatile and delicious.
Ingredients for 4-6 servings:
- 9 lasagna noodles
- 2 tablespoons olive oil
- 1 pound mushrooms, sliced
- 3 cloves garlic, minced
- 10 ounces fresh spinach leaves
- 15 ounces ricotta cheese
- 1 egg
- 2 cups marinara sauce
- 2 cups shredded mozzarella cheese
- 1 cup grated Parmesan cheese
- Salt and pepper to taste
Cooking Instructions:
1. Preheat and Prepare: Preheat your oven to 375°F (190°C). Cook the lasagna noodles according to the package instructions until al dente. Drain and set aside.
2. Cook the Vegetables: In a large skillet, heat the olive oil over medium heat. Add the sliced mushrooms and cook until they’re golden brown and their moisture has evaporated, about 8-10 minutes.
Add the minced garlic and cook for an additional 1 minute. Stir in the fresh spinach and cook until wilted. Season with salt and pepper to taste, then remove from heat.
3. Mix the Ricotta Filling: In a medium bowl, combine the ricotta cheese, egg, salt, and pepper. Mix until smooth and well blended.
4. Assemble the Lasagna: Spread 1/2 cup of marinara sauce on the bottom of a 9×13 inch baking dish. Place three lasagna noodles on top. Spread half of the ricotta mixture over the noodles, followed by half of the mushroom and spinach mixture. Sprinkle with 1/3 of the mozzarella cheese.
Repeat the layers, ending with noodles on top. Pour the remaining marinara sauce over the noodles, and sprinkle with the remaining mozzarella and all the Parmesan cheese.
5. Bake the Lasagna: Cover the baking dish with aluminum foil and bake in the preheated oven for 25 minutes. Remove the foil and bake for an additional 15-20 minutes, or until the cheese is bubbly and golden brown. Let the lasagna cool for 10 minutes before serving.
Extra Tips: When freezing this Mushroom and Spinach Lasagna, assemble the dish in a freezer-safe container, but don’t bake it. Wrap it tightly with plastic wrap and aluminum foil to prevent freezer burn.
To cook from frozen, allow the lasagna to thaw overnight in the refrigerator, then bake as directed. If baking directly from frozen, add an additional 20-25 minutes to the covered baking time to guarantee it’s fully heated through.
For added flavor, consider using a mix of mushroom varieties, such as cremini or portobello, and feel free to add a pinch of nutmeg to the ricotta mixture for a subtle depth of flavor.
Zesty Lemon Garlic Shrimp Pasta
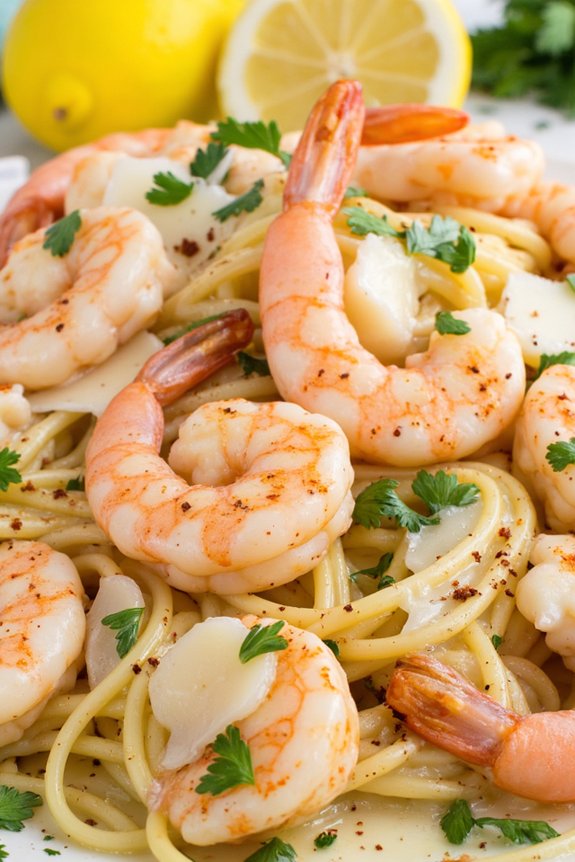
Zesty Lemon Garlic Shrimp Pasta is a delicious and invigorating dish that combines the bright flavors of lemon and garlic with succulent shrimp and perfectly cooked pasta. This recipe is perfect for those who are looking to prepare a quick, yet elegant meal that can also be stored in the freezer for those busy weeknights.
The citrusy zest of the lemon elevates the shrimp, while the garlic adds a layer of warmth and depth to the dish. It’s a perfect balance of flavors that will leave your taste buds tantalized.
This dish isn’t only packed with flavor but is also incredibly easy to prepare. With a few simple ingredients, you can create a memorable meal that’s sure to impress your family and friends. Plus, it’s freezer-friendly, so you can make a larger batch and store it for later, ensuring you always have a delicious homemade meal on hand.
The combination of pasta, shrimp, and a light lemon garlic sauce makes this dish both satisfying and light, making it a wonderful choice for any occasion.
Ingredients for 4-6 people:
- 1 pound (450g) shrimp, peeled and deveined
- 12 ounces (340g) linguine or spaghetti
- 4 tablespoons olive oil
- 4 cloves garlic, minced
- Zest and juice of 2 lemons
- 1 teaspoon red pepper flakes
- Salt and black pepper to taste
- 1/4 cup fresh parsley, chopped
- 1/2 cup grated Parmesan cheese
Cooking Instructions:
- Cook the Pasta: Begin by bringing a large pot of salted water to a boil. Add the linguine or spaghetti and cook according to package instructions until al dente. Drain and set aside, reserving 1 cup of the pasta cooking water.
- Prepare the Shrimp: While the pasta is cooking, season the shrimp with salt and black pepper. In a large skillet over medium heat, add 2 tablespoons of olive oil. Once hot, add the shrimp and cook for 2-3 minutes on each side until they turn pink and opaque. Remove the shrimp from the skillet and set aside.
- Make the Sauce: In the same skillet, add the remaining 2 tablespoons of olive oil. Add the minced garlic and red pepper flakes, sautéing for about 1 minute until fragrant. Don’t let the garlic burn.
- Combine Ingredients: Add the cooked pasta to the skillet along with the reserved pasta water, lemon zest, and lemon juice. Toss to combine and coat the pasta thoroughly. Return the shrimp to the skillet and mix well.
- Final Touches: Remove the skillet from the heat and add the chopped parsley and grated Parmesan cheese. Toss everything together until the cheese is melted and the ingredients are evenly distributed.
- Serve: Serve the pasta immediately while warm, garnished with additional parsley and lemon wedges if desired.
Extra Tips:
For best results, use fresh shrimp as they tend to have a sweeter and more robust flavor. If you prefer a bit more heat, increase the amount of red pepper flakes.
When freezing this dish, allow it to cool completely before transferring it to an airtight container. To reheat, simply thaw in the refrigerator overnight and warm on the stove over low heat, adding a splash of water or broth to prevent the pasta from drying out. Adjust seasonings as needed after reheating.
Homemade Meatloaf With Mashed Potatoes
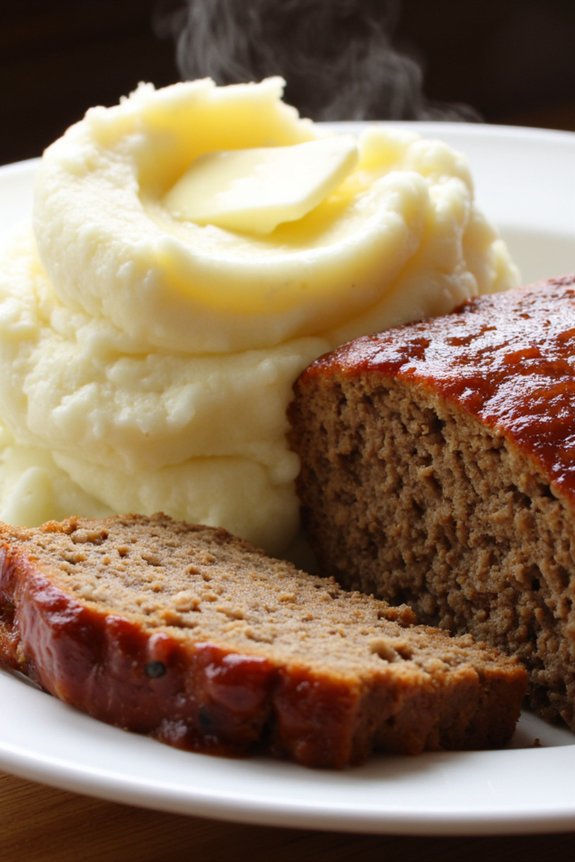
Homemade Meatloaf with Mashed Potatoes is a classic comfort meal that not only satisfies your taste buds but also makes for a convenient meal prep option. This delightful dish combines a juicy, flavorful meatloaf with creamy, buttery mashed potatoes, creating a hearty and wholesome meal that feels like a warm hug.
Perfect for busy weeknights, this recipe can be easily prepared in advance and stored in the freezer, ready to be reheated whenever you need a quick and delicious dinner.
The beauty of this dish lies in its simplicity and the ability to customize the flavors to your liking. Whether you prefer your meatloaf with a tangy glaze or a simple seasoning, the choice is yours.
Pair it with the velvety mashed potatoes, and you have a meal that pleases both adults and children alike. This recipe serves 4-6 people, making it ideal for family dinners or for creating multiple servings that can be enjoyed throughout the week.
Ingredients for Meatloaf:
- 1 1/2 pounds ground beef
- 1 cup breadcrumbs
- 1/2 cup milk
- 1 egg
- 1 small onion, finely chopped
- 2 cloves garlic, minced
- 1 tablespoon Worcestershire sauce
- 1 tablespoon ketchup
- 1 teaspoon salt
- 1/2 teaspoon black pepper
Ingredients for Glaze:
- 1/4 cup ketchup
- 2 tablespoons brown sugar
- 1 tablespoon Dijon mustard
Ingredients for Mashed Potatoes:
- 2 pounds potatoes, peeled and cubed
- 1/2 cup milk
- 1/4 cup butter
- Salt and pepper to taste
Cooking Instructions:
- Preheat Oven: Preheat your oven to 350°F (175°C).
- Prepare Meatloaf Mixture: In a large bowl, combine the ground beef, breadcrumbs, milk, egg, onion, garlic, Worcestershire sauce, ketchup, salt, and pepper. Mix well until all ingredients are evenly incorporated.
- Shape the Meatloaf: Transfer the mixture to a loaf pan or shape it into a loaf on a baking sheet lined with parchment paper.
- Make the Glaze: In a small bowl, mix together the ketchup, brown sugar, and Dijon mustard. Spread this glaze evenly over the top of the meatloaf.
- Bake the Meatloaf: Place the meatloaf in the preheated oven and bake for 60-75 minutes, or until the internal temperature reaches 160°F (71°C).
- Cook the Potatoes: While the meatloaf is baking, add the cubed potatoes to a large pot and cover with cold water. Bring to a boil over high heat, then reduce to a simmer. Cook until potatoes are tender, about 15-20 minutes.
- Mash the Potatoes: Drain the potatoes and return them to the pot. Add milk and butter, and mash until smooth. Season with salt and pepper to taste.
- Serve: Once the meatloaf is done, let it rest for a few minutes before slicing. Serve with the mashed potatoes on the side.
Extra Tips:
For a more flavorful meatloaf, consider adding finely chopped herbs such as parsley or thyme to the meat mixture. If you prefer a spicier kick, a dash of hot sauce or a pinch of cayenne pepper can elevate the taste.
When freezing the dish, allow the meatloaf to cool completely before wrapping it tightly in aluminum foil or plastic wrap. The mashed potatoes can be stored in an airtight container. Reheat both in the oven or microwave, adding a splash of milk to the potatoes if they seem a bit dry after freezing.