

There’s something magical about gathering around the table to celebrate a loved one’s birthday. I’ve put together a list of recipes that are sure to make the day extra special. From a comforting meatloaf with a modern twist to the creamy goodness of chicken Alfredo pasta, every dish is crafted with love. Whether you lean towards the hearty warmth of a slow-cooked beef stew or the vibrant taste of stuffed bell peppers, these recipes will inspire your next culinary adventure. Ready to explore these delightful options?
Classic Meatloaf With a Twist
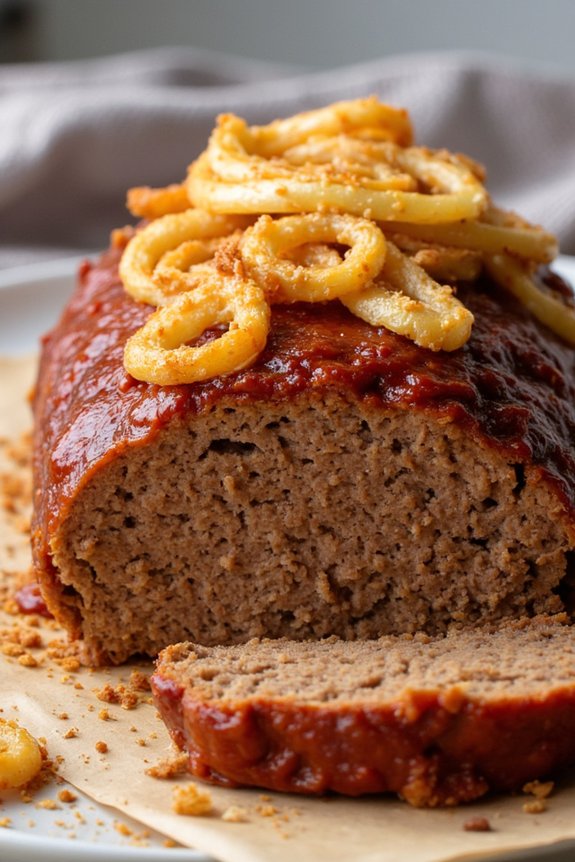
Meatloaf is a beloved classic that brings warmth and nostalgia to any family gathering, especially birthdays. However, this recipe adds a modern twist to the traditional dish by incorporating unexpected flavors and textures. This version embraces a savory blend of spices and a surprise ingredient that elevates the dish to a new level.
Whether you’re hosting a birthday dinner or simply craving comfort food, this meatloaf promises to be the star of the meal.
The twist in this meatloaf comes from the addition of tangy barbecue sauce mixed with a hint of honey and a sprinkle of smoked paprika. These ingredients add depth and a slight sweetness that perfectly complement the savory meat. Additionally, topping the meatloaf with a layer of crispy onion straws just before serving introduces a delightful crunch that contrasts beautifully with the tender meat.
Gather your loved ones around the table and enjoy this reinvented classic, perfect for a serving size of 4-6 people.
Ingredients:
- 2 pounds ground beef
- 1 cup breadcrumbs
- 1/2 cup milk
- 2 eggs
- 1 small onion, finely chopped
- 2 cloves garlic, minced
- 1/4 cup ketchup
- 1/4 cup barbecue sauce
- 1 tablespoon honey
- 1 teaspoon smoked paprika
- 1 tablespoon Worcestershire sauce
- Salt and pepper to taste
- 1 cup pre-made crispy onion straws (store-bought or homemade)
Cooking Instructions:
- Preheat the Oven: Begin by preheating your oven to 350°F (175°C). This will guarantee that the meatloaf cooks evenly throughout.
- Mix the Ingredients: In a large mixing bowl, combine the ground beef, breadcrumbs, milk, eggs, chopped onion, minced garlic, ketchup, barbecue sauce, honey, smoked paprika, Worcestershire sauce, salt, and pepper. Use your hands or a spatula to mix everything thoroughly until all ingredients are well incorporated.
- Shape the Meatloaf: Transfer the meat mixture to a large baking dish or a loaf pan. Shape it into a loaf form, ensuring it’s compact and evenly shaped for consistent cooking.
- Bake: Place the meatloaf in the preheated oven and bake for 1 hour, or until the internal temperature reaches 160°F (71°C). The top should be caramelized and slightly crispy.
- Add the Onion Straws: Five minutes before the meatloaf is done, sprinkle the crispy onion straws over the top. This will allow them to adhere to the loaf and become even crunchier without burning.
- Rest and Serve: Once cooked, remove the meatloaf from the oven and let it rest for about 10 minutes before slicing. This will help the juices redistribute and make slicing easier.
Extra Tips: For a juicier meatloaf, avoid overmixing the meat mixture, as this can lead to a denser texture. If you prefer a spicier kick, consider adding a teaspoon of hot sauce or a pinch of cayenne pepper to the mixture.
You can also experiment with different types of ground meat such as turkey or a beef-pork mix for varying flavors. Finally, if you’re making homemade onion straws, consider soaking the onions in buttermilk before dredging them in flour for an extra layer of flavor.
Creamy Chicken Alfredo Pasta
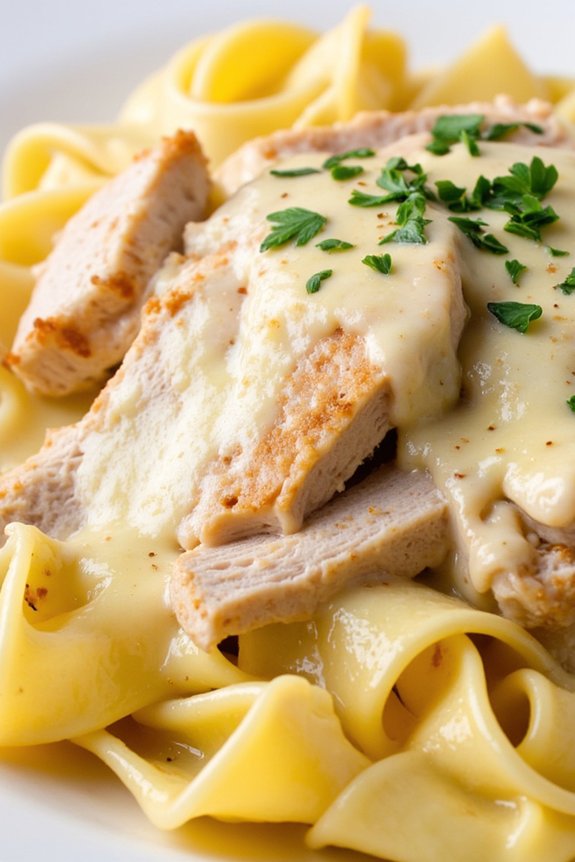
Creamy Chicken Alfredo Pasta is a classic and indulgent dish that’s perfect for a family birthday dinner. Its rich and velvety sauce, combined with tender pieces of chicken and perfectly cooked pasta, creates a delightful harmony of flavors and textures. Preparing this dish not only fills your home with irresistible aromas but also offers a comforting meal that brings everyone together around the table.
The beauty of Creamy Chicken Alfredo Pasta lies in its simplicity and elegance. With just a few quality ingredients, you can create a restaurant-worthy dish that will impress your family and guests. The key is to use fresh ingredients, such as heavy cream and Parmesan cheese, to achieve the luscious sauce that clings to each strand of pasta. This recipe serves 4-6 people, making it ideal for an intimate family celebration.
Ingredients for 4-6 servings:
- 1 pound of fettuccine pasta
- 2 tablespoons olive oil
- 1 pound boneless, skinless chicken breast, sliced
- Salt and black pepper to taste
- 4 cloves garlic, minced
- 1 cup heavy cream
- 1 cup grated Parmesan cheese
- 1 cup chicken broth
- 1 tablespoon unsalted butter
- 1 teaspoon Italian seasoning
- Fresh parsley, chopped (for garnish)
Cooking Instructions:
- Cook the Pasta: Bring a large pot of salted water to a boil. Add the fettuccine pasta and cook according to package instructions until al dente. Drain the pasta and set aside.
- Prepare the Chicken: In a large skillet, heat olive oil over medium heat. Season the sliced chicken breast with salt and black pepper. Add the chicken to the skillet and cook for about 5-7 minutes, or until golden brown and cooked through. Remove the chicken from the skillet and set aside.
- Sauté the Garlic: In the same skillet, add the minced garlic and sauté for about 1 minute until fragrant.
- Make the Sauce: Pour in the chicken broth and bring to a simmer. Add the heavy cream and butter, stirring until the butter melts and the mixture is smooth. Reduce the heat to low and gradually add the grated Parmesan cheese, stirring continuously until the cheese has melted and the sauce is creamy.
- Season the Sauce: Stir in the Italian seasoning and adjust the seasoning with salt and black pepper to taste.
- Combine Everything: Return the cooked chicken to the skillet, along with the cooked fettuccine pasta. Toss everything together until the pasta is well-coated with the sauce.
- Serve: Transfer the Creamy Chicken Alfredo Pasta to a serving platter. Garnish with chopped fresh parsley and serve immediately.
Extra Tips:
For the best results, use freshly grated Parmesan cheese as it melts more smoothly into the sauce compared to pre-grated options. You can also add a pinch of nutmeg to the sauce for an extra layer of flavor.
If the sauce thickens too much while cooling, simply add a splash of reserved pasta water or additional chicken broth to reach the desired consistency. Finally, feel free to add vegetables like broccoli or spinach for added nutrition and color.
Homemade Margherita Pizza

A Birthday Family Dinner is a perfect occasion to indulge in the simple yet delightful flavors of a Homemade Margherita Pizza. This classic Italian favorite is known for its fresh ingredients and rich taste, making it a universally loved dish that’s both elegant and comforting.
The combination of a crisp, golden crust, melted mozzarella, fresh basil, and ripe tomatoes creates a harmonious balance of flavors that are sure to please everyone at the table. By crafting the pizza at home, you can guarantee the highest quality of ingredients and a personal touch that makes it even more special for your birthday celebration.
Making a Homemade Margherita Pizza is surprisingly straightforward, even for those who aren’t seasoned chefs. The key is to focus on quality ingredients and a few essential steps that bring out the pizza’s best qualities.
This recipe will guide you through creating a delicious pizza that serves 4-6 people, perfect for sharing with family and friends during a cozy dinner gathering. With the right preparation, you’ll be able to present a mouthwatering pizza that looks as impressive as it tastes.
Ingredients (Serves 4-6)
- 2 1/2 cups all-purpose flour
- 1 cup warm water
- 1 packet active dry yeast (about 2 1/4 teaspoons)
- 1 teaspoon sugar
- 1 teaspoon salt
- 2 tablespoons olive oil
- 1 1/2 cups fresh mozzarella, sliced
- 1 cup tomato sauce
- 2-3 fresh tomatoes, sliced
- A handful of fresh basil leaves
- Salt and pepper to taste
Cooking Instructions
1. Prepare the Dough: In a small bowl, combine warm water, sugar, and yeast. Let it sit for about 5 minutes until the mixture becomes frothy. This step activates the yeast, which is vital for a good rise.
2. Make the Dough: In a large mixing bowl, combine the flour and salt. Make a well in the center and add the yeast mixture along with olive oil. Mix until a dough forms. Knead the dough on a floured surface for about 8-10 minutes until it’s smooth and elastic.
Place it in a lightly oiled bowl, cover with a damp cloth, and let it rise for 1-2 hours or until it doubles in size.
3. Preheat the Oven: Preheat your oven to 475°F (245°C). If you have a pizza stone, place it in the oven as it preheats to guarantee a crispy crust.
4. Prepare the Pizza Base: Once the dough has risen, punch it down to remove excess air. Divide it into two equal parts for two pizzas. Roll out each portion on a floured surface into a 12-inch circle.
5. Assemble the Pizza: Place the rolled dough on a pizza peel or baking sheet lined with parchment paper. Spread a thin layer of tomato sauce over the base, leaving about a 1-inch border.
Arrange the sliced mozzarella and tomatoes evenly over the sauce. Sprinkle with salt and pepper to taste.
6. Bake the Pizza: Slide the pizza onto the preheated pizza stone or directly onto the oven rack. Bake for 10-12 minutes until the crust is golden brown and the cheese is bubbly and starting to brown.
7. Add Fresh Basil: Remove the pizza from the oven and immediately add fresh basil leaves. The heat from the pizza will slightly wilt the basil, releasing its fragrant aroma.
8. Slice and Serve: Allow the pizza to cool for a few minutes before slicing. Serve hot and enjoy your Homemade Margherita Pizza with family and friends.
Extra Tips
When making a Homemade Margherita Pizza, using fresh and high-quality ingredients makes a significant difference in flavor. Opt for fresh mozzarella and vine-ripened tomatoes for the best results.
If you have access to a pizza stone, it can greatly enhance the crispness of the crust. Additionally, don’t overload the pizza with toppings; the beauty of a Margherita pizza lies in its simplicity and balance.
Finally, remember that practice makes perfect—don’t be afraid to experiment with dough thickness and baking times to find your preferred pizza texture.
Slow-Cooked Beef Stew
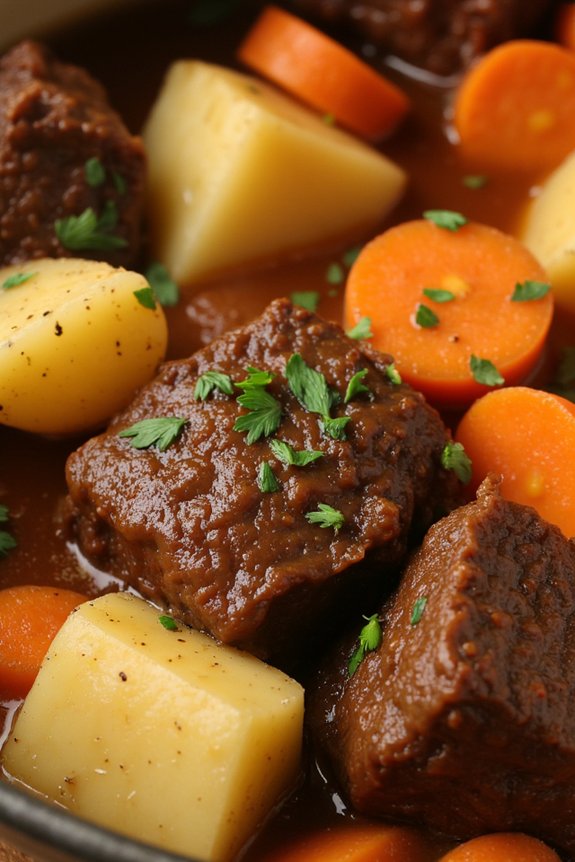
There’s nothing quite like a hearty beef stew to bring the family together for a birthday celebration. Slow-cooked beef stew is a timeless classic that warms both the heart and soul. Rich in flavors and offering a comforting depth, this dish is perfect for a cozy family dinner.
The beauty of this stew lies in its simplicity, allowing the ingredients to meld together over time, creating a symphony of flavors that’s sure to delight everyone at the table. This recipe serves 4-6 people, making it ideal for a small family gathering.
The slow-cooked beef becomes tender and succulent, absorbing the flavors of the broth and spices, while the vegetables add texture and nutrition. The dish requires minimal preparation, and the slow cooking process allows you to focus on other birthday festivities while the stew simmers away, filling your home with an irresistible aroma.
Ingredients:
- 2 pounds beef chuck, cut into 1-inch cubes
- 3 tablespoons all-purpose flour
- 2 tablespoons olive oil
- 1 large onion, chopped
- 3 cloves garlic, minced
- 4 cups beef broth
- 1 cup red wine (optional)
- 3 large carrots, sliced
- 3 potatoes, peeled and diced
- 2 stalks celery, chopped
- 2 tablespoons tomato paste
- 1 tablespoon Worcestershire sauce
- 1 teaspoon dried thyme
- 1 teaspoon dried rosemary
- 2 bay leaves
- Salt and pepper to taste
- Fresh parsley, chopped (for garnish)
Instructions:
- Prepare the Beef: Start by patting the beef cubes dry with paper towels. Coat the beef in flour, shaking off any excess. This step helps create a rich, thick sauce as the stew cooks.
- Brown the Beef: In a large skillet, heat olive oil over medium-high heat. Add the beef cubes in batches, making sure not to overcrowd the pan. Brown the beef on all sides, then transfer to a slow cooker.
- Sauté Vegetables: In the same skillet, add the chopped onion and garlic. Sauté for about 3 minutes until the onion becomes translucent. Transfer the onion and garlic to the slow cooker.
- Combine Ingredients: Add the carrots, potatoes, and celery to the slow cooker with the beef. Stir in the tomato paste, Worcestershire sauce, thyme, rosemary, and bay leaves. Season with salt and pepper.
- Add Liquids: Pour the beef broth and red wine (if using) over the beef and vegetables. Stir to combine, ensuring the ingredients are well mixed.
- Slow Cook: Cover and cook on low heat for 8-10 hours or on high heat for 4-6 hours. The beef should be tender and the vegetables cooked through.
- Finishing Touches: Once cooked, taste and adjust seasoning if necessary. Remove bay leaves before serving. Garnish with fresh parsley for a burst of color and flavor.
Extra Tips:
For an even richer flavor, consider searing the beef in bacon fat instead of olive oil. This adds an extra layer of taste to the stew.
If you prefer a thicker stew, remove the lid during the last hour of cooking to allow the liquid to reduce. You can also mash a few of the potatoes directly in the pot for added thickness.
Serve the stew with crusty bread or over mashed potatoes for a complete meal. Remember, this dish tastes even better the next day, so consider making it ahead of time for more intensified flavors.
Baked Ziti With Sausage
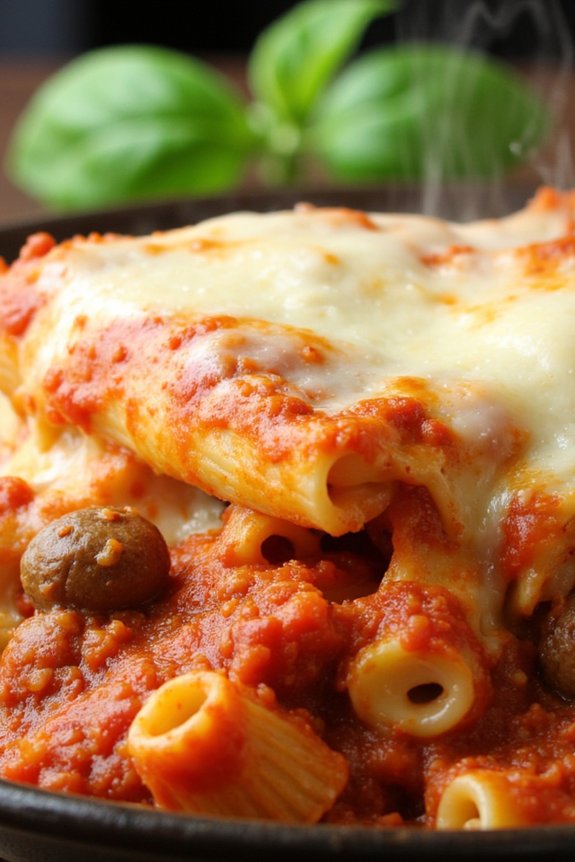
Baked Ziti With Sausage is a perfect dish for a birthday family dinner, combining the comforting flavors of pasta, rich tomato sauce, and savory sausage. This hearty meal is sure to please both adults and children alike, and its ease of preparation makes it an ideal choice for a festive gathering.
The creamy layers of melted cheese and the robust flavors of Italian sausage create a delightful culinary experience that everyone will enjoy. This recipe is designed to serve 4-6 people, making it suitable for small to medium-sized gatherings.
The combination of ziti pasta, flavorful sausage, and a blend of cheeses guarantees that each bite is satisfying and delicious. Whether you’re celebrating a birthday or simply enjoying a special family meal, Baked Ziti With Sausage will be a crowd-pleaser that brings everyone together around the dinner table.
Ingredients:
- 1 pound ziti pasta
- 1 pound Italian sausage, casings removed
- 2 cups marinara sauce
- 1 cup ricotta cheese
- 2 cups shredded mozzarella cheese
- 1/2 cup grated Parmesan cheese
- 1 tablespoon olive oil
- 2 cloves garlic, minced
- 1 teaspoon dried oregano
- 1 teaspoon dried basil
- Salt and pepper to taste
Cooking Instructions:
- Preheat the Oven: Start by preheating your oven to 375°F (190°C). This guarantees that it’s at the right temperature for baking the ziti once assembled.
- Cook the Pasta: Bring a large pot of salted water to a boil. Add the ziti pasta and cook until al dente, following the package instructions. Drain the pasta and set it aside.
- Prepare the Sausage: In a large skillet, heat olive oil over medium heat. Add the Italian sausage and cook, breaking it up with a spoon, until it’s browned and cooked through. This should take about 7-10 minutes.
- Add Garlic and Seasoning: Add the minced garlic to the skillet with the sausage and sauté for about 1 minute until fragrant. Stir in the dried oregano, dried basil, salt, and pepper, ensuring the sausage is well-seasoned.
- Combine Sauce and Sausage: Pour the marinara sauce into the skillet with the sausage mixture. Stir well to combine and let it simmer for about 5 minutes to allow the flavors to meld together.
- Assemble the Ziti: In a large mixing bowl, combine the cooked ziti pasta with the sausage and marinara sauce mixture. Add the ricotta cheese and half of the mozzarella cheese. Mix everything together until well combined.
- Transfer to Baking Dish: Lightly grease a 9×13 inch baking dish. Pour the ziti mixture into the prepared dish, spreading it out evenly.
- Add Cheese Topping: Sprinkle the remaining mozzarella cheese and the grated Parmesan cheese evenly over the top of the pasta.
- Bake: Place the baking dish in the preheated oven and bake for 25-30 minutes, or until the cheese is melted and bubbly, and the top is lightly golden.
- Serve: Remove from oven and let it cool for a few minutes before serving. This allows the cheese to set slightly, making it easier to serve.
Extra Tips:
For a little extra flavor, you can add a pinch of red pepper flakes to the sausage mixture if you enjoy a bit of heat.
Consider using freshly grated Parmesan cheese for the best flavor, and don’t hesitate to experiment with different types of sausage, such as spicy Italian sausage, for a variation in taste.
If you prefer a creamier texture, you can mix a bit of heavy cream into the marinara sauce before combining it with the pasta.
Finally, garnishing with freshly chopped basil or parsley before serving can add a touch of freshness and color to your dish.
Grilled Lemon Herb Salmon

Grilled Lemon Herb Salmon is a delightful and healthy dish that’s perfect for a birthday family dinner. This savory recipe combines the fresh and zesty flavors of lemon and herbs with the rich taste of salmon, providing a satisfying meal that will impress your loved ones. The grilling process enhances the natural flavors of the salmon, creating a perfectly cooked dish with a slightly crispy exterior and a tender, flaky interior.
Paired with a simple side salad or roasted vegetables, this dish isn’t only easy to prepare but also a crowd-pleaser for any special occasion.
Preparing Grilled Lemon Herb Salmon requires minimal ingredients and effort, making it an ideal choice for home cooks of all skill levels. The key to this recipe is in the marinade, which infuses the salmon with a burst of flavor from fresh herbs and lemon juice. By allowing the salmon to marinate, you guarantee that each bite is packed with deliciousness.
This recipe serves 4-6 people, making it perfect for a family gathering or a small dinner party.
Ingredients (serves 4-6):
- 4-6 salmon fillets (6-8 ounces each)
- 2 lemons, juiced and zested
- 3 tablespoons olive oil
- 2 tablespoons fresh dill, chopped
- 2 tablespoons fresh parsley, chopped
- 2 garlic cloves, minced
- Salt and pepper to taste
- Lemon slices (for garnish)
- Fresh herbs (for garnish)
Cooking Instructions:
- Prepare the Marinade: In a small bowl, combine the lemon juice, lemon zest, olive oil, chopped dill, chopped parsley, minced garlic, salt, and pepper. Mix well until all ingredients are fully incorporated.
- Marinate the Salmon: Place the salmon fillets in a shallow dish or a resealable plastic bag. Pour the marinade over the salmon, guaranteeing each fillet is evenly coated. Cover the dish or seal the bag, and refrigerate for at least 30 minutes to allow the flavors to meld.
- Preheat the Grill: Preheat your grill to medium-high heat, approximately 375°F (190°C). Lightly oil the grill grates to prevent sticking.
- Grill the Salmon: Remove the salmon from the marinade and place it skin-side down on the preheated grill. Grill for about 4-5 minutes per side, depending on the thickness of the fillets, until the salmon is cooked through and flakes easily with a fork.
- Rest and Serve: Once the salmon is cooked, remove it from the grill and let it rest for a few minutes. Garnish with fresh lemon slices and herbs before serving.
Extra Tips:
To guarantee the salmon remains moist and flavorful, avoid overcooking by keeping a close eye on the grill. If you prefer a smokier flavor, consider using a cedar plank to grill the salmon.
Additionally, feel free to experiment with the herbs and adjust them according to your personal taste preferences. For an added touch, serve the grilled salmon with a side of lemon wedges for an extra burst of citrus flavor. Enjoy your Grilled Lemon Herb Salmon with a light white wine for a truly delightful dining experience.
Stuffed Bell Peppers
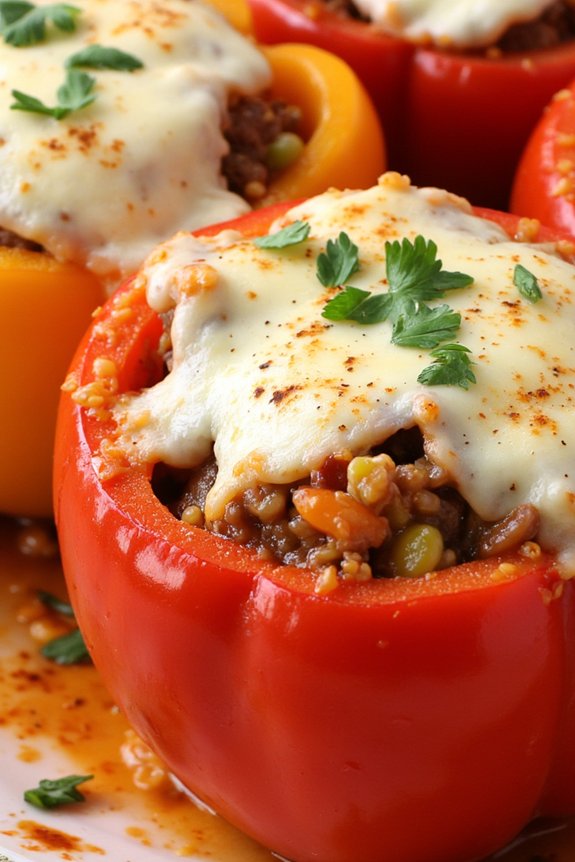
Stuffed bell peppers are a delightful and colorful addition to any birthday family dinner. This dish combines the sweetness of bell peppers with a savory filling of seasoned meat and grains, creating a harmonious blend of flavors and textures. Not only do stuffed bell peppers make for a visually appealing presentation, but they’re also versatile enough to adapt to a variety of dietary preferences.
Whether you’re hosting a small gathering or a larger celebration, this recipe will guarantee that your guests leave the table satisfied. The following recipe serves 4-6 people, making it perfect for a family dinner. The filling consists of ground meat, rice, and a mix of vegetables, all seasoned with herbs and spices that elevate the dish’s taste.
By baking the stuffed peppers, you allow the flavors to meld together while the pepper becomes tender, adding to the overall enjoyment of the meal. With a prep time of just 20 minutes and a cooking time of approximately 45 minutes, you’ll have a delicious main course ready in just over an hour.
Ingredients (Serves 4-6):
- 6 large bell peppers (any color)
- 1 pound ground beef or turkey
- 1 cup cooked rice
- 1 medium onion, diced
- 2 cloves garlic, minced
- 1 can (14.5 oz) diced tomatoes, drained
- 1 cup shredded mozzarella cheese
- 1 tablespoon olive oil
- 1 teaspoon salt
- 1/2 teaspoon black pepper
- 1 teaspoon dried oregano
- 1 teaspoon dried basil
- 1/2 teaspoon paprika
- 1/4 cup chopped fresh parsley
Cooking Instructions:
- Preheat Oven: Preheat your oven to 375°F (190°C). This will guarantee it’s hot enough to bake the stuffed bell peppers evenly.
- Prepare Bell Peppers: Wash the bell peppers and cut the tops off. Remove seeds and membranes from inside. Lightly brush the outside of the peppers with olive oil. Place them upright in a baking dish.
- Cook Filling: In a large skillet, heat 1 tablespoon of olive oil over medium heat. Add the diced onion and minced garlic, sautéing until the onion becomes translucent. Add the ground beef or turkey, cooking until browned. Drain any excess fat from the skillet.
- Mix Filling: Stir in the drained diced tomatoes, cooked rice, salt, black pepper, oregano, basil, and paprika. Let the mixture simmer for about 5 minutes, allowing flavors to meld. Remove from heat and mix in half of the shredded mozzarella cheese.
- Stuff Peppers: Carefully fill each bell pepper with the meat and rice mixture, pressing down gently to pack it in. Top each stuffed pepper with the remaining mozzarella cheese.
- Bake Peppers: Cover the baking dish with aluminum foil and bake in the preheated oven for 30 minutes. Remove the foil and bake for an additional 15 minutes, or until the peppers are tender and the cheese is golden and bubbly.
- Garnish and Serve: Once done, remove from the oven and let cool slightly. Garnish with chopped fresh parsley before serving.
Extra Tips:
For an extra burst of flavor, consider adding a splash of Worcestershire sauce or a tablespoon of tomato paste to the filling. If you prefer a vegetarian version, substitute the meat with a mixture of black beans and corn.
Additionally, for a kick, add a pinch of red pepper flakes to the filling mixture. Always guarantee the bell peppers are of similar size for even cooking, and feel free to experiment with different types of cheese for varied flavor profiles.
Savory Beef and Broccoli Stir-Fry
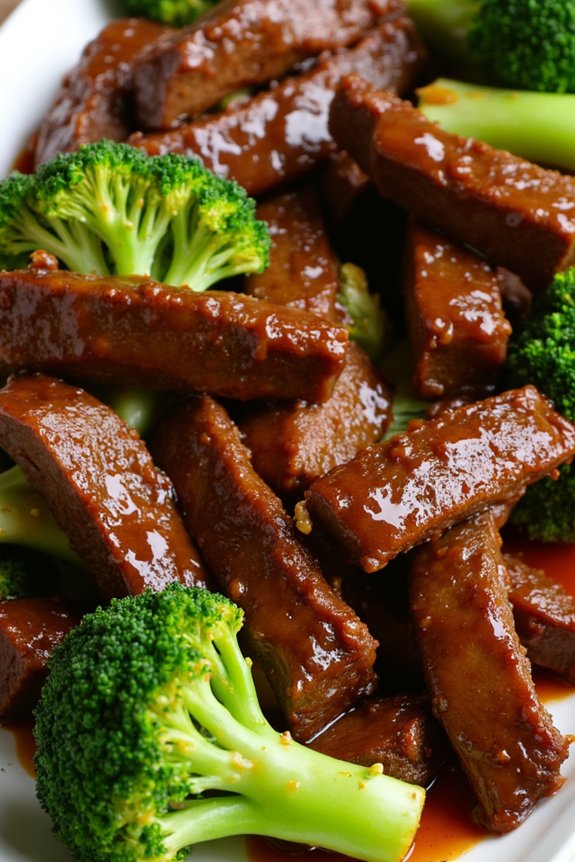
Indulge in a classic family favorite with this Savory Beef and Broccoli Stir-Fry, perfect for a special birthday dinner. This dish combines tender strips of beef with crisp broccoli florets in a rich, savory sauce that’s both satisfying and delicious.
Ideal for a gathering of 4 to 6 people, this recipe shines with its simple preparation and bold flavors, making it an excellent choice for celebrating special moments with loved ones. The vibrant colors and textures come together beautifully, guaranteeing that it not only tastes amazing but also looks stunning on the dinner table.
The balance of flavors in this dish is achieved through a combination of soy sauce, garlic, ginger, and a touch of sesame oil, which infuses the beef with aromatic goodness. The broccoli provides a fresh, crunchy contrast that pairs perfectly with the tender meat.
This stir-fry is quick to prepare, making it a delightful choice for those who want to spend more time enjoying the company of family rather than being tied up in the kitchen. Whether served over steamed rice or noodles, this dish is sure to be a hit at your birthday celebration.
Ingredients (Serves 4-6):
- 1 1/2 pounds beef sirloin, thinly sliced
- 4 cups broccoli florets
- 3 tablespoons vegetable oil, divided
- 3 cloves garlic, minced
- 1 tablespoon fresh ginger, minced
- 1/2 cup soy sauce
- 2 tablespoons oyster sauce
- 1 tablespoon cornstarch
- 1 tablespoon water
- 1 tablespoon sesame oil
- 1 teaspoon sugar
- Salt and pepper to taste
- Cooked rice or noodles, for serving
Cooking Instructions:
- Prepare the Beef and Broccoli: Begin by slicing the beef sirloin thinly against the grain to guarantee tenderness. Rinse and drain the broccoli florets, then set them aside.
- Make the Sauce: In a small bowl, whisk together the soy sauce, oyster sauce, sesame oil, sugar, and a pinch of salt and pepper. In a separate small bowl, mix the cornstarch with water to create a slurry.
- Cook the Beef: Heat 1 tablespoon of vegetable oil in a large wok or skillet over medium-high heat. Add the beef slices in batches, cooking each batch for 2-3 minutes until browned and just cooked through. Remove the beef from the pan and set aside.
- Stir-Fry the Broccoli: In the same wok or skillet, add another tablespoon of oil. Add the broccoli florets and stir-fry for 3-4 minutes until they’re bright green and tender-crisp.
- Combine Ingredients: Return the beef to the pan with the broccoli. Add the remaining tablespoon of oil, along with the minced garlic and ginger. Stir-fry for about 1 minute until fragrant.
- Add the Sauce: Pour the prepared sauce over the beef and broccoli mixture, stirring well to coat. Add the cornstarch slurry to the pan and cook for another 1-2 minutes until the sauce thickens and everything is heated through.
- Serve: Remove from heat and serve immediately over a bed of steamed rice or noodles, garnished with a sprinkle of sesame seeds if desired.
Extra Tips:
For the best results, make sure to slice the beef thinly and uniformly. This not only guarantees even cooking but also enhances the tenderness of the meat.
If possible, marinating the beef for 20-30 minutes before cooking can intensify the flavors even more. When stir-frying, keep the heat high and the movements quick to achieve that perfect texture.
Finally, to save time, you can prepare the sauce and slice the beef ahead of time, so everything is ready to go when you start cooking. Enjoy your meal and the celebration!
Roasted Vegetable Lasagna
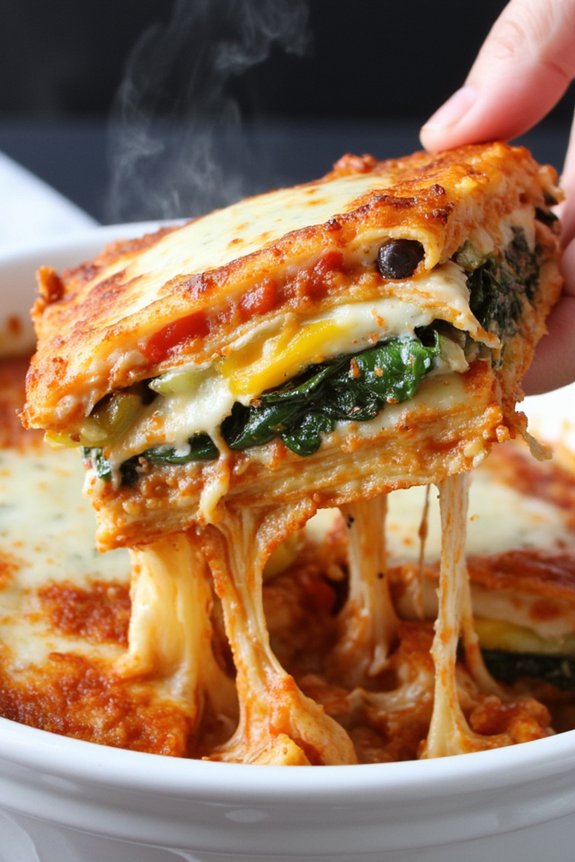
Roasted Vegetable Lasagna is a delightful twist on the classic Italian dish, perfect for a birthday family dinner. Packed with a medley of roasted vegetables and layered with creamy ricotta, gooey mozzarella, and tangy marinara sauce, this lasagna is a comforting dish that’s sure to please both vegetarians and meat-lovers alike.
The roasted vegetables add a depth of flavor and a delightful texture that elevates this lasagna to a gourmet level, making it a standout dish for any special occasion. This lasagna isn’t only delicious but also nutritious, providing a hearty serving of vegetables in every bite.
The roasting process enhances the natural sweetness and flavors of the vegetables, creating a rich and savory base for the lasagna. This recipe serves 4-6 people and is ideal for a cozy family gathering, where everyone can enjoy a warm plate of homemade goodness.
Whether you’re celebrating a birthday or any other special moment, Roasted Vegetable Lasagna is sure to make your meal memorable.
Ingredients:
- 12 lasagna noodles
- 2 tablespoons olive oil
- 1 large zucchini, sliced
- 1 large yellow squash, sliced
- 1 red bell pepper, sliced
- 1 yellow bell pepper, sliced
- 1 large onion, sliced
- 2 cups baby spinach
- 3 cloves garlic, minced
- 1 teaspoon dried oregano
- 1 teaspoon dried basil
- Salt and pepper to taste
- 2 cups ricotta cheese
- 1 egg
- 3 cups marinara sauce
- 2 cups shredded mozzarella cheese
- 1/2 cup grated Parmesan cheese
Instructions:
1. Prepare the Vegetables: Preheat your oven to 400°F (200°C). On a large baking sheet, spread out the zucchini, yellow squash, red and yellow bell peppers, and onion. Drizzle with olive oil and season with salt, pepper, oregano, and basil. Toss to coat the vegetables evenly. Roast in the oven for about 20-25 minutes, or until the vegetables are tender and lightly browned, stirring halfway through.
2. Cook the Noodles: While the vegetables are roasting, bring a large pot of salted water to a boil. Cook the lasagna noodles according to the package instructions until al dente. Drain and set aside.
3. Prepare the Ricotta Mixture: In a medium bowl, combine the ricotta cheese, egg, and a pinch of salt and pepper. Mix until smooth and creamy.
4. Assemble the Lasagna: Preheat your oven to 375°F (190°C). In a 9×13-inch baking dish, spread a thin layer of marinara sauce on the bottom. Layer 4 lasagna noodles over the sauce. Spread half of the ricotta mixture over the noodles, followed by half of the roasted vegetables and a handful of baby spinach. Sprinkle with a cup of mozzarella cheese.
Repeat the layers once more, ending with a final layer of noodles, marinara sauce, remaining mozzarella, and Parmesan cheese.
5. Bake the Lasagna: Cover the dish with aluminum foil and bake in the preheated oven for 25 minutes. Remove the foil and bake for an additional 15-20 minutes, or until the cheese is bubbly and golden brown. Let the lasagna rest for 10 minutes before serving.
Extra Tips:
For an even more robust flavor, consider adding a splash of balsamic vinegar to the vegetables before roasting. You can also add more vegetables like mushrooms or eggplant for added variety.
If you prefer a little heat, sprinkle some red pepper flakes into the marinara sauce. Letting the lasagna rest before serving allows the layers to set, making it easier to cut and serve without the layers sliding apart.
Honey Glazed Ham With Pineapple
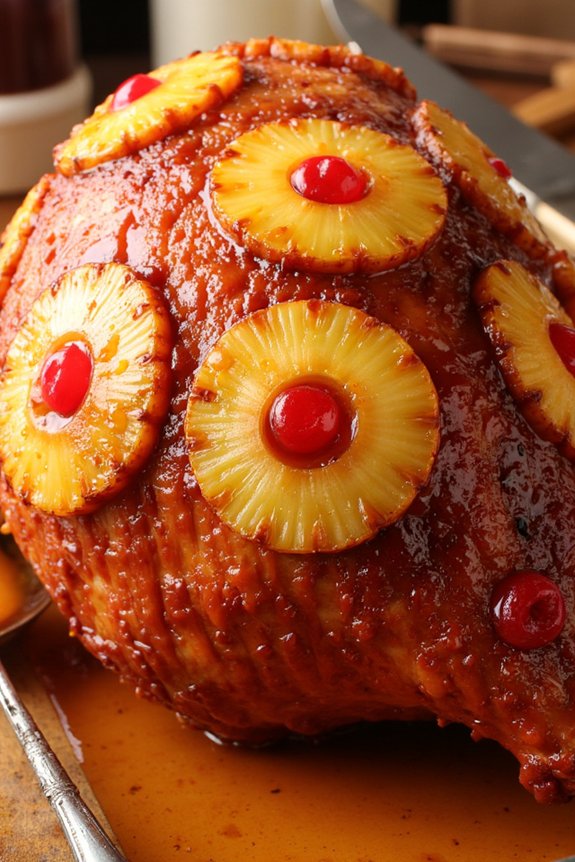
Honey Glazed Ham With Pineapple is a delightful centerpiece for any birthday family dinner. This dish combines the savory flavor of ham with the sweetness of honey and the tropical taste of pineapple, creating a harmonious blend that’s both satisfying and festive. The glaze caramelizes beautifully in the oven, giving the ham a shiny, golden-brown crust that’s sure to impress your guests.
It’s a dish that requires minimal preparation, making it a perfect choice for those who want to spend more time celebrating and less time in the kitchen. This recipe serves 4-6 people, making it an ideal option for small family gatherings. The honey glaze, enriched with cloves and cinnamon, infuses the ham with a rich aroma and adds a complex layer of flavor.
The pineapple not only complements the sweetness of the glaze but also helps to keep the ham moist during cooking. By following this step-by-step guide, you’ll be able to prepare a succulent Honey Glazed Ham With Pineapple that will have everyone asking for seconds.
Ingredients:
- 4-6 pound fully cooked bone-in ham
- 1 cup honey
- 1/2 cup brown sugar
- 1/4 cup Dijon mustard
- 1/4 teaspoon ground cloves
- 1/2 teaspoon ground cinnamon
- 1 can (20 ounces) pineapple slices in juice
- Whole cloves, for studding
- Maraschino cherries (optional)
- Toothpicks
Instructions:
- Preheat the Oven: Start by preheating your oven to 325°F (163°C). This will guarantee that your ham cooks evenly.
- Prepare the Ham: Place the ham in a large roasting pan. Using a sharp knife, score the surface of the ham in a diamond pattern. This will allow the glaze to penetrate the meat better. If desired, stud the intersections of the diamond cuts with whole cloves for added flavor.
- Make the Glaze: In a small saucepan over medium heat, combine the honey, brown sugar, Dijon mustard, ground cloves, and ground cinnamon. Stir the mixture until the sugar has dissolved and the glaze is smooth and slightly thickened. Remove from heat.
- Apply the Glaze: Brush the prepared glaze generously over the entire surface of the ham, making sure to get it into the scored cuts. Reserve a portion of the glaze for basting later.
- Arrange Pineapple and Cherries: Drain the pineapple slices and reserve the juice. Arrange the pineapple slices over the ham, securing them with toothpicks. If using, place a maraschino cherry in the center of each pineapple ring and secure it with a toothpick.
- Roast the Ham: Pour the reserved pineapple juice into the bottom of the roasting pan. Cover the ham loosely with aluminum foil and place it in the preheated oven. Bake for approximately 1.5 to 2 hours, or until the internal temperature reaches 140°F (60°C).
- Baste and Caramelize: During the last 30 minutes of cooking, remove the foil and baste the ham with the remaining glaze every 10 minutes. This will help create a caramelized crust.
- Rest the Ham: Once cooked, remove the ham from the oven and let it rest for 15-20 minutes before carving. This allows the juices to redistribute throughout the meat, making it more tender.
Extra Tips:
For the best flavor, choose a high-quality ham that isn’t overly salty. When scoring the ham, be careful not to cut too deeply into the meat. If you prefer a spicier glaze, you can add a pinch of cayenne pepper to the glaze mixture.
Remember to remove the toothpicks before serving. Finally, any leftover ham can be used in sandwiches or salads, making this dish a versatile option for post-celebration meals.