

After a busy day, there’s nothing better than easy meals that don’t require cooking. I’m excited to share some quick and delightful no-cook dinner recipes perfect for family nights. How about a zesty gazpacho with avocado and shrimp or a creamy chicken Caesar wrap to spice things up? These meals are super easy to prepare and offer a refreshing twist to your usual dinners. Let’s get started!
Zesty Gazpacho With Avocado and Shrimp

Zesty Gazpacho With Avocado and Shrimp is a revitalizing and flavorful no-cook dish perfect for a warm day. Originating from Spain, gazpacho is traditionally a chilled soup made from a blend of fresh vegetables and seasonings. In this version, the classic recipe gets a zesty twist with the addition of creamy avocado and succulent shrimp, creating a delightful combination of textures and tastes.
This dish isn’t only easy to prepare but also packed with nutrients, making it an ideal choice for a healthy meal that doesn’t require any cooking. Perfect for serving 4-6 people, this Zesty Gazpacho With Avocado and Shrimp is sure to impress your family and friends with its vibrant flavors and appealing presentation.
The creamy avocado balances the tangy tomato base, while the shrimp adds a touch of elegance and protein to the dish. Serve it as an appetizer or a light main course, and you’ll have a dish that’s both satisfying and simple to prepare without even turning on the stove.
Ingredients:
- 2 large ripe tomatoes, chopped
- 1 cucumber, peeled and diced
- 1 red bell pepper, chopped
- 1/2 red onion, chopped
- 2 cloves garlic, minced
- 3 cups tomato juice
- 2 tablespoons red wine vinegar
- 1 tablespoon olive oil
- Salt and pepper to taste
- 1 avocado, peeled, pitted, and diced
- 12-16 cooked shrimp, peeled and deveined
- 2 tablespoons fresh cilantro, chopped
- 1 lime, cut into wedges
Instructions:
- Prepare the base: In a large mixing bowl, combine the chopped tomatoes, cucumber, red bell pepper, red onion, and minced garlic. Stir these fresh ingredients together until well mixed.
- Blend for smoothness: Transfer the vegetable mixture to a blender or food processor. Add the tomato juice, red wine vinegar, and olive oil. Blend the mixture until smooth. If you prefer a chunkier texture, pulse the blender instead of blending continuously.
- Season the soup: Once blended to your desired consistency, pour the mixture back into the bowl. Season with salt and pepper to taste. Stir well to verify the seasoning is evenly distributed throughout the soup.
- Chill the gazpacho: Cover the bowl with plastic wrap or a lid and refrigerate for at least 2 hours. This chilling time allows the flavors to meld together, enhancing the overall taste of the gazpacho.
- Prepare the toppings: Just before serving, dice the avocado and toss it gently with a little lime juice to prevent browning. Set aside.
- Assemble and serve: Ladle the chilled gazpacho into bowls. Top each serving with diced avocado, cooked shrimp, and a sprinkle of fresh cilantro. Garnish with lime wedges on the side for an extra zesty kick.
Extra Tips: When making Zesty Gazpacho With Avocado and Shrimp, verify that your ingredients are as fresh as possible for the best flavor. Ripe tomatoes and avocado will contribute to the creaminess and richness of the dish.
If you want to add a bit of heat, consider incorporating a small jalapeño pepper when blending the base. Also, if you have time, prepare the gazpacho a day in advance to allow the flavors to fully develop. Finally, if you have leftovers, store them in an airtight container in the refrigerator for up to two days.
Fresh Caprese Salad With Balsamic Glaze
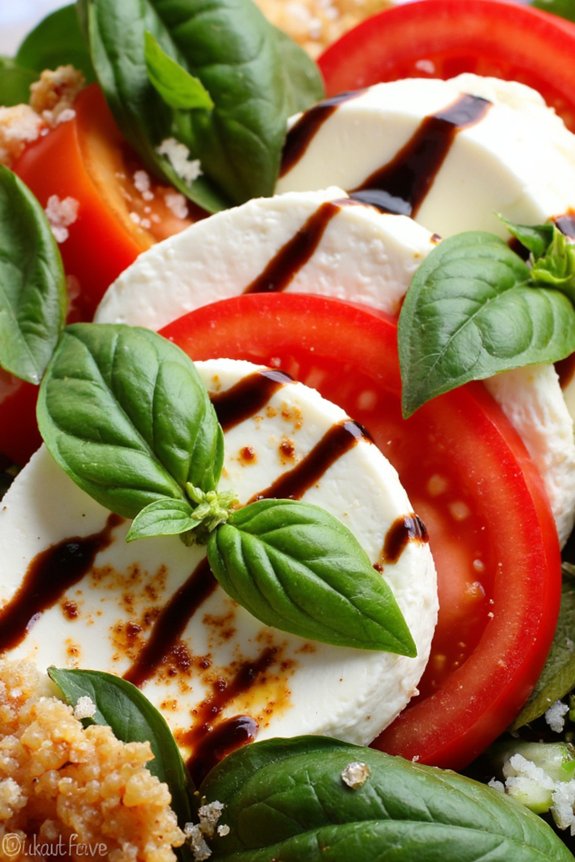
Fresh Caprese Salad With Balsamic Glaze is a delightful, no-cook dish that captures the essence of Italian cuisine. This invigorating salad is perfect for a quick dinner, a starter, or a side dish. With its vibrant colors and simple yet delicious flavors, the Caprese Salad is a tribute to the freshness of ripe tomatoes, the creaminess of mozzarella, and the fragrant touch of fresh basil. The addition of balsamic glaze elevates the dish by adding a sweet and tangy finish that balances the flavors beautifully.
Ideal for warm evenings or when you’re short on time, this salad is as beautiful as it’s tasty. The Caprese Salad is also highly versatile, allowing you to enjoy it in various settings, whether it’s a casual family dinner or an elegant gathering. The ingredients are readily available and require minimal preparation, making it an excellent choice for those who crave simplicity without compromising taste.
Ingredients (serving size: 4-6 people):
- 4 large ripe tomatoes
- 1 pound fresh mozzarella cheese
- 1 cup fresh basil leaves
- Salt, to taste
- Black pepper, to taste
- 1/2 cup balsamic glaze
- 1/4 cup extra virgin olive oil
Instructions:
- Prepare the Tomatoes: Begin by washing and drying the tomatoes. Slice them into 1/4-inch thick rounds. Arrange them on a large serving platter.
- Slice the Mozzarella: Take the fresh mozzarella cheese and slice it into 1/4-inch thick rounds, similar to the tomatoes. For a uniform look, try to match the diameter of the cheese slices with the tomato slices.
- Layer the Ingredients: On the serving platter with the tomatoes, alternate layers of tomato slices, mozzarella slices, and fresh basil leaves. Continue layering until all ingredients are used, creating a visually appealing pattern.
- Season and Dress the Salad: Lightly season the layered salad with salt and black pepper according to your taste. Drizzle the extra virgin olive oil evenly over the salad, followed by the balsamic glaze.
- Serve: Allow the salad to sit for a few minutes at room temperature to let the flavors meld together. Serve immediately and enjoy the freshness in every bite.
Extra Tips:
For the best results, use the freshest ingredients you can find. Opt for heirloom tomatoes when they’re in season for an added depth of flavor.
If you can’t find balsamic glaze, you can make your own by reducing balsamic vinegar in a saucepan until it thickens.
This dish can also be customized by adding a sprinkle of pine nuts or a few slices of avocado for an extra twist. Remember to serve the salad at room temperature for peak flavor.
Spicy Thai Peanut Noodle Salad
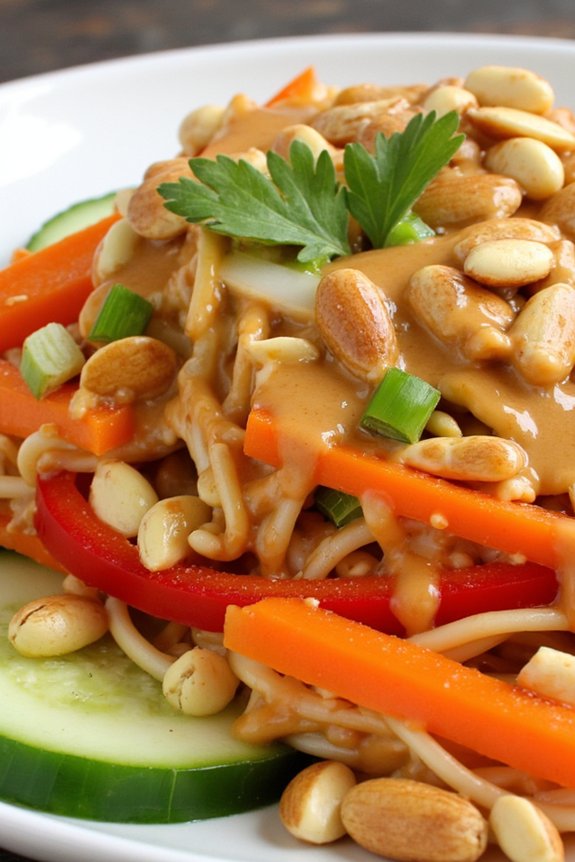
Spicy Thai Peanut Noodle Salad is a vibrant and flavorful dish that combines the rich creaminess of peanut sauce with the rejuvenating crunch of fresh vegetables. This no-cook recipe is perfect for warm days when you want something delicious without firing up the stove. It’s a delightful blend of spicy, sweet, and tangy flavors that will tantalize your taste buds.
The salad isn’t only easy to prepare but also packed with nutrients, making it a healthy and satisfying meal for lunch or dinner.
The beauty of the Spicy Thai Peanut Noodle Salad lies in its versatility and ease of preparation. With a few simple ingredients, you can whip up a dish that’s both visually appealing and incredibly tasty. The key is in the flavorful peanut dressing, which can be adjusted to suit your heat tolerance.
Whether you’re serving it as a main course or a side dish, this salad is sure to impress guests and family alike. It’s a great option for meal prep, potlucks, or a quick weeknight dinner.
Ingredients (Serving Size: 4-6 people):
- 12 ounces rice noodles
- 1 cup shredded carrots
- 1 red bell pepper, thinly sliced
- 1 cucumber, julienned
- 3 green onions, chopped
- 1/2 cup fresh cilantro, chopped
- 1/2 cup roasted peanuts, roughly chopped
- 1/4 cup soy sauce
- 1/4 cup creamy peanut butter
- 2 tablespoons lime juice
- 2 tablespoons rice vinegar
- 1 tablespoon honey
- 1 tablespoon sesame oil
- 1 tablespoon sriracha or chili paste (adjust to taste)
- 2 cloves garlic, minced
- Salt and pepper to taste
Instructions:
- Prepare the Noodles: Begin by soaking the rice noodles in warm water according to the package instructions until they’re soft. Once done, drain the noodles and rinse them under cold water to stop the cooking process. Set aside.
- Make the Peanut Dressing: In a medium mixing bowl, combine the soy sauce, peanut butter, lime juice, rice vinegar, honey, sesame oil, sriracha, and minced garlic. Whisk until smooth and well combined. Taste and adjust the seasoning with salt and pepper as needed.
- Assemble the Salad: In a large bowl, combine the softened rice noodles, shredded carrots, sliced red bell pepper, julienned cucumber, and chopped green onions. Pour the peanut dressing over the noodle mixture and toss everything together until well coated.
- Add the Toppings: Add the chopped fresh cilantro and roasted peanuts to the salad. Gently toss once more to confirm the toppings are evenly distributed.
- Serve: Transfer the Spicy Thai Peanut Noodle Salad to a serving platter or individual bowls. For an extra kick, you can add more sriracha on top before serving.
Extra Tips:
For a more protein-rich version, consider adding grilled chicken, shrimp, or tofu to the salad. If preparing ahead of time, keep the dressing separate and toss it with the salad just before serving to maintain the freshness and crunch of the vegetables.
Feel free to customize the vegetables based on what’s in season or your personal preference; snow peas or bean sprouts make excellent additions. Adjust the level of spice by varying the amount of sriracha according to your taste.
Creamy Chicken Caesar Wraps
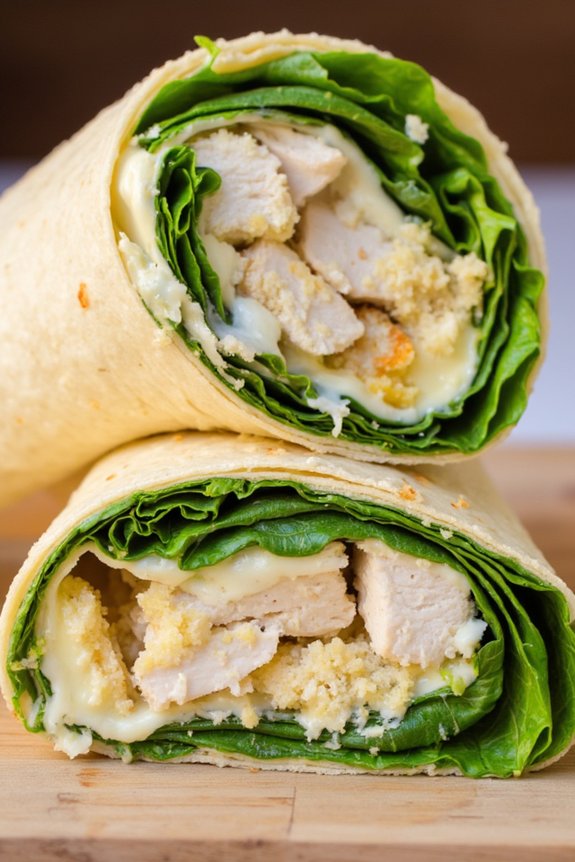
Looking for a no-fuss, quick dinner option that’s both delicious and satisfying? These Creamy Chicken Caesar Wraps are the perfect solution. They’re packed with flavor, require minimal preparation, and don’t require any cooking. Ideal for those warm nights when you want something light yet filling, these wraps bring together the classic taste of Caesar salad with the convenience of a wrap.
Not only are they great for dinner, but they also make excellent leftovers for a next-day lunch. The core of this dish is the creamy Caesar dressing that coats the tender chicken breast, crisp romaine lettuce, and savory Parmesan cheese. Wrapped in a soft tortilla, this dish is a delightful blend of textures and tastes that will please everyone at the table.
Whether you’re serving a family of four or a small dinner party of six, these wraps are quick to assemble and sure to be a hit.
Ingredients for 4-6 servings:
- 2 cups cooked chicken breast, shredded or diced
- 1 cup Caesar dressing
- 1/2 cup grated Parmesan cheese
- 6 cups romaine lettuce, chopped
- 6 large flour tortillas
- 1/2 cup croutons, slightly crushed
- Salt and pepper to taste
Instructions:
- Prepare the Ingredients: Begin by ensuring your chicken is cooked and either shredded or diced into bite-sized pieces. If using leftover chicken, make sure it’s chilled or at room temperature for easy handling.
- Mix the Dressing: In a large mixing bowl, combine the shredded chicken with the Caesar dressing. Stir until the chicken is evenly coated with the dressing. This forms the main filling of your wrap.
- Assemble the Wraps: Lay out the flour tortillas on a clean, flat surface. In the center of each tortilla, layer a generous portion of the Caesar chicken mixture.
- Add the Greens: Top the chicken with a handful of chopped romaine lettuce, ensuring an even distribution across all tortillas. This adds a fresh, crunchy texture to your wraps.
- Finish with Cheese and Croutons: Sprinkle grated Parmesan cheese over the lettuce, followed by a handful of slightly crushed croutons for added crunch. Season with salt and pepper to taste.
- Wrap It Up: Carefully fold one side of the tortilla over the filling, tuck in the sides, and roll it up tightly to enclose the ingredients. Repeat for all tortillas.
- Serve: Cut each wrap in half at a diagonal angle for an attractive presentation, and serve immediately.
Extra Tips:
For a more personalized touch, consider adding extra fillings such as sliced avocado, sun-dried tomatoes, or a sprinkle of bacon bits.
If you prefer a spicier kick, add a dash of hot sauce to the Caesar dressing before mixing with the chicken. This dish can also be made ahead of time; simply wrap each filled tortilla tightly in plastic wrap and store in the refrigerator for up to a day. Just unwrap and serve when ready to eat.
Mediterranean Hummus and Veggie Platter
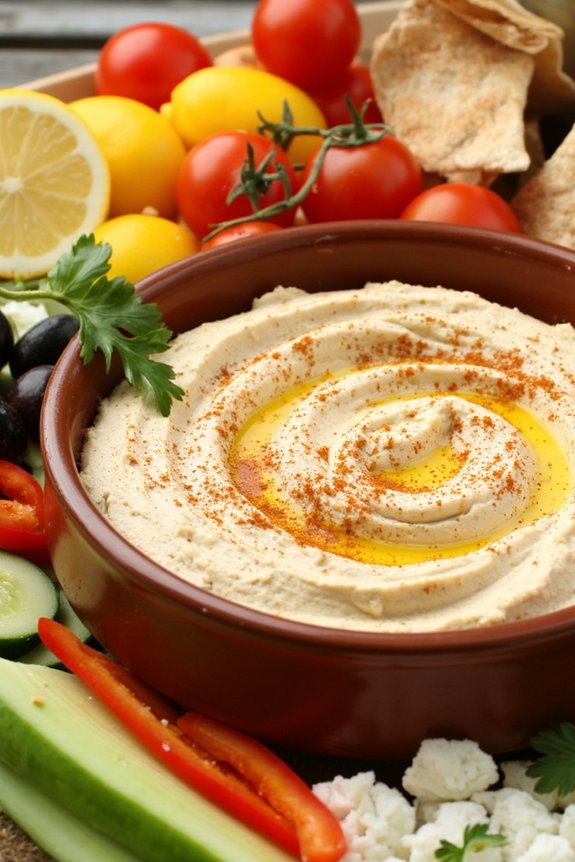
Mediterranean Hummus and Veggie Platter is a vibrant and wholesome dish that brings together the fresh flavors of the Mediterranean right to your table. This no-cook recipe is perfect for a quick and easy meal that doesn’t compromise on taste or nutrition. It’s loaded with creamy hummus, crisp vegetables, and flavorful accompaniments that make it a delightful choice for any occasion, whether it’s a casual family dinner or an impressive appetizer for a gathering.
The beauty of this dish lies in its simplicity and the freshness of its ingredients. With minimal preparation, you can create a colorful and satisfying platter that appeals to all senses. The rich, creamy hummus pairs perfectly with the crunch of fresh veggies, while olives and feta cheese add a delightful, savory depth to each bite.
This Mediterranean Hummus and Veggie Platter isn’t only visually appealing but also packed with nutrients, making it a delicious and health-conscious option.
Ingredients for 4-6 servings:
- 2 cups of store-bought or homemade hummus
- 2 cups of assorted cherry tomatoes, halved
- 2 cucumbers, sliced into rounds
- 1 red bell pepper, sliced into strips
- 1 yellow bell pepper, sliced into strips
- 1 cup Kalamata olives
- 1 cup crumbled feta cheese
- 1 cup of baby carrots
- 1 cup of pita bread or pita chips
- Fresh parsley for garnish
- 1 tablespoon of olive oil
- 1 teaspoon of paprika
- Lemon wedges for serving
Instructions:
- Prepare the Platter Base: Start by spreading the hummus evenly in the center of a large serving platter. Use a spoon to create a smooth surface and a slight dip in the center for a decorative touch.
- Arrange the Vegetables: Neatly arrange the cherry tomatoes, cucumber slices, red and yellow bell pepper strips, and baby carrots around the hummus. Try to alternate colors for a visually appealing presentation.
- Add the Savory Elements: Scatter the Kalamata olives and crumbled feta cheese over and around the vegetables. Verify they’re evenly distributed for consistent flavor in every bite.
- Garnish and Flavor: Drizzle olive oil over the hummus, then sprinkle paprika and freshly chopped parsley for added flavor and color contrast.
- Serve with Pita: Arrange the pita bread or pita chips around the edges of the platter for easy dipping. Add lemon wedges to the side for those who like a citrusy kick.
Extra Tips:
For a personalized touch, consider adding other Mediterranean favorites like marinated artichoke hearts, sun-dried tomatoes, or roasted red peppers. If you prefer a bit of heat, sprinkle some crushed red pepper flakes over the hummus.
This platter can be prepared in advance; simply cover it with plastic wrap and refrigerate until serving. When ready to serve, let it sit at room temperature for about 15 minutes to allow the hummus to soften and the flavors to meld beautifully.
Enjoy this dish with a glass of chilled white wine or iced tea for a revitalizing dining experience.
Southwest Black Bean and Corn Salad
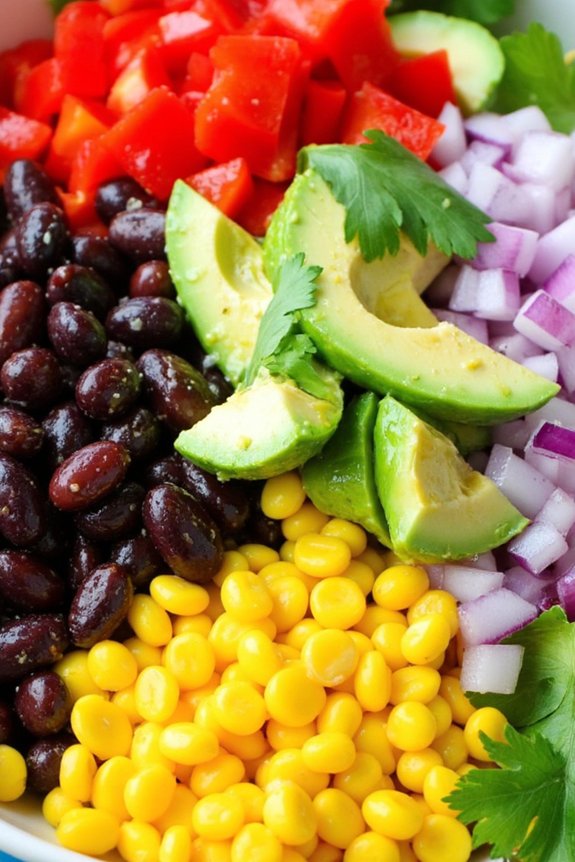
Southwest Black Bean and Corn Salad is a vibrant and nutritious dish that’s perfect for a no-cook dinner option. This salad is a wonderful mix of flavors and textures, featuring hearty black beans and crunchy corn, all tied together with a zesty lime dressing.
It’s not only easy to throw together but also packed with protein and fiber, making it both satisfying and healthy. Whether you’re looking for a quick lunch or a side dish for your dinner spread, this salad is a versatile choice that can be enjoyed on its own or paired with other dishes.
Ideal for serving 4-6 people, this Southwest Black Bean and Corn Salad can be made in minutes, requiring no heat at all. Perfect for those hot summer days or when you simply want a quick and invigorating meal, this dish will become a staple in your no-cook recipe collection.
The combination of fresh vegetables, beans, and spices creates a delightful dish that’s both visually appealing and deliciously aromatic.
Ingredients:
- 2 cans (15 oz each) black beans, drained and rinsed
- 2 cups frozen corn, thawed
- 1 red bell pepper, diced
- 1 small red onion, finely chopped
- 1 avocado, diced
- 1/4 cup fresh cilantro, chopped
- 1/4 cup lime juice (about 2 limes)
- 2 tablespoons olive oil
- 1 teaspoon ground cumin
- 1/2 teaspoon chili powder
- Salt and pepper to taste
Instructions:
1. Prepare the Ingredients: Begin by draining and rinsing the black beans thoroughly in a colander. Allow them to drip dry while you prepare the rest of the ingredients.
Dice the red bell pepper and avocado, and finely chop the red onion and fresh cilantro.
2. Mix the Salad: In a large mixing bowl, combine the black beans, thawed corn, diced red bell pepper, chopped red onion, and avocado.
3. Make the Dressing: In a small bowl, whisk together the lime juice, olive oil, ground cumin, and chili powder. Season with salt and pepper to taste.
4. Combine and Toss: Pour the dressing over the bean and corn mixture. Add the chopped cilantro. Gently toss everything together until all ingredients are well-coated with the dressing.
5. Chill and Serve: For best results, refrigerate the salad for at least 30 minutes to allow the flavors to meld. Serve chilled as a standalone dish or alongside grilled meats or tacos.
Extra Tips:
For added flavor, consider using grilled corn instead of frozen for a smoky taste. If you prefer a bit of heat, you can add a diced jalapeño to the mix.
The salad can be made a day in advance and stored in the refrigerator, which allows the flavors to develop further. Just be sure to add the avocado right before serving to guarantee it stays fresh and vibrant.
Adjust the seasoning to your liking, and feel free to experiment with additional spices or herbs.
Smoked Salmon and Cream Cheese Bagels
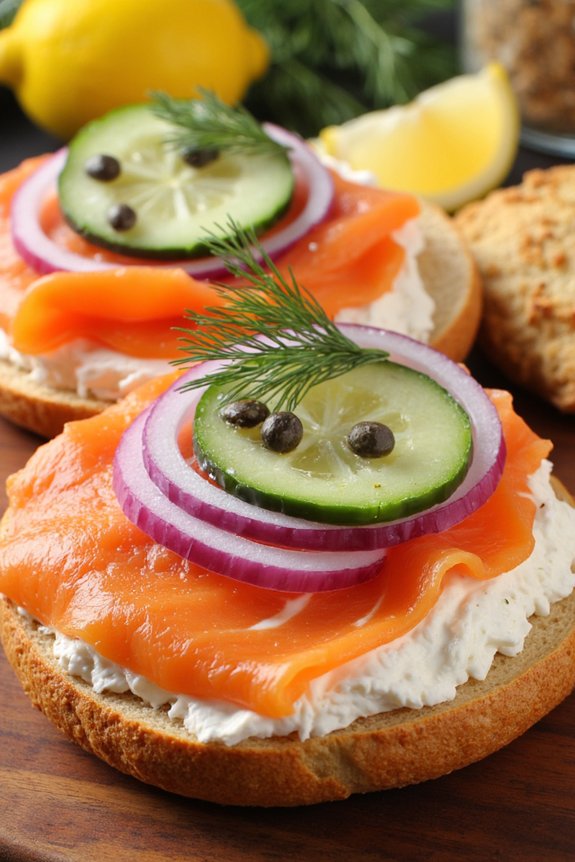
Smoked salmon and cream cheese bagels are a delightful, no-cook dinner option that combines savory and creamy flavors with a hint of freshness from vegetables and herbs. This dish is perfect for when you want something quick yet satisfying, without having to turn on the stove. Ideal for a light dinner or brunch, these bagels provide a gourmet feel with minimal effort.
The combination of flavors and textures makes it a crowd-pleaser, suitable for family gatherings, picnics, or even a casual dinner party.
One of the best things about smoked salmon and cream cheese bagels is their versatility. You can easily customize them to your liking by adding different toppings or using various types of bagels. Whether you prefer plain, everything, or whole grain, the key lies in balancing the flavors with quality ingredients.
This recipe provides a delightful balance of the rich cream cheese, the smoky salmon, and the fresh, crisp vegetables, making it an irresistible choice for a quick yet elegant meal.
Ingredients (Serves 4-6):
- 6 bagels of your choice (plain, everything, or whole grain)
- 8 ounces of cream cheese
- 8 ounces of smoked salmon
- 1 small red onion, thinly sliced
- 1 large cucumber, thinly sliced
- 1 cup of capers
- 1/4 cup of fresh dill, chopped
- 1 lemon, cut into wedges
- Salt and pepper to taste
Instructions:
- Prepare the Bagels: Begin by slicing the bagels in half horizontally. If desired, lightly toast them to add a bit of crunch, but this step is optional and not necessary for a no-cook preparation.
- Spread the Cream Cheese: Evenly spread a generous amount of cream cheese on each half of the bagels. Make sure that the cream cheese is at room temperature for easy spreading.
- Layer the Ingredients: Lay slices of smoked salmon over the cream cheese. Arrange them so that each bite will have a good amount of salmon.
- Add Vegetables: Place a few slices of red onion and cucumber on top of the salmon. The onions add a bit of tang and crunch, while the cucumbers add freshness and contrast.
- Garnish with Capers and Dill: Sprinkle capers generously over the top of the vegetables. These add a salty kick that complements the salmon. Garnish with fresh dill for a burst of herby flavor.
- Season and Serve: Season with a light sprinkle of salt and pepper, to taste. Serve the bagels with lemon wedges on the side for those who want a citrusy brightness.
Extra Tips:
When preparing smoked salmon and cream cheese bagels, using high-quality ingredients can make a significant difference in taste. Opt for wild-caught smoked salmon if possible, as it tends to have a richer flavor.
For cream cheese, full-fat varieties offer the best texture and taste for spreading. Make sure all your ingredients are fresh, especially the vegetables, to maintain the desired crispness and flavor.
Additionally, if you’re preparing these in advance, keep the components separate until serving to prevent the bagels from becoming soggy.
Crunchy Asian Slaw With Tofu
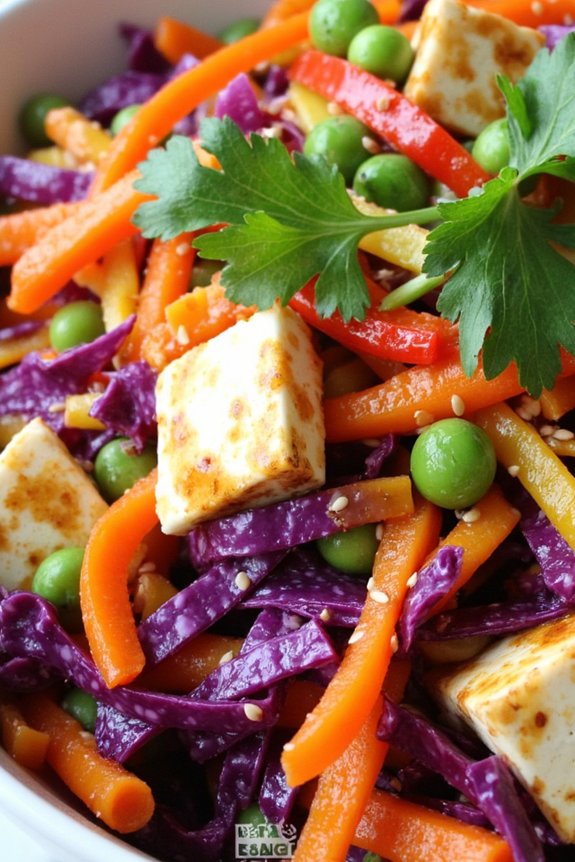
Crunchy Asian Slaw With Tofu is a revitalizing and satisfying dish that’s perfect for a quick and healthy no-cook dinner. Combining vibrant vegetables with protein-rich tofu, this slaw isn’t only nutritious but also incredibly flavorful. The crunchy textures and zesty Asian-inspired dressing make it a delightful choice for those warm evenings when you want something light yet fulfilling.
This recipe is ideal for serving 4 to 6 people and is perfect for a family dinner or a small gathering with friends. The preparation involves no cooking, making it an excellent option for those who prefer quick and easy meals. With a medley of fresh vegetables and a tangy dressing, Crunchy Asian Slaw With Tofu is sure to become a staple in your repertoire of no-cook recipes.
Ingredients:
- 1 block (14 oz) of firm tofu
- 4 cups of shredded cabbage (mix of green and purple)
- 1 cup of shredded carrots
- 1 red bell pepper, thinly sliced
- 1 cup of edamame beans (shelled)
- 4 green onions, thinly sliced
- 1/2 cup of fresh cilantro, roughly chopped
- 1/4 cup of toasted sesame seeds
- 1/4 cup of soy sauce
- 2 tablespoons of rice vinegar
- 1 tablespoon of sesame oil
- 1 tablespoon of honey or maple syrup
- 1 tablespoon of lime juice
- 1 teaspoon of grated ginger
- Salt and pepper to taste
Instructions:
- Prepare the Tofu: Drain the tofu and pat it dry with a clean towel to remove any excess moisture. Cut the tofu into small cubes and set aside.
- Mix the Vegetables: In a large bowl, combine the shredded cabbage, carrots, red bell pepper, edamame beans, and green onions. Toss them together to guarantee an even mix of ingredients.
- Make the Dressing: In a small bowl, whisk together the soy sauce, rice vinegar, sesame oil, honey (or maple syrup), lime juice, and grated ginger. Season with salt and pepper to taste. Adjust the flavors according to your preference.
- Assemble the Slaw: Add the cubed tofu to the mixed vegetables. Pour the dressing over the slaw and toss everything together until the vegetables and tofu are well coated with the dressing.
- Add Fresh Herbs and Seeds: Gently fold in the chopped cilantro and sprinkle the toasted sesame seeds over the slaw for added crunch and flavor.
- Serve: Transfer the slaw to a serving platter or individual bowls. Serve immediately for the best texture and taste.
Extra Tips:
For an extra burst of flavor, consider adding a dash of chili flakes or a finely sliced chili pepper to the dressing if you enjoy a bit of heat.
If you have time, let the slaw sit in the refrigerator for about 15-20 minutes before serving; this allows the flavors to meld together beautifully.
Remember to always use fresh, high-quality vegetables to guarantee maximum crunch and taste in your slaw. Enjoy this delicious and easy no-cook dinner with a side of crusty bread or rice crackers for a complete meal.
Hearty Chickpea and Quinoa Bowl
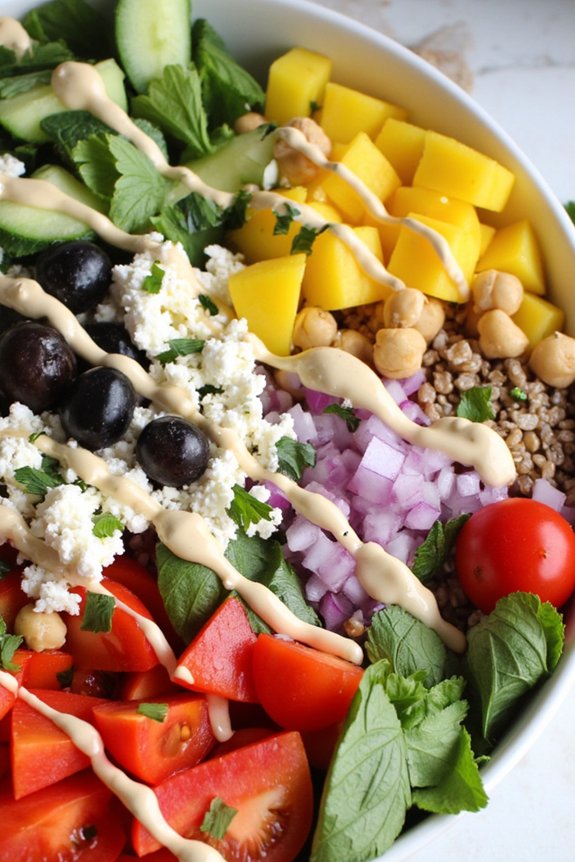
Hearty Chickpea and Quinoa Bowl is the perfect no-cook dinner recipe for those nights when you want something nutritious and satisfying without turning on the stove. This dish combines protein-rich chickpeas and quinoa with a medley of fresh vegetables and a tangy lemon-tahini dressing, creating a hearty meal that’s both revitalizing and filling.
It’s an ideal choice for busy evenings, as it requires minimal preparation and can be easily customized to suit your taste preferences.
The beauty of this Hearty Chickpea and Quinoa Bowl lies in its versatility. You can mix and match your favorite vegetables, add in different types of beans, or swap the quinoa for another grain like couscous or bulgur. The lemon-tahini dressing ties all the flavors together, offering a creamy and zesty finish that elevates the entire dish.
Serve this bowl chilled or at room temperature, making it a great option for picnics, potlucks, or meal prepping for the week ahead.
Ingredients (Serves 4-6):
- 1 can (15 oz) chickpeas, drained and rinsed
- 2 cups cooked quinoa
- 1 cup cherry tomatoes, halved
- 1 cucumber, diced
- 1 red bell pepper, diced
- 1 small red onion, finely chopped
- 1/4 cup fresh parsley, chopped
- 1/4 cup fresh mint, chopped
- 1/2 cup crumbled feta cheese
- 1/4 cup kalamata olives, pitted and sliced
For the Dressing:
- 1/3 cup tahini
- 1/4 cup freshly squeezed lemon juice
- 2 tablespoons olive oil
- 1 clove garlic, minced
- Salt and pepper to taste
- Water, to thin as needed
Instructions:
- Prepare the Quinoa: If you haven’t already cooked the quinoa, start by rinsing it under cold water, then cook according to package instructions. Allow it to cool before using it in the salad.
- Assemble the Bowl: In a large mixing bowl, combine the drained chickpeas, cooked quinoa, cherry tomatoes, cucumber, red bell pepper, red onion, parsley, mint, feta cheese, and olives. Mix well to combine all the ingredients evenly.
- Make the Dressing: In a small bowl, whisk together the tahini, lemon juice, olive oil, and minced garlic until smooth. Season with salt and pepper to taste. If the dressing is too thick, add water a tablespoon at a time until you reach your desired consistency.
- Dress the Salad: Pour the dressing over the chickpea and quinoa mixture. Toss everything together until the dressing is evenly distributed throughout the salad.
- Serve: Divide the salad into individual bowls or serve it family-style in a large dish. It’s ready to eat immediately but can also be chilled for about 30 minutes for a more invigorating taste.
Extra Tips:
Feel free to experiment with additional ingredients such as roasted red peppers, sun-dried tomatoes, or avocado for added flavor and texture.
If you prefer a bit of heat, add a pinch of red pepper flakes to the dressing. This dish can be prepared a day in advance and stored in the refrigerator; just keep the dressing separate until you’re ready to serve to prevent the salad from becoming soggy.
Enjoy your Hearty Chickpea and Quinoa Bowl as a main course or pair it with a simple soup or crusty bread for a complete meal.
Tropical Fruit and Yogurt Parfait
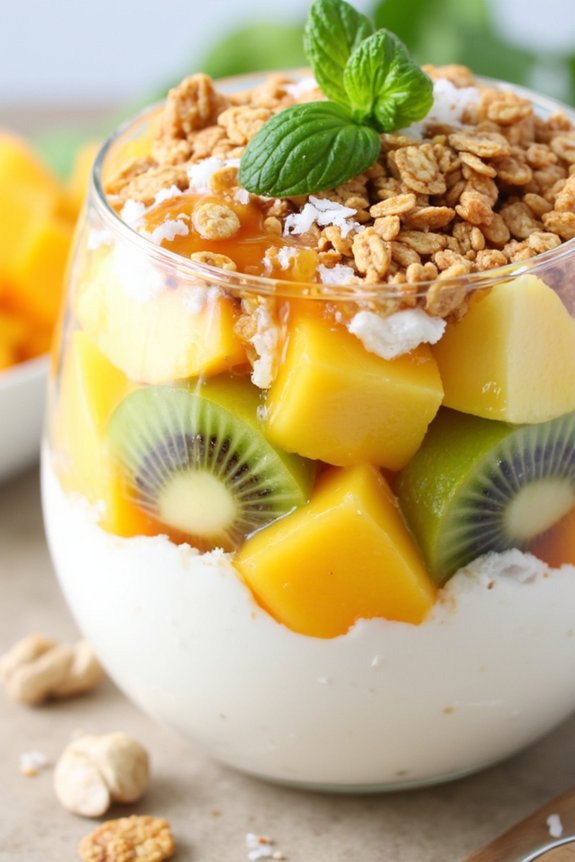
Indulge in the revitalizing and vibrant flavors of the tropics with this delightful Tropical Fruit and Yogurt Parfait. This no-cook dish is perfect for those hot summer days when you crave something cool and satisfying without turning on the stove. With layers of creamy yogurt, juicy tropical fruits, and a crunchy granola topping, this parfait isn’t only delicious but also packed with nutrients.
It’s a versatile dish that can be served as a breakfast treat, a midday snack, or even a light dessert. The beauty of this parfait is in its simplicity and the freshness of the ingredients. By combining ripe, juicy fruits like mango, pineapple, and kiwi with creamy Greek yogurt, you create a delightful contrast of textures and flavors.
The addition of granola adds a satisfying crunch, making each spoonful a delight. This dish isn’t only easy to assemble but can also be made ahead of time, making it perfect for entertaining or for a quick grab-and-go breakfast.
Ingredients for 4-6 servings:
- 2 cups of Greek yogurt
- 1 cup of fresh mango, diced
- 1 cup of fresh pineapple, diced
- 1 cup of kiwi, peeled and diced
- 1/2 cup of shredded coconut
- 1 cup of granola
- 2 tablespoons of honey
- Mint leaves for garnish (optional)
Instructions:
- Prepare the Fruit: Begin by washing, peeling, and dicing the mango, pineapple, and kiwi. Aim for uniform-sized pieces to guarantee an even distribution of flavors in each layer.
- Layer the Parfait: In a glass or bowl, start by adding a generous spoonful of Greek yogurt as the base layer. Smooth it out with the back of the spoon to create an even layer.
- Add the Fruit: Sprinkle a portion of the diced mango, pineapple, and kiwi over the yogurt. Try to distribute the fruit evenly to guarantee a burst of flavor in every bite.
- Sprinkle with Coconut: Add a layer of shredded coconut over the fruit. This will add a subtle nutty flavor and enhance the tropical essence of the parfait.
- Repeat the Layers: Repeat the layers of yogurt, fruit, and coconut until the glass is almost full. Confirm the top layer is yogurt to hold the granola in place.
- Top with Granola: Add a generous layer of granola on top of the yogurt. The granola will provide a delightful crunch and complement the creaminess of the yogurt and the juiciness of the fruit.
- Drizzle with Honey: Finish by drizzling a small amount of honey over the granola for added sweetness and shine.
- Garnish and Serve: If desired, garnish with fresh mint leaves for an extra touch of freshness and serve immediately.
Extra Tips:
To enhance the flavors further, consider using a vanilla-flavored Greek yogurt or adding a dash of vanilla extract to plain yogurt. If you’re making the parfaits ahead of time, keep the granola separate until just before serving to prevent it from becoming soggy.
Feel free to customize your parfait by incorporating other tropical fruits like papaya or passion fruit, or by using flavored granola for an extra twist. Adjust the sweetness to your liking by reducing or increasing the honey, and enjoy this tropical treat any time of the day!