

Life with family can get pretty busy, and cooking a hearty meal sometimes feels impossible. That’s why these cozy, easy crock pot recipes are such lifesavers. They’re friendly on the budget and ideal for nights when you want a fuss-free dinner at the table. Picture a classic beef stew or creamy chicken soup wafting through your home. Ready to check out the rest of the recipes? Let’s get started!
Classic Beef Stew
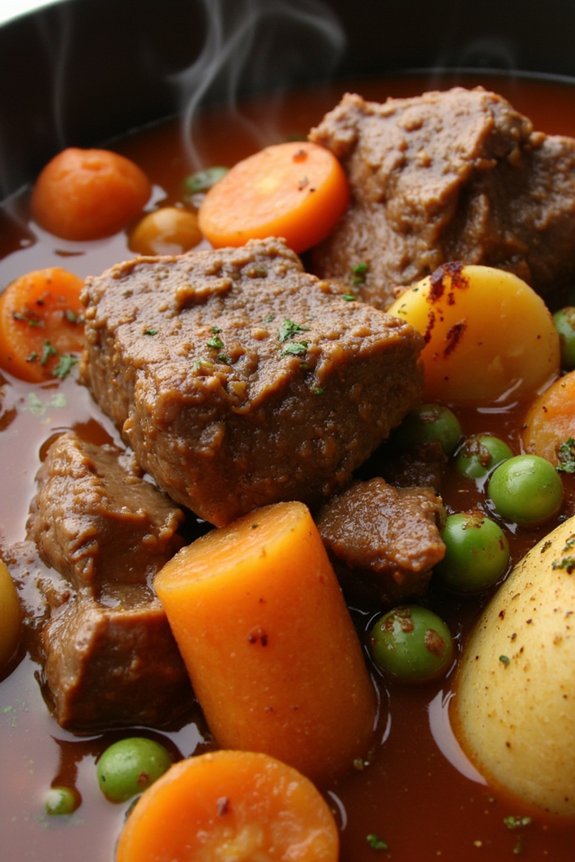
Classic Beef Stew is a hearty, comforting dish that’s perfect for a cozy dinner with family or friends. This traditional recipe features tender chunks of beef simmered to perfection in a rich, savory broth filled with an array of vegetables and aromatic herbs. The slow-cooking process allows the flavors to meld beautifully, resulting in a dish that’s both satisfying and deeply flavorful.
Perfect for a chilly evening, this stew is certain to warm you from the inside out. This Classic Beef Stew recipe serves 4-6 people and is ideal for both novice and experienced cooks looking to create a delicious meal with ease. Using simple ingredients and straightforward steps, you’ll be able to whip up this comforting dish without much fuss.
Whether you’re preparing it for a weeknight dinner or a special occasion, this beef stew will undoubtedly be a hit with everyone at the table.
Ingredients:
- 2 pounds beef chuck, cut into 1-inch cubes
- 3 tablespoons vegetable oil
- 1 large onion, chopped
- 3 cloves garlic, minced
- 2 tablespoons tomato paste
- 4 cups beef broth
- 1 cup red wine (optional)
- 2 bay leaves
- 1 teaspoon dried thyme
- Salt and pepper to taste
- 4 large carrots, peeled and sliced
- 4 large potatoes, peeled and diced
- 2 stalks celery, sliced
- 1 cup frozen peas
Instructions:
- Prepare the Beef: Pat the beef cubes dry with paper towels to guarantee they brown properly. Season them with salt and pepper.
- Brown the Beef: In a large pot or Dutch oven, heat 2 tablespoons of vegetable oil over medium-high heat. Add the beef in batches, making sure not to overcrowd the pot. Brown the beef on all sides, then remove it from the pot and set it aside.
- Sauté the Aromatics: Add the remaining tablespoon of oil to the pot, then add the chopped onion. Sauté for about 5 minutes until the onion is soft and translucent. Add the minced garlic and cook for another minute.
- Add Tomato Paste: Stir in the tomato paste and cook for about 2 minutes, allowing it to caramelize slightly.
- Deglaze the Pot: Pour in the red wine (if using) and scrape up any browned bits from the bottom of the pot. Allow the wine to reduce by half.
- Simmer the Stew: Return the beef to the pot, then add the beef broth, bay leaves, thyme, and a bit more salt and pepper. Bring the mixture to a boil, then reduce the heat to low and cover the pot. Simmer for 1 hour.
- Add Vegetables: After an hour, add the carrots, potatoes, and celery to the pot. Continue simmering, covered, for another hour or until the beef and vegetables are tender.
- Finish the Stew: Remove the bay leaves and stir in the frozen peas. Cook for an additional 5 minutes until the peas are heated through. Taste and adjust seasoning if necessary.
Extra Tips:
For a thicker stew, you can mash a few of the potatoes against the side of the pot or add a slurry of cornstarch and water towards the end of cooking. If you prefer a stew with a deeper flavor, consider making it a day in advance—this allows the flavors to develop even more.
When reheating, add a splash of beef broth or water to loosen the stew if it has thickened too much. Enjoy your Classic Beef Stew with a side of crusty bread to soak up all the delicious broth!
Creamy Chicken and Wild Rice Soup

Creamy Chicken and Wild Rice Soup is a comforting and hearty meal that’s perfect for a cozy dinner at home. This dish combines tender chicken, earthy wild rice, and a creamy broth infused with aromatic herbs and vegetables, creating a satisfying blend of flavors and textures. Ideal for colder months or any time you’re in need of a comforting meal, this soup is sure to be a crowd-pleaser in your household.
Preparing this soup is simple and requires only a handful of ingredients, making it a perfect choice for busy weeknights when you want a homemade meal without spending hours in the kitchen. Whether you’re serving it as a starter or the main course, this creamy chicken and wild rice soup is versatile and can be paired with a fresh salad or warm bread for a complete meal. Below, you’ll find the ingredients and step-by-step instructions needed to prepare this delicious dish for 4-6 people.
Ingredients (serving size: 4-6 people):
- 2 tablespoons olive oil
- 1 medium onion, diced
- 2 carrots, peeled and diced
- 2 celery stalks, diced
- 3 cloves garlic, minced
- 1 teaspoon dried thyme
- 1 teaspoon dried rosemary
- Salt and pepper to taste
- 4 cups chicken broth
- 1 cup wild rice, rinsed and drained
- 2 cups cooked chicken, shredded
- 1 cup heavy cream
- 2 tablespoons all-purpose flour
- 1/4 cup fresh parsley, chopped
Cooking Instructions:
- Sauté the Vegetables: In a large pot, heat the olive oil over medium heat. Add the diced onion, carrots, and celery, and sauté for about 5-7 minutes until the vegetables are softened. Stir in the minced garlic, thyme, rosemary, salt, and pepper, and cook for an additional minute until fragrant.
- Add Broth and Rice: Pour in the chicken broth and bring the mixture to a boil. Add the rinsed wild rice, reduce the heat to low, cover the pot, and let it simmer for about 45-50 minutes, or until the rice is tender.
- Incorporate Chicken: Once the rice is cooked, stir in the shredded chicken. Allow it to heat through, which should take about 5 minutes.
- Make it Creamy: In a separate small bowl, whisk together the heavy cream and flour until smooth. Slowly pour this mixture into the soup, stirring constantly to avoid lumps. Continue to cook for another 5-10 minutes until the soup has thickened to your desired consistency.
- Finish and Serve: Stir in the chopped parsley, taste, and adjust the seasoning if necessary. Remove the soup from heat and serve hot, garnished with additional parsley if desired.
Extra Tips: To make this soup even more flavorful, consider using homemade chicken broth or adding a splash of white wine when sautéing the vegetables. If you prefer a thicker soup, simply increase the amount of flour in the cream mixture. For a lighter version, substitute half-and-half for heavy cream.
Additionally, this soup can be made ahead of time and stored in the refrigerator for up to three days, making it an excellent dish for meal prepping. Reheat gently on the stovetop, adding a bit more broth or cream if it thickens too much when chilled.
Savory Pot Roast With Vegetables
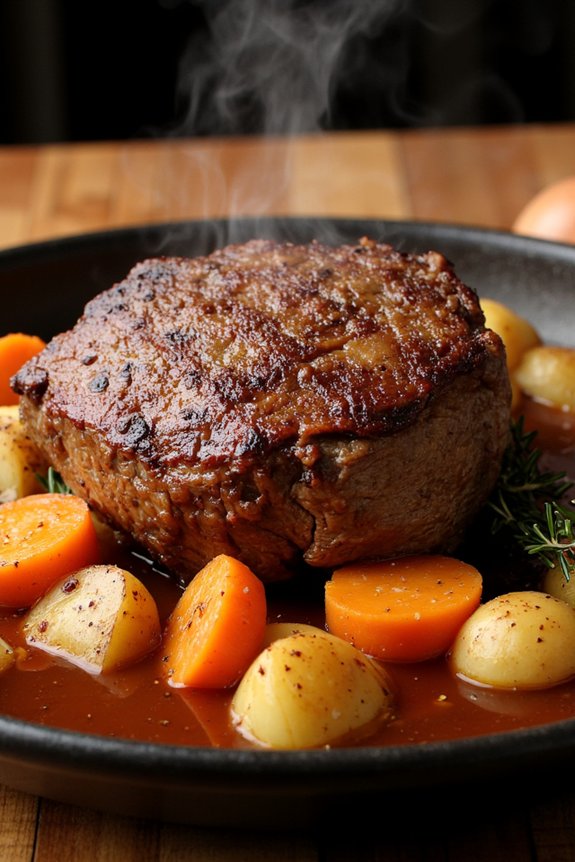
Savory Pot Roast With Vegetables is a classic comfort dish that combines tender beef with a medley of flavorful vegetables, slow-cooked to perfection. This hearty meal is perfect for family dinners or any gathering where you want to impress your guests with a dish that’s both satisfying and easy to make. The slow-cooking process allows the flavors to meld together beautifully, resulting in a meal that’s rich in taste and aroma.
The beauty of a pot roast lies in its simplicity and the ease with which it can be prepared. Once the initial preparation is done, the oven takes over, allowing you to attend to other tasks or simply relax while dinner cooks itself. This recipe serves 4-6 people, making it ideal for a family meal or for entertaining friends. With the right ingredients and a bit of patience, you’ll have a delicious pot roast that everyone will enjoy.
Ingredients (for 4-6 servings):
- 3-4 pounds beef chuck roast
- 2 tablespoons olive oil
- Salt and pepper to taste
- 4 cloves garlic, minced
- 1 large onion, chopped
- 4 carrots, peeled and cut into 2-inch pieces
- 4 potatoes, peeled and quartered
- 2 cups beef broth
- 1 cup red wine (optional)
- 2 tablespoons tomato paste
- 2 teaspoons dried thyme
- 2 teaspoons dried rosemary
- 2 bay leaves
Instructions:
- Preheat Oven: Preheat your oven to 325°F (165°C) to guarantee it’s ready for slow cooking.
- Season the Roast: Generously season the beef chuck roast with salt and pepper on all sides.
- Sear the Roast: In a large oven-safe pot or Dutch oven, heat olive oil over medium-high heat. Sear the roast on all sides until browned, about 4-5 minutes per side. This step is essential for locking in the flavors.
- Add Aromatics: Remove the roast from the pot and set aside. In the same pot, add the minced garlic and chopped onion. Sauté until the onions are translucent, about 3-4 minutes.
- Deglaze the Pot: Pour in the red wine (if using) and scrape up any brown bits from the bottom of the pot. This deglazing adds depth to the flavor of the dish.
- Combine Ingredients: Return the roast to the pot. Add the carrots, potatoes, beef broth, tomato paste, thyme, rosemary, and bay leaves. Stir to combine everything.
- Cook the Pot Roast: Cover the pot with a lid and transfer it to the preheated oven. Allow it to cook for about 3-4 hours, or until the meat is fork-tender. Check occasionally to verify there’s enough liquid; add more broth if necessary.
- Check for Doneness: Once the roast is tender, remove it from the oven. Discard the bay leaves. Taste and adjust the seasonings if needed.
- Serve: Slice the beef and serve it with the cooked vegetables, ladling the rich sauce over the top.
Extra Tips:
For the best results, choose a well-marbled chuck roast, as the fat will render during cooking and enhance the flavor and tenderness of the meat.
If you prefer a thicker sauce, you can remove the roast and vegetables once cooked and simmer the liquid on the stovetop until reduced to your desired consistency. Alternatively, mix a tablespoon of cornstarch with water and stir it into the sauce to thicken.
Enjoy your Savory Pot Roast With Vegetables with a side of crusty bread to soak up the delicious sauce!
Hearty Lentil and Vegetable Chili

Hearty Lentil and Vegetable Chili is a wholesome and satisfying dish that’s perfect for any occasion. This recipe combines protein-rich lentils with a medley of fresh vegetables and aromatic spices to create a chili that isn’t only delicious but also nourishing.
It’s an ideal meal for those looking for a comforting dinner that’s both hearty and healthy. This dish is also completely vegetarian and can easily be made vegan, making it suitable for a wide range of dietary preferences.
The process of making this chili is straightforward and requires minimal prep, making it an excellent choice for a busy weeknight dinner. The flavors meld beautifully as the chili simmers, allowing the spices to infuse into the vegetables and lentils.
This recipe serves 4-6 people, making it perfect for a family meal or for meal prepping for the week ahead. Whether you’re a seasoned cook or a beginner, this Hearty Lentil and Vegetable Chili is sure to become a staple in your dinner rotation.
Ingredients for 4-6 servings:
- 1 tablespoon olive oil
- 1 large onion, diced
- 2 cloves garlic, minced
- 2 carrots, diced
- 2 celery stalks, diced
- 1 red bell pepper, diced
- 1 green bell pepper, diced
- 1 zucchini, diced
- 1 cup dried green or brown lentils, rinsed
- 1 can (14 ounces) diced tomatoes
- 4 cups vegetable broth
- 2 tablespoons tomato paste
- 1 tablespoon chili powder
- 1 teaspoon ground cumin
- 1 teaspoon smoked paprika
- Salt and pepper to taste
- Optional toppings: fresh cilantro, avocado slices, lime wedges
Instructions:
- Prepare the Ingredients: Begin by preparing all your vegetables. Dice the onion, carrots, celery, bell peppers, and zucchini. Mince the garlic and rinse the lentils thoroughly under cold water.
- Sauté the Vegetables: In a large pot or Dutch oven, heat the olive oil over medium heat. Add the diced onion and garlic, and sauté for about 3-4 minutes until the onion becomes translucent.
- Add More Vegetables: Add the carrots, celery, red and green bell peppers, and zucchini to the pot. Stir well and cook for another 5-7 minutes until the vegetables begin to soften.
- Incorporate the Lentils and Tomatoes: Stir in the rinsed lentils, canned diced tomatoes, and tomato paste. Mix everything well to make certain the tomato paste is evenly distributed.
- Season the Chili: Add the chili powder, ground cumin, smoked paprika, salt, and pepper to the pot. Stir to combine all the spices with the vegetables and lentils.
- Simmer the Chili: Pour in the vegetable broth, bring the mixture to a boil, then reduce the heat to low. Cover the pot and let it simmer for 30-35 minutes, or until the lentils are tender and cooked through.
- Adjust Seasoning: Taste the chili and adjust the seasoning if necessary, adding more salt, pepper, or spices to suit your preference.
- Serve: Once the chili is ready, serve it hot with your choice of optional toppings such as fresh cilantro, avocado slices, and lime wedges for added flavor.
Extra Tips:
To intensify the flavors, consider preparing the chili a day in advance and reheating it before serving. The flavors will deepen as they sit overnight.
If you prefer a spicier kick, feel free to add a pinch of cayenne pepper or a chopped jalapeño when adding the spices.
For a thicker consistency, you can mash some of the lentils with a potato masher or the back of a spoon. This dish freezes well, so consider making a double batch and storing portions in airtight containers for easy future meals.
BBQ Pulled Pork Sandwiches

BBQ Pulled Pork Sandwiches are a delicious and satisfying meal that brings the flavors of a classic barbecue to your dining table. This dish is perfect for family gatherings or a casual dinner with friends, offering a hearty and flavorful experience. The tender, slow-cooked pork is infused with rich barbecue sauce, then piled high on a soft bun and paired with your choice of toppings for an irresistible sandwich.
To create these mouthwatering sandwiches, you’ll need to start with a good cut of pork, like a pork shoulder or Boston butt, which will become incredibly tender after cooking. The slow-cooking process allows the pork to absorb the flavors of a homemade or store-bought barbecue sauce, resulting in savory, juicy meat that falls apart with a fork. Serve these sandwiches with coleslaw or pickles for an added crunch and a perfect balance of flavors.
Ingredients (Serves 4-6)
- 3-4 pounds pork shoulder or Boston butt
- 1 large onion, sliced
- 2 cups barbecue sauce
- 1 cup chicken broth
- 1 tablespoon brown sugar
- 1 tablespoon smoked paprika
- 1 teaspoon garlic powder
- 1 teaspoon onion powder
- 1 teaspoon salt
- 1 teaspoon black pepper
- 6 hamburger buns or sandwich rolls
- Coleslaw (optional, for topping)
- Pickles (optional, for topping)
Cooking Instructions
- Prepare the Pork: Begin by trimming any excess fat from the pork shoulder. Rub the pork with a mixture of smoked paprika, garlic powder, onion powder, salt, and pepper, ensuring the meat is evenly coated with spices.
- Setup the Slow Cooker: Place the sliced onions at the bottom of your slow cooker. This will create a flavorful base for the pork to cook on and add depth to your sauce.
- Cook the Pork: Place the seasoned pork shoulder on top of the onions. In a separate bowl, combine the barbecue sauce, chicken broth, and brown sugar, then pour this mixture over the pork.
- Slow-Cook the Pork: Cover the slow cooker and cook on low for 8-10 hours or on high for 4-6 hours. The pork should be tender and easily shredded with a fork.
- Shred the Pork: Once cooked, remove the pork from the slow cooker and place it on a cutting board. Use two forks to shred the meat, discarding any large pieces of fat.
- Combine with Sauce: Return the shredded pork to the slow cooker and mix it with the juices and onions until well combined. Let it soak for an additional 10-15 minutes on the warm setting to absorb more flavor.
- Assemble the Sandwiches: Toast the hamburger buns if desired, then generously pile the pulled pork onto each bun. Top with coleslaw and pickles if using, and serve immediately.
Extra Tips
For the best flavor, consider preparing your BBQ pulled pork a day in advance. This allows the flavors to meld and intensify overnight.
Additionally, if you prefer a spicier kick, add a pinch of cayenne pepper or a few dashes of hot sauce to the barbecue sauce mixture.
If you’re short on time, you can also use a pressure cooker to speed up the cooking process, but be sure to follow the manufacturer’s instructions for cooking times and safety.
Chicken Cacciatore

Chicken Cacciatore, an Italian classic, is a hearty and flavorful dish that’s perfect for an easy dinner. Also known as “hunter’s chicken,” this rustic meal combines tender chicken with a medley of tomatoes, bell peppers, onions, and aromatic herbs. The dish is typically simmered until all the flavors meld together, creating a rich sauce that beautifully coats the chicken.
It’s a comforting meal that can be enjoyed on its own or served over pasta, rice, or crusty bread to soak up the savory sauce.
While Chicken Cacciatore may sound fancy, it’s surprisingly simple to make. The key is to let the ingredients slowly cook together, allowing each component to contribute to the overall depth of flavor. This recipe is perfect for a family dinner, serving 4-6 people, and is easily adaptable to suit your taste by adding more vegetables or adjusting the spices.
Whether you’re a seasoned cook or a beginner, you’ll find that Chicken Cacciatore is a delightful dish to prepare and enjoy.
Ingredients for 4-6 Servings:
- 6 chicken thighs, bone-in and skin-on
- 2 tablespoons olive oil
- 1 large onion, sliced
- 1 red bell pepper, sliced
- 1 yellow bell pepper, sliced
- 3 cloves garlic, minced
- 1 can (28 ounces) crushed tomatoes
- 1/2 cup chicken broth
- 1/2 cup dry white wine (optional)
- 1 teaspoon dried oregano
- 1 teaspoon dried basil
- 1/2 teaspoon red pepper flakes
- Salt and pepper to taste
- 1/4 cup fresh parsley, chopped
- Fresh basil leaves for garnish (optional)
Cooking Instructions:
- Prepare the Chicken: Season the chicken thighs with salt and pepper on both sides. Heat olive oil in a large skillet or Dutch oven over medium-high heat. Add the chicken thighs, skin side down, and brown them for about 5 minutes on each side until golden. Remove the chicken from the pan and set aside.
- Cook the Vegetables: In the same pan, add the sliced onion, red and yellow bell peppers, and garlic. Sauté for 5-7 minutes until the vegetables are soft and the onion is translucent.
- Add Liquids and Seasonings: Pour in the white wine, if using, and let it simmer for 2-3 minutes to reduce slightly. Add the crushed tomatoes, chicken broth, oregano, basil, and red pepper flakes. Stir to combine.
- Simmer the Chicken: Return the chicken thighs to the pan, nestling them into the sauce. Bring the mixture to a simmer, then reduce the heat to low. Cover and let it cook for 30-40 minutes, or until the chicken is cooked through and tender, and the flavors have melded together.
- Finish and Serve: Taste the sauce and adjust the seasoning with more salt and pepper if needed. Stir in the chopped parsley. Serve the Chicken Cacciatore hot, garnished with fresh basil leaves, if desired.
Extra Tips:
For a more robust flavor, marinate the chicken in olive oil, garlic, and herbs for a few hours before cooking. If you prefer a thicker sauce, remove the lid during the last 10 minutes of cooking to let it reduce.
For a complete meal, consider serving the dish with a side of pasta or a fresh green salad. This dish is also great for meal prep, as the flavors deepen and become even more delicious the next day.
Mushroom Risotto
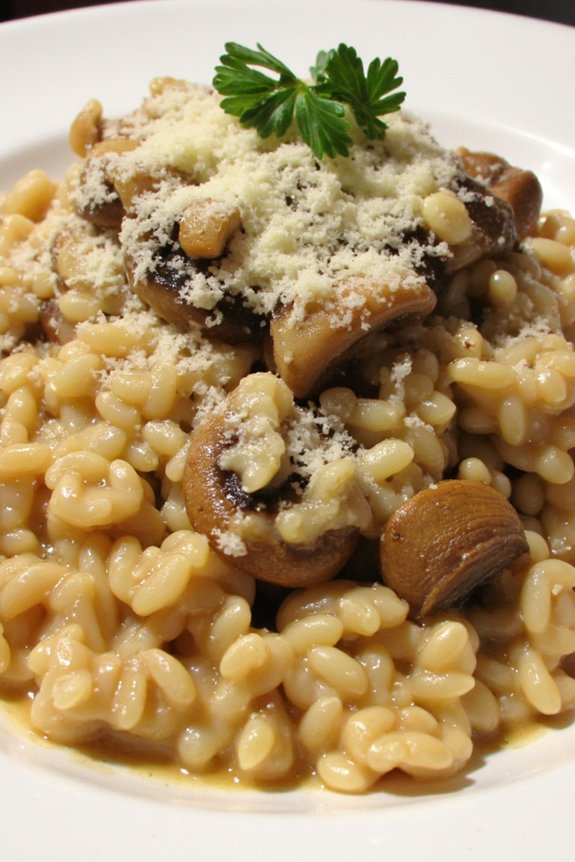
Mushroom Risotto is a classic Italian dish that combines the creamy texture of Arborio rice with the rich, earthy flavors of mushrooms. This dish is perfect for a cozy dinner at home, comforting yet sophisticated enough to impress guests.
The key to an unforgettable Mushroom Risotto is the gradual addition of broth, allowing the rice to slowly absorb the liquid and release its starches, resulting in a creamy consistency without the need for cream.
This recipe serves 4-6 people and requires attention to detail and patience, but the result is well worth the effort. The combination of mushrooms, Parmesan cheese, and a touch of white wine creates a deep, savory flavor that’s both satisfying and elegant.
To make this dish, you’ll need to gather the following ingredients:
Ingredients:
- 2 cups Arborio rice
- 1 pound fresh mushrooms (such as cremini or shiitake), sliced
- 1 medium onion, finely chopped
- 3 cloves garlic, minced
- 6 cups chicken or vegetable broth
- 1 cup dry white wine
- 1 cup grated Parmesan cheese
- 3 tablespoons olive oil
- 2 tablespoons unsalted butter
- Salt and pepper to taste
- Fresh parsley, chopped (optional for garnish)
Instructions:
- Prepare the Broth: In a medium saucepan, bring the chicken or vegetable broth to a simmer. Keep it warm over low heat throughout the cooking process.
- Sauté Mushrooms: Heat 2 tablespoons of olive oil in a large skillet over medium heat. Add the sliced mushrooms and cook until they’re golden brown and have released their moisture, about 5-7 minutes. Remove the mushrooms from the skillet and set aside.
- Cook Onions and Garlic: In the same skillet, add the remaining 1 tablespoon of olive oil. Add the chopped onion and sauté until translucent, about 3-4 minutes. Stir in the minced garlic and cook for an additional minute.
- Toast the Rice: Add the Arborio rice to the skillet with the onions and garlic. Stir to coat the rice grains with oil, cooking for about 2 minutes until the edges of the rice become translucent.
- Deglaze with Wine: Pour in the white wine and stir constantly until the wine is completely absorbed by the rice.
- Add Broth Gradually: Begin adding the warm broth, one ladle at a time, to the rice. Stir frequently and allow each addition of broth to be absorbed before adding the next. Continue this process until the rice is tender and creamy, about 18-20 minutes.
- Incorporate Mushrooms and Cheese: Once the rice is cooked, stir in the sautéed mushrooms, Parmesan cheese, and butter. Season with salt and pepper to taste.
- Garnish and Serve: Remove the risotto from heat and let it sit for a couple of minutes. Garnish with chopped fresh parsley before serving if desired.
Extra Tips:
To guarantee the perfect risotto, use a wide, shallow pan to allow for even cooking and stirring.
Constant stirring is vital for releasing the rice’s starches and achieving the desired creamy texture.
Be mindful not to rush the process; adding the broth gradually is imperative for the perfect consistency.
If the risotto is too thick at the end of cooking, simply stir in a little more broth to reach your desired texture.
Enjoy your Mushroom Risotto with a glass of the same white wine used in cooking for a harmonious flavor pairing.
Stuffed Bell Peppers

Stuffed Bell Peppers are a delightful, colorful dish that’s perfect for a family dinner. These hearty and healthy peppers are filled with a savory mixture of ground meat, rice, and vegetables, all seasoned to perfection. The dish isn’t only visually appealing but also packed with nutrients, offering a balanced meal in each pepper.
The combination of flavors and textures makes Stuffed Bell Peppers a favorite for both kids and adults alike, and they’re versatile enough to allow for various ingredient substitutions based on dietary preferences or available ingredients.
This recipe for Stuffed Bell Peppers serves 4-6 people and is relatively simple to prepare, making it an excellent choice for a weeknight meal. Whether you’re an experienced cook or just starting out, this dish is forgiving and can be adjusted to suit your tastes.
The process involves preparing the filling, stuffing the peppers, and baking them to perfection. The result is a deliciously satisfying meal that can be enjoyed on its own or paired with a side salad or crusty bread.
Ingredients:
- 6 large bell peppers (any color)
- 1 pound ground beef or turkey
- 1 cup cooked rice
- 1 can (15 ounces) diced tomatoes, drained
- 1 small onion, finely chopped
- 2 cloves garlic, minced
- 1 teaspoon dried oregano
- 1 teaspoon dried basil
- Salt and pepper to taste
- 1 cup shredded mozzarella cheese
- 2 tablespoons olive oil
- 1/4 cup chopped fresh parsley
Cooking Instructions:
- Prepare the Peppers: Preheat your oven to 375°F (190°C). Slice the tops off the bell peppers and remove the seeds and membranes. Lightly brush the outside of the peppers with olive oil and place them upright in a baking dish.
- Cook the Filling: In a large skillet, heat the olive oil over medium heat. Add the chopped onion and garlic, sautéing until the onion is translucent. Add the ground beef or turkey, breaking it apart with a spoon, and cook until browned. Drain any excess fat.
- Mix the Filling: In the skillet with the cooked meat, add the drained diced tomatoes, cooked rice, oregano, basil, salt, and pepper. Stir thoroughly and let simmer for 5 minutes to meld the flavors.
- Stuff the Peppers: Spoon the meat and rice mixture into each prepared bell pepper, filling them generously. Place the tops back on the peppers or leave them open, according to preference.
- Bake: Cover the baking dish with foil and bake in the preheated oven for 30 minutes. Remove the foil and sprinkle the tops with mozzarella cheese. Return to the oven and bake for an additional 10-15 minutes, or until the cheese is bubbly and golden.
- Garnish: Once baked, remove the peppers from the oven and let them cool slightly. Garnish with fresh parsley before serving.
Extra Tips:
For an extra burst of flavor, consider adding a tablespoon of Worcestershire sauce or soy sauce to the meat mixture before stuffing the peppers. If you prefer a vegetarian option, substitute the ground meat with a mix of beans or lentils.
To save time, you can prepare the filling a day ahead and store it in the refrigerator, stuffing and baking the peppers just before serving. Additionally, if you want softer peppers, blanch them in boiling water for a few minutes before stuffing.
Tuscan White Bean Soup
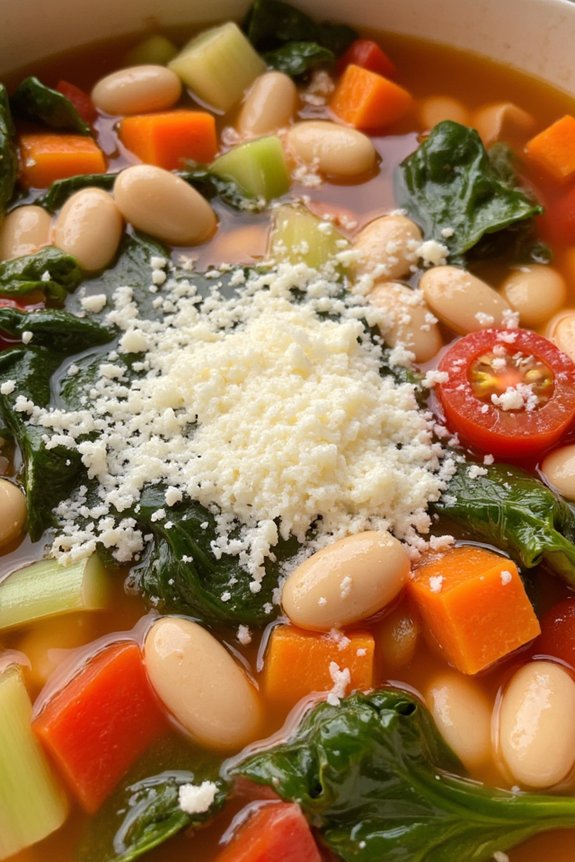
Tuscan White Bean Soup is a hearty, comforting dish perfect for a cozy dinner. This classic Italian soup combines creamy white beans with vegetables and herbs, creating a flavorful broth that warms the soul.
It’s simple to prepare and relies on fresh ingredients that meld together beautifully, making it a go-to recipe for busy weeknights or leisurely weekends. The soup isn’t only delicious but also nourishing, providing a healthy dose of protein and fiber from the beans along with vitamins from the vegetables.
Perfect for a family dinner or a gathering with friends, this recipe serves 4-6 people. It’s versatile enough to be adapted to your taste preferences or dietary needs. You can make it vegetarian by using vegetable broth, or add some pancetta or sausage for a more robust flavor.
Serve it with crusty bread for a complete meal that will satisfy everyone at the table.
Ingredients:
- 2 tablespoons olive oil
- 1 medium onion, diced
- 2 cloves garlic, minced
- 2 carrots, peeled and diced
- 2 celery stalks, diced
- 1 teaspoon dried thyme
- 1 teaspoon dried rosemary
- 1/4 teaspoon red pepper flakes (optional)
- 4 cups vegetable or chicken broth
- 2 (15-ounce) cans cannellini beans, drained and rinsed
- 1 (14-ounce) can diced tomatoes
- Salt and pepper to taste
- 2 cups kale or spinach, chopped
- 1 tablespoon lemon juice
- Grated Parmesan cheese, for serving
Instructions:
- Prepare the Ingredients: Start by preparing all your ingredients. Dice the onion, carrot, and celery, mince the garlic, and chop the kale or spinach. Drain and rinse the cannellini beans and set everything aside for easy access during cooking.
- Sauté the Vegetables: In a large pot, heat the olive oil over medium heat. Add the diced onion, carrot, and celery, and sauté for about 5 minutes until the vegetables are softened. Stir in the minced garlic, cooking for an additional minute until fragrant.
- Add Herbs and Spices: Sprinkle in the dried thyme, rosemary, and red pepper flakes if using. Stir the herbs and spices into the vegetable mixture, allowing their flavors to meld for about 1 minute.
- Combine Broth and Beans: Pour in the vegetable or chicken broth, and add the drained cannellini beans and diced tomatoes. Stir everything together, ensuring the beans are submerged in the liquid.
- Season the Soup: Season with salt and pepper to taste. Bring the soup to a gentle boil, then reduce the heat to a simmer. Let it cook for about 20 minutes, allowing the flavors to develop and the beans to become tender.
- Add Greens and Finish: Stir in the chopped kale or spinach, and let it wilt into the soup, which should take about 2-3 minutes. Add the lemon juice to brighten the flavors and adjust seasoning if necessary.
- Serve: Ladle the soup into bowls and top with grated Parmesan cheese. Serve with a side of crusty bread for dipping.
Extra Tips: For a creamier texture, you can blend a portion of the soup using an immersion blender or by transferring a cup of the soup to a blender, then returning it to the pot. This will thicken the soup without adding any dairy.
If you prefer a heartier soup, consider adding cooked Italian sausage or pancetta for extra flavor. The soup can be stored in the refrigerator for up to three days, and it often tastes even better the next day as the flavors continue to meld.
Teriyaki Chicken and Broccoli

Teriyaki Chicken and Broccoli is a delightful dish that combines the savory flavors of teriyaki sauce with the freshness of broccoli. This easy dinner recipe is perfect for busy weeknights when you want something quick yet satisfying. The sweet and savory teriyaki glaze coats tender pieces of chicken, while the broccoli adds a nutritious crunch, making it a well-rounded meal that both adults and kids will love.
The dish isn’t only flavorful but also visually appealing, with the vibrant green broccoli and golden-brown chicken offering a feast for the eyes as well as the palate.
This recipe serves 4-6 people and can be paired with steamed rice or noodles for a complete meal. Preparing Teriyaki Chicken and Broccoli involves marinating the chicken in a homemade teriyaki sauce, which guarantees it’s tender and flavorful. The broccoli is cooked just right to maintain its crispness and nutrients.
By following these instructions, you’ll create a dish that’s not only delicious but also easy to make, allowing you to enjoy a homemade meal without spending hours in the kitchen.
Ingredients:
- 1 1/2 pounds of boneless, skinless chicken thighs or breasts
- 1 tablespoon of vegetable oil
- 4 cups of broccoli florets
- 1/2 cup of soy sauce
- 1/4 cup of honey
- 1/4 cup of rice vinegar
- 1 tablespoon of cornstarch
- 1 tablespoon of water
- 2 teaspoons of minced garlic
- 1 teaspoon of grated fresh ginger
- Sesame seeds for garnish (optional)
- Sliced green onions for garnish (optional)
Cooking Instructions:
- Prepare the Chicken: Cut the chicken into bite-sized pieces. In a large bowl, mix together the soy sauce, honey, rice vinegar, garlic, and ginger. Add the chicken pieces to the marinade, making sure they’re well coated. Let the chicken marinate in the refrigerator for at least 30 minutes for best results.
- Cook the Chicken: Heat the vegetable oil in a large skillet over medium-high heat. Remove the chicken from the marinade, reserving the marinade for later use. Add the chicken to the skillet and cook until golden brown and cooked through, about 6-8 minutes. Remove the chicken from the skillet and set aside.
- Cook the Broccoli: In the same skillet, add a splash of water and the broccoli florets. Cover and steam the broccoli for about 3-4 minutes, until it’s vibrant green and tender but still crisp. Remove the broccoli from the skillet and set aside with the chicken.
- Make the Teriyaki Sauce: In a small bowl, mix the cornstarch with water to create a slurry. Add the reserved marinade to the skillet and bring to a simmer. Stir in the cornstarch slurry and cook until the sauce has thickened, about 2-3 minutes.
- Combine Ingredients: Return the cooked chicken and broccoli to the skillet. Toss everything together until the chicken and broccoli are well coated with the teriyaki sauce. Cook for an additional 2-3 minutes to heat everything through.
- Serve: Transfer the Teriyaki Chicken and Broccoli to a serving dish. Garnish with sesame seeds and sliced green onions if desired. Serve hot with steamed rice or noodles.
Extra Tips: When cutting the chicken, try to keep the pieces uniform in size to promote even cooking. If you prefer a spicier dish, you can add a pinch of red pepper flakes to the marinade. For more flavor, let the chicken marinate overnight in the refrigerator.
If fresh ginger isn’t available, ground ginger can be used as a substitute, though fresh is recommended for the best flavor. Finally, if you want to add more vegetables, bell peppers or snap peas work well in this dish.
Spaghetti and Meatballs

Spaghetti and meatballs is a classic comfort food that never fails to impress. This hearty and delicious dish combines tender, juicy meatballs with a rich, savory tomato sauce served over a bed of perfectly cooked spaghetti. It’s a family favorite that’s perfect for any night of the week, offering a warm, satisfying meal that brings everyone to the table.
Whether you’re an experienced cook or a beginner, this recipe is simple to follow and guarantees a delicious outcome every time. The key to great spaghetti and meatballs lies in the balance of flavors and textures. The meatballs, made from a mix of ground beef and pork, are seasoned with herbs and spices to enhance their flavor.
They’re then simmered in a homemade tomato sauce, allowing the flavors to meld together beautifully. Paired with al dente spaghetti, this dish is a wonderful combination of hearty, savory, and comforting elements. This recipe serves 4-6 people, making it perfect for family dinners or small gatherings.
Ingredients:
- 1 pound ground beef
- 1/2 pound ground pork
- 1 cup breadcrumbs
- 1/2 cup grated Parmesan cheese
- 1/4 cup chopped fresh parsley
- 2 cloves garlic, minced
- 1 egg
- 1 teaspoon salt
- 1/2 teaspoon black pepper
- 1/2 teaspoon dried oregano
- 1/2 teaspoon dried basil
- 2 tablespoons olive oil
- 1 onion, finely chopped
- 4 cups canned crushed tomatoes
- 2 tablespoons tomato paste
- 1 teaspoon sugar
- 1 pound spaghetti
- Salt for pasta water
- Grated Parmesan cheese for serving
Cooking Instructions:
- Prepare the Meatballs: In a large bowl, combine the ground beef, ground pork, breadcrumbs, Parmesan cheese, parsley, minced garlic, egg, salt, pepper, oregano, and basil. Mix well until all ingredients are evenly incorporated. Shape the mixture into meatballs about 1 1/2 inches in diameter.
- Brown the Meatballs: In a large skillet over medium heat, heat the olive oil. Add the meatballs in batches, making sure not to overcrowd the pan. Brown them on all sides for about 8-10 minutes. Remove the meatballs from the skillet and set aside.
- Make the Sauce: In the same skillet, add the chopped onion and sauté until softened, about 5 minutes. Stir in the crushed tomatoes, tomato paste, and sugar. Bring the mixture to a simmer.
- Simmer the Meatballs in Sauce: Return the meatballs to the skillet, nestling them into the sauce. Cover the skillet and let the meatballs simmer in the sauce for about 30 minutes, stirring occasionally, until the meatballs are cooked through and the sauce has thickened.
- Cook the Spaghetti: While the meatballs are simmering, bring a large pot of salted water to a boil. Add the spaghetti and cook according to the package instructions until al dente. Drain well.
- Serve: Divide the cooked spaghetti among serving plates. Top with meatballs and sauce. Garnish with additional grated Parmesan cheese and fresh parsley if desired.
Extra Tips:
To make sure your meatballs hold their shape, be gentle when mixing the meat mixture—overworking it can make the meatballs tough. If you prefer a smoother sauce, you can purée the crushed tomatoes before adding them to the skillet.
For an extra layer of flavor, you might consider adding a splash of red wine to the tomato sauce while it simmers. When cooking the spaghetti, be sure to reserve a cup of pasta water; you can use it to thin out the sauce if it becomes too thick. Enjoy your delicious homemade spaghetti and meatballs!
Sweet and Sour Pork

Sweet and Sour Pork is a classic Chinese dish that combines the perfect balance of tangy and sweet flavors with a hint of savory goodness. It’s a popular choice for both casual dinners and special occasions, offering a delightful taste experience with every bite. The dish features succulent pieces of pork coated in a crispy batter, all tossed in a vibrant sauce made from a mixture of pineapple juice, vinegar, and sugar, along with colorful bell peppers and juicy pineapple chunks.
Whether you’re a seasoned cook or trying this recipe for the first time, Sweet and Sour Pork promises to be a delicious addition to your dinner repertoire. Cooking Sweet and Sour Pork at home allows you to customize the flavors and ingredients to your liking, guaranteeing a fresher and healthier meal compared to take-out.
This recipe serves 4-6 people, making it perfect for a family dinner or a small gathering. With a few simple steps, you’ll be able to create a mouthwatering dish that rivals any restaurant version. So, gather your ingredients and let’s get started on making this delightful sweet and sour experience.
Ingredients (Serves 4-6):
- 1 pound pork tenderloin or pork shoulder, cut into 1-inch cubes
- 1/2 cup all-purpose flour
- 1/2 cup cornstarch
- 1 teaspoon salt
- 1/2 teaspoon black pepper
- 2 eggs, beaten
- 1 cup vegetable oil (for frying)
- 1 cup bell peppers (red and green), cut into 1-inch pieces
- 1 cup pineapple chunks (canned or fresh)
- 1/2 cup onion, cut into 1-inch pieces
- 1/2 cup sugar
- 1/3 cup rice vinegar or white vinegar
- 1/4 cup ketchup
- 2 tablespoons soy sauce
- 1 tablespoon cornstarch (for sauce thickening)
- 1/4 cup water
Cooking Instructions:
- Prepare the Pork: In a large bowl, mix the flour, cornstarch, salt, and black pepper. Dip the pork cubes into the beaten eggs, then dredge them in the flour mixture, making sure each piece is well-coated.
- Fry the Pork: Heat the vegetable oil in a deep skillet over medium-high heat. Once hot, carefully add the coated pork cubes in batches, frying until they’re golden brown and cooked through, roughly 4-5 minutes per batch. Remove and drain on paper towels.
- Make the Sauce: In a small saucepan, combine the sugar, rice vinegar, ketchup, soy sauce, and water. Heat over medium heat until the sugar dissolves. In a separate small bowl, mix the tablespoon of cornstarch with a little water to make a slurry. Add this to the sauce, stirring constantly until the sauce thickens.
- Stir-Fry the Vegetables: In a large wok or skillet, add a small amount of oil over medium heat. Stir-fry the bell peppers, onion, and pineapple chunks for about 3-4 minutes until they’re slightly tender but still crisp.
- Combine Everything: Add the fried pork to the wok with the vegetables, then pour over the sweet and sour sauce. Toss everything together until well-coated and heated through, about 2-3 minutes.
- Serve: Transfer the Sweet and Sour Pork to a serving dish and enjoy it hot, preferably with steamed rice or noodles.
Extra Tips: For the best results, make sure that the pork is cut into uniform pieces, which will help it cook evenly. Adjust the sweetness or tanginess of the sauce to your preference by varying the amount of sugar or vinegar.
If you prefer a spicier kick, consider adding a little chili sauce or fresh chili peppers to the sauce. Finally, using fresh pineapple can enhance the flavor and texture of the dish, providing a more natural sweetness.
Vegetable Curry
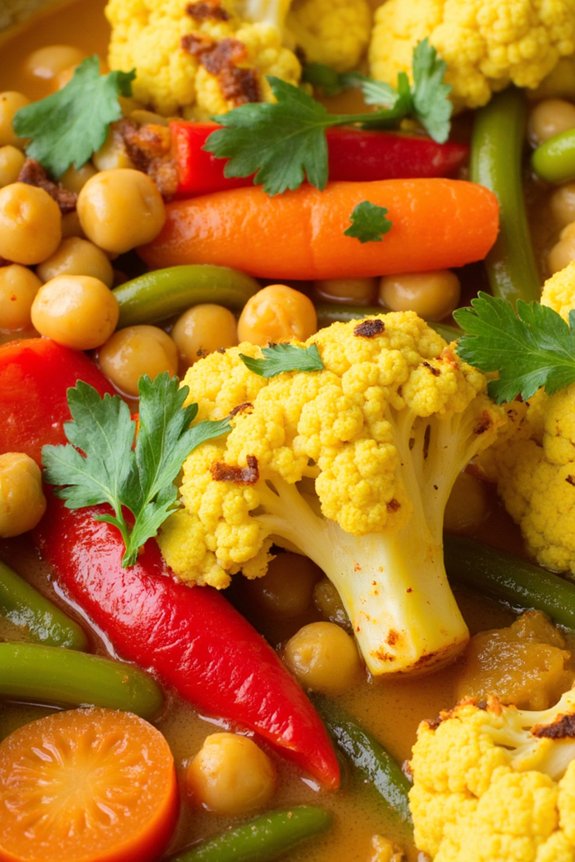
Vegetable curry is a delightful and comforting dish that’s perfect for an easy dinner. Bursting with vibrant colors and rich flavors, this curry is a wonderful way to enjoy a variety of vegetables in one meal. Whether you’re a seasoned chef or a beginner in the kitchen, this recipe is straightforward and sure to impress.
The blend of spices, creamy coconut milk, and fresh vegetables creates a harmonious balance that will leave you and your guests satisfied. This vegetable curry isn’t only nutritious but also versatile. You can customize it by using your favorite vegetables or whatever you have on hand.
It’s a fantastic way to incorporate more plant-based meals into your diet while enjoying a meal that’s both hearty and wholesome. Serve it with a side of steamed rice or warm naan bread for a complete and satisfying dinner.
Ingredients (Serves 4-6):
- 2 tablespoons vegetable oil
- 1 large onion, chopped
- 3 cloves garlic, minced
- 1 tablespoon fresh ginger, grated
- 2 tablespoons curry powder
- 1 teaspoon ground cumin
- 1 teaspoon ground coriander
- 1 teaspoon turmeric
- 1 teaspoon garam masala
- 1 can (14 oz) coconut milk
- 1 cup vegetable broth
- 2 large carrots, sliced
- 1 red bell pepper, chopped
- 1 cup cauliflower florets
- 1 cup green beans, trimmed and cut into 1-inch pieces
- 1 can (14 oz) chickpeas, drained and rinsed
- Salt and pepper to taste
- Fresh cilantro, chopped (for garnish)
- Juice of 1 lime
Cooking Instructions:
- Prepare the Aromatics: Heat the vegetable oil in a large pan over medium heat. Add the chopped onion and sauté for about 5 minutes until it becomes translucent.
- Add Garlic and Ginger: Stir in the minced garlic and grated ginger, cooking for an additional 1-2 minutes until fragrant.
- Incorporate Spices: Mix in the curry powder, ground cumin, ground coriander, turmeric, and garam masala. Stir well to coat the onions, garlic, and ginger with the spices, cooking for another minute to enhance the flavors.
- Add Liquids: Pour in the coconut milk and vegetable broth, stirring to combine all ingredients thoroughly. Bring the mixture to a gentle simmer.
- Cook the Vegetables: Add the sliced carrots, chopped red bell pepper, cauliflower florets, and green beans to the pan. Stir everything together, ensuring the vegetables are well-coated with the curry sauce.
- Simmer the Curry: Allow the curry to simmer gently for 20-25 minutes, or until the vegetables are tender but not mushy. Stir occasionally to prevent sticking.
- Finish with Chickpeas: Add the drained chickpeas to the curry and cook for an additional 5 minutes to heat through. Season with salt and pepper to taste.
- Garnish and Serve: Remove the pan from the heat. Squeeze the juice of one lime over the curry and garnish with freshly chopped cilantro. Serve hot with rice or naan bread.
Extra Tips:
For an extra depth of flavor, consider roasting the vegetables before adding them to the curry. This will give them a slightly caramelized taste that complements the spices beautifully.
If you prefer a thicker curry, let it simmer uncovered for a few extra minutes to reduce the sauce. Adjust the level of heat by adding more or less curry powder according to your taste preference.
This dish also freezes well, so you can make a larger batch and save some for a future meal.
Zesty Taco Soup

Zesty Taco Soup is a delightful and flavorful meal that brings together the bold spices of Mexican cuisine in a warm, comforting soup. Perfect for a weeknight dinner, this delicious dish will satisfy your cravings for something zesty and hearty.
It’s an excellent choice for those who enjoy a bit of spice in their meals and want a soup that’s both filling and easy to prepare. With a combination of ground beef, beans, corn, and a medley of spices, this taco soup is the perfect way to enjoy the flavors of tacos in a new and exciting form.
This recipe for Zesty Taco Soup serves 4-6 people and takes less than an hour to prepare and cook. The ingredients are simple, and the cooking process is straightforward, making it an ideal choice for busy families or anyone looking for a quick, tasty meal.
The soup is versatile, allowing you to adjust the level of spice to suit your taste. Garnish it with your favorite toppings like shredded cheese, sour cream, or avocado for an extra touch of creaminess and flavor.
Ingredients:
- 1 pound ground beef
- 1 medium onion, chopped
- 2 cloves garlic, minced
- 1 can (15 oz) black beans, drained and rinsed
- 1 can (15 oz) corn, drained
- 1 can (15 oz) diced tomatoes
- 1 can (4 oz) diced green chilies
- 2 cups beef broth
- 1 packet taco seasoning mix
- Salt and pepper to taste
- Optional toppings: shredded cheese, sour cream, avocado, chopped cilantro, tortilla chips
Cooking Instructions:
- Prepare the Ingredients: Begin by gathering all the ingredients. Chop the onion and mince the garlic to have them ready for cooking.
- Cook the Ground Beef: In a large pot or Dutch oven, over medium heat, add the ground beef. Cook until browned, breaking it apart with a spatula as it cooks. This should take about 5-7 minutes.
- Add Onion and Garlic: Once the beef is browned, drain any excess fat, if necessary. Add the chopped onion and minced garlic to the pot. Sauté for 3-4 minutes, until the onion is translucent and the garlic is fragrant.
- Combine the Ingredients: Stir in the black beans, corn, diced tomatoes, and diced green chilies. Mix well to combine all the ingredients.
- Add Broth and Seasoning: Pour in the beef broth and sprinkle the taco seasoning mix over the ingredients. Stir well to guarantee the seasoning is evenly distributed. Add salt and pepper to taste.
- Simmer the Soup: Bring the soup to a boil, then reduce the heat to low. Cover and let it simmer for 20-25 minutes, allowing the flavors to meld together.
- Check and Serve: Taste the soup and adjust seasoning if necessary. Serve hot, garnished with your choice of toppings like shredded cheese, sour cream, avocado, chopped cilantro, or crumbled tortilla chips for added texture and flavor.
Extra Tips:
When making Zesty Taco Soup, feel free to customize the level of spice by adjusting the amount of taco seasoning or adding a pinch of cayenne pepper for an extra kick.
If you prefer a vegetarian version, substitute the ground beef with a plant-based protein or extra beans. This soup can also be made in advance and stored in the refrigerator for up to three days, making it a great option for meal prep.
Reheat it on the stove or microwave, and enjoy the robust flavors that develop over time.
Cheesy Potato and Ham Casserole

Searching for a comforting and easy dinner recipe that will delight the whole family? Search no further than this Cheesy Potato and Ham Casserole. This dish combines tender potatoes, savory ham, and gooey cheese all baked into a creamy casserole that’s sure to become a household favorite.
Perfect for using up leftover ham or when you’re in need of a hearty meal, this casserole is both satisfying and simple to prepare. Whether you’re serving it as a weeknight dinner or bringing it to a potluck, this casserole is versatile and can be enjoyed at any occasion.
The ingredients are basic, yet when combined, they create a dish that’s rich in flavor and texture. Follow the recipe below to make this delightful Cheesy Potato and Ham Casserole for a serving size of 4-6 people.
Ingredients:
- 3 cups diced potatoes
- 2 cups diced cooked ham
- 1 medium onion, chopped
- 2 cups shredded cheddar cheese
- 1 can (10.5 oz) condensed cream of mushroom soup
- 1 cup sour cream
- 1/2 cup milk
- 1 teaspoon garlic powder
- 1 teaspoon onion powder
- Salt and pepper to taste
- 2 tablespoons butter
- 1/2 cup breadcrumbs (optional)
Cooking Instructions:
- Preheat the Oven: Preheat your oven to 375°F (190°C).
- Prepare the Potatoes: Peel and dice the potatoes into small, even cubes. This will guarantee they cook evenly.
- Cook the Onions: In a skillet, melt the butter over medium heat. Add the chopped onions and sauté until they become translucent, about 5 minutes.
- Mix the Ingredients: In a large mixing bowl, combine the diced potatoes, cooked ham, sautéed onions, shredded cheddar cheese, cream of mushroom soup, sour cream, milk, garlic powder, onion powder, salt, and pepper. Stir well until all ingredients are evenly distributed.
- Assemble the Casserole: Pour the mixture into a greased 9×13 inch baking dish. Spread it out evenly. If desired, sprinkle breadcrumbs over the top for an added crunchy topping.
- Bake the Casserole: Cover the baking dish with aluminum foil and bake in the preheated oven for 45 minutes. Remove the foil and bake for an additional 15 minutes, or until the top is golden brown and the potatoes are tender.
- Cool and Serve: Let the casserole cool for a few minutes before serving. This will make it easier to cut and serve.
Extra Tips:
If you prefer a different flavor profile, consider swapping the cheddar cheese with Monterey Jack or a blend of cheeses. For an added layer of flavor, you can also add chopped bell peppers or peas to the mix.
Make sure the potatoes are diced evenly to guarantee they cook through properly. If you have leftover casserole, it reheats well in the oven or microwave, making it a great option for meal prep. Enjoy your comforting and delicious Cheesy Potato and Ham Casserole!