

Gathering around the dinner table with family can be one of the most heartwarming experiences. Especially when the meal is something everyone looks forward to. From cheesy baked ziti to creamy chicken Alfredo, these comforting dishes turn ordinary evenings into cherished memories. Picture the joy on your kids’ faces as they roll meatballs for spaghetti or pick their favorite pizza toppings. Ready to explore more family-friendly recipes that will make your dinners extra special?
Cheesy Baked Ziti

Cheesy Baked Ziti is a delightful and comforting Italian-American dish that the whole family will enjoy. The combination of perfectly cooked ziti pasta, flavorful marinara sauce, and a generous amount of melted cheese makes it an irresistible meal for kids and adults alike.
This dish is perfect for those cozy family dinners where everyone gathers around the table to share stories and enjoy a hearty meal together. The best part? It’s easy to prepare and doesn’t require a lot of time in the kitchen, making it ideal for busy weeknights.
This recipe for Cheesy Baked Ziti serves 4-6 people, providing ample portions for a family dinner. The dish features layers of pasta, sauce, and cheese that are baked to perfection, creating a golden, bubbly top layer that’s sure to tempt everyone at the table.
The addition of herbs and spices enhances the flavor, while the creamy ricotta cheese adds a rich texture that makes every bite a joyous experience. Gather your ingredients, follow these simple steps, and you’ll have a delicious dish ready to serve in no time.
Ingredients:
- 1 pound ziti pasta
- 2 cups marinara sauce
- 1 pound ground beef or Italian sausage (optional)
- 1 cup ricotta cheese
- 2 cups shredded mozzarella cheese
- 1/2 cup grated Parmesan cheese
- 1 teaspoon dried oregano
- 1 teaspoon dried basil
- Salt and pepper, to taste
- 2 cloves garlic, minced
- 1 tablespoon olive oil
Cooking Instructions:
- Preheat the Oven: Start by preheating your oven to 375°F (190°C) to make sure it’s ready once your ziti is assembled.
- Cook the Pasta: Bring a large pot of salted water to a boil. Add the ziti pasta and cook according to package instructions until al dente. Drain the pasta and set aside.
- Prepare the Sauce: In a large skillet, heat the olive oil over medium heat. Add the minced garlic and sauté until fragrant. If using, add the ground beef or Italian sausage to the skillet and cook until browned. Drain any excess fat.
- Combine with Marinara: Stir the marinara sauce into the skillet with the meat. Add dried oregano, dried basil, salt, and pepper. Let the mixture simmer for about 5 minutes to blend the flavors.
- Assemble the Dish: In a large mixing bowl, combine the cooked ziti, ricotta cheese, and half of the mozzarella cheese. Add the sauce mixture to the bowl and stir until everything is well combined.
- Layer and Bake: Spread half of the ziti mixture in a 9×13-inch baking dish. Sprinkle with half of the remaining mozzarella cheese. Add the rest of the ziti mixture and top with the remaining mozzarella and Parmesan cheese.
- Bake the Ziti: Cover the baking dish with foil and bake in the preheated oven for 20 minutes. Remove the foil and bake for an additional 10-15 minutes, or until the cheese is bubbly and golden brown.
- Serve: Once baked, let the ziti cool for a few minutes before serving. This allows the layers to set, making it easier to serve.
Extra Tips:
To enhance the flavor of your Cheesy Baked Ziti, consider adding a pinch of red pepper flakes to the sauce for a bit of heat. You can also incorporate chopped spinach or sautéed mushrooms for added nutrition.
If you prefer a vegetarian version, simply omit the meat and add extra vegetables or even a plant-based protein. For a crispy topping, sprinkle some breadcrumbs on top of the cheese before baking.
Finally, for leftovers, this dish reheats wonderfully, making it an excellent option for meal prep.
Creamy Chicken Alfredo
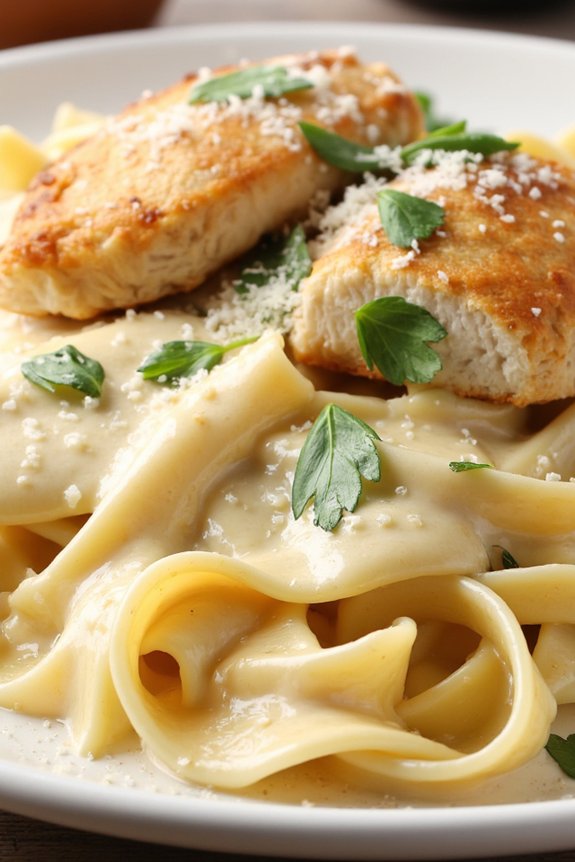
Creamy Chicken Alfredo is a timeless classic that brings comfort and delight to every family dinner table. This dish is a perfect blend of tender chicken, rich and creamy Alfredo sauce, and perfectly cooked pasta, making it a favorite among both kids and adults. The luscious sauce, with its combination of butter, cream, and Parmesan cheese, coats the pasta and chicken beautifully, creating a dish that’s both satisfying and indulgent.
Whether you’re gathering around the table on a busy weeknight or celebrating a special occasion, this dish is sure to bring smiles and full bellies.
Preparing Creamy Chicken Alfredo is straightforward and requires only a few simple ingredients, making it an ideal choice for family dinners. The key to a successful Alfredo is in the sauce, which should be smooth and rich without being overly heavy. By following this recipe, you’ll be able to create a delicious meal that your family will love, and one that you’ll enjoy making time and time again.
This recipe serves 4-6 people, perfect for a cozy family dinner.
Ingredients:
- 1 pound of fettuccine pasta
- 2 tablespoons olive oil
- 1 pound boneless, skinless chicken breasts
- Salt and pepper to taste
- 4 tablespoons unsalted butter
- 2 cups heavy cream
- 1 cup freshly grated Parmesan cheese
- 2 cloves garlic, minced
- 1 tablespoon chopped fresh parsley (optional)
- 1/2 teaspoon Italian seasoning (optional)
Instructions:
- Cook the Pasta: Begin by boiling a large pot of salted water. Add the fettuccine pasta and cook according to the package instructions until al dente. Once cooked, drain the pasta and set it aside.
- Prepare the Chicken: While the pasta is cooking, heat olive oil in a large skillet over medium heat. Season the chicken breasts with salt and pepper. Place the chicken in the skillet and cook for about 6-7 minutes on each side, or until the chicken is no longer pink and has a golden crust. Remove the chicken from the skillet and let it rest for a few minutes before slicing it into thin strips.
- Make the Alfredo Sauce: In the same skillet, melt the butter over medium heat. Add the minced garlic and sauté for about 1 minute until fragrant. Pour in the heavy cream and bring the mixture to a simmer. Stir in the Parmesan cheese, allowing it to melt and thicken the sauce. If desired, add Italian seasoning for extra flavor.
- Combine Ingredients: Add the cooked pasta and sliced chicken to the skillet with the Alfredo sauce. Toss everything together until the pasta and chicken are well coated with the sauce.
- Serve: Transfer the Creamy Chicken Alfredo to serving plates. Garnish with chopped fresh parsley for a touch of color and freshness. Serve immediately while hot.
Extra Tips: For the best results, use freshly grated Parmesan cheese as it melts more smoothly and provides a richer flavor compared to pre-grated varieties. If the sauce becomes too thick, you can loosen it by adding a splash of pasta water.
Additionally, feel free to customize the dish by adding vegetables like broccoli or spinach for added nutrition and color. Remember, the key to a great Alfredo isn’t to overheat the sauce, as this can cause it to separate. Enjoy your homemade Creamy Chicken Alfredo with a fresh side salad or garlic bread for a complete meal.
Classic Beef Tacos

Immerse yourself in a delicious family dinner experience with these Classic Beef Tacos that are sure to be a hit with kids and adults alike.
These tacos are packed with flavorful seasoned beef, fresh toppings, and the perfect crunch from crispy taco shells. Not only are they incredibly tasty, but they’re also easy to prepare, making them a great option for busy weeknights or relaxing weekends.
The whole family can get involved in the preparation, from grating cheese to assembling their own tacos, making dinner both fun and interactive.
The beauty of these Classic Beef Tacos lies in their simplicity and versatility. You can customize the toppings according to your family’s preferences, adding more vegetables, different cheeses, or even a dollop of sour cream.
This recipe serves 4-6 people, providing a hearty meal that will leave everyone satisfied. Whether you’re hosting a casual dinner or just looking for a comforting meal to share with your loved ones, these tacos are sure to be a crowd-pleaser.
Ingredients (Serves 4-6):
- 1 pound ground beef
- 1 packet taco seasoning mix
- 2/3 cup water
- 12 taco shells
- 1 cup shredded lettuce
- 1 cup diced tomatoes
- 1 cup shredded cheddar cheese
- 1/2 cup chopped onions
- 1/2 cup sour cream (optional)
- 1/2 cup salsa (optional)
- 1 tablespoon olive oil
Instructions:
- Prepare the Beef: Heat the olive oil in a large skillet over medium heat. Add the ground beef and cook until it’s browned, breaking it apart with a spatula as it cooks. This should take about 7-10 minutes.
- Season the Beef: Once the beef is browned and fully cooked, drain any excess fat from the skillet. Return the skillet to the heat and stir in the taco seasoning mix and water. Bring the mixture to a simmer and reduce the heat to low. Let it simmer for about 5 minutes until the sauce thickens, stirring occasionally.
- Prepare the Taco Shells: While the beef is simmering, preheat the oven to 350°F (175°C). Place the taco shells on a baking sheet and warm them in the oven for about 5 minutes until they’re crispy.
- Assemble the Tacos: Remove the taco shells from the oven and fill each shell with a generous portion of the seasoned beef mixture. Top with shredded lettuce, diced tomatoes, onions, and shredded cheese. If desired, add a dollop of sour cream and salsa to each taco for extra flavor.
- Serve and Enjoy: Serve the tacos immediately while they’re still warm and crispy. Provide additional toppings on the side for everyone to customize their own tacos to their liking.
Extra Tips:
For added flavor, consider incorporating a mix of spices such as cumin and paprika to the beef while cooking.
If you prefer softer shells, you can substitute hard taco shells with flour or corn tortillas, warming them on a skillet for a softer bite.
To make the meal more nutritious, add extra vegetables like bell peppers or avocado to the topping options.
Finally, if you have leftovers, the seasoned beef can easily be stored in the refrigerator and reheated for a quick lunch or dinner the next day.
Homemade Mac and Cheese
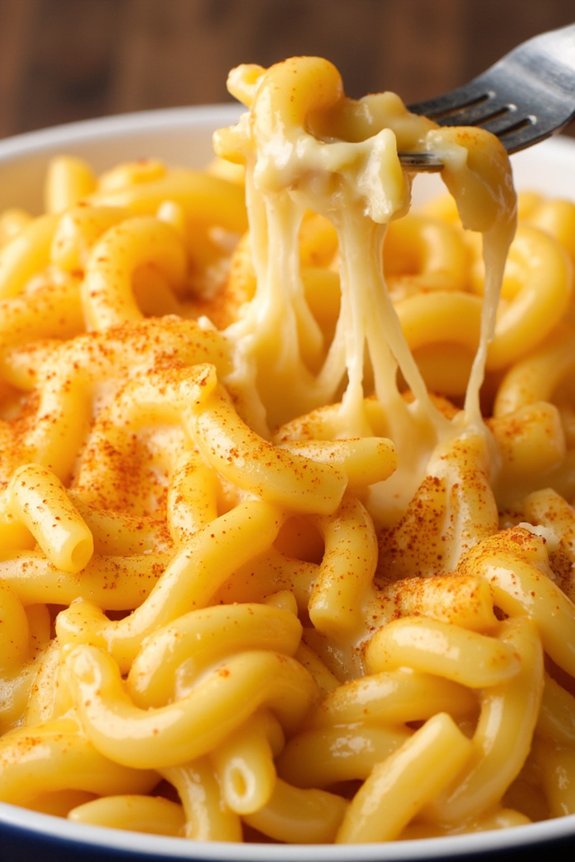
Nothing says comfort like a warm bowl of creamy homemade mac and cheese. This beloved classic is a hit with kids and adults alike, making it the perfect dish for a cozy family dinner.
Made with tender pasta enveloped in a rich, cheesy sauce, this recipe is both simple and satisfying. With just a few fresh ingredients and a bit of time, you’ll have a delicious meal that brings everyone to the table.
This homemade mac and cheese recipe is perfect for serving 4-6 people, ensuring there’s enough to go around for seconds. The blend of cheeses creates a velvety sauce that clings perfectly to every piece of pasta, making each bite as delightful as the last.
So, gather around the kitchen and prepare for a meal that’s bound to become a family favorite.
Ingredients:
- 1 pound elbow macaroni
- 4 tablespoons unsalted butter
- 1/4 cup all-purpose flour
- 3 cups whole milk
- 1 cup heavy cream
- 2 cups shredded sharp cheddar cheese
- 1 cup shredded mozzarella cheese
- 1/2 cup grated Parmesan cheese
- 1 teaspoon mustard powder
- Salt and pepper to taste
- Optional: 1/2 teaspoon paprika for garnish
Instructions:
- Cook the Pasta: Begin by bringing a large pot of salted water to a boil. Add the elbow macaroni and cook according to package instructions until al dente. Drain the pasta and set it aside.
- Make the Roux: In a large saucepan over medium heat, melt the butter. Once melted, sprinkle in the flour, whisking continuously for about 1-2 minutes until the mixture is golden and bubbly.
- Create the Sauce: Gradually whisk in the milk and heavy cream, ensuring there are no lumps. Continue stirring until the mixture thickens slightly, approximately 5 minutes.
- Add the Cheese: Reduce the heat to low and slowly stir in the cheddar, mozzarella, and Parmesan cheeses. Add the mustard powder and season with salt and pepper. Stir until the cheeses are fully melted, and the sauce is smooth and creamy.
- Combine Pasta and Sauce: Add the cooked pasta to the cheese sauce, stirring until the pasta is well-coated with the sauce.
- Serve and Garnish: Serve immediately, garnishing with a sprinkle of paprika if desired for a touch of color and flavor.
Extra Tips:
For an extra crunchy topping, consider transferring the mac and cheese to a baking dish, topping it with breadcrumbs, and baking it in a 350°F (175°C) oven for about 15-20 minutes. This provides a delightful contrast between the creamy interior and the crisp exterior.
If you wish to experiment with flavors, try adding a pinch of garlic powder or a dash of hot sauce for a mild kick. Remember, the quality of the cheese greatly impacts the flavor, so opt for freshly grated cheese whenever possible for the best results.
BBQ Chicken Pizza
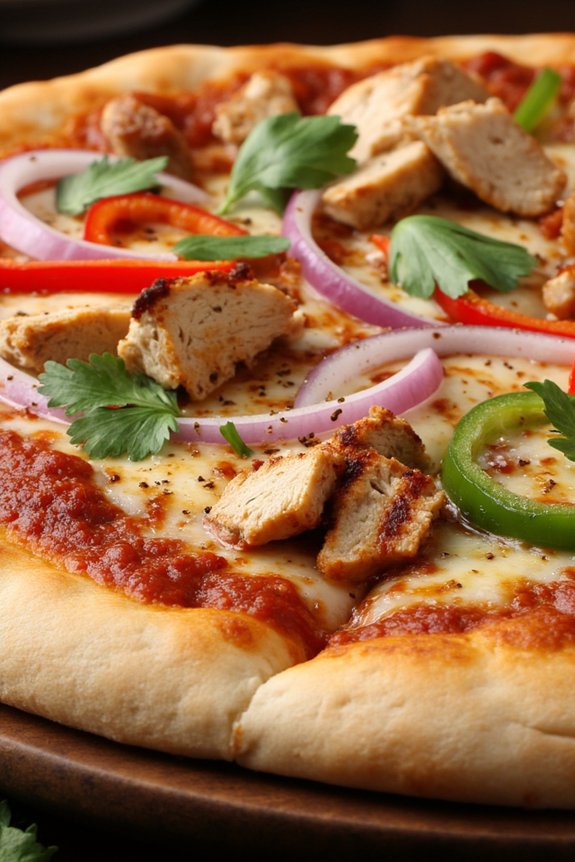
BBQ Chicken Pizza is a delightful twist on the classic pizza that your entire family will adore. With its tangy barbecue sauce, succulent grilled chicken, and a cheesy topping, this dish is perfect for a cozy dinner. The sweet and savory flavors of the BBQ sauce complement the smoked chicken and fresh vegetables, making it a hit even with the pickiest eaters.
This pizza isn’t only delicious but also simple to prepare, guaranteeing you spend more quality time with your family rather than in the kitchen. This recipe is designed to serve 4-6 people, making it ideal for a family meal. The combination of fresh and flavorful ingredients creates a balanced and satisfying dish.
Whether you’re enjoying a weeknight dinner or a weekend gathering, BBQ Chicken Pizza will quickly become a family favorite. The following recipe outlines everything you need to make this delicious meal come together effortlessly.
Ingredients:
- 1 pre-made pizza dough (or homemade)
- 1 cup barbecue sauce
- 2 cups cooked chicken breast, shredded
- 1 ½ cups mozzarella cheese, shredded
- ½ cup red onion, thinly sliced
- 1 small green bell pepper, thinly sliced
- 1 small red bell pepper, thinly sliced
- 1/4 cup fresh cilantro, chopped
- 1 tablespoon olive oil
- 1 teaspoon garlic powder
- Salt and pepper to taste
Cooking Instructions:
- Preheat the Oven: Begin by preheating your oven to 450°F (232°C). If you have a pizza stone, place it in the oven to heat up as well; this helps create a crispy crust.
- Prepare the Dough: Roll out the pizza dough on a lightly floured surface to your desired thickness. Transfer the rolled dough onto a baking sheet or parchment paper for easy handling.
- Brush with Olive Oil: Lightly brush the rolled-out dough with olive oil to prevent it from drying out during baking. Sprinkle garlic powder evenly over the dough for added flavor.
- Spread the Sauce: Evenly spread the barbecue sauce over the pizza dough, leaving a small border around the edges for the crust.
- Add the Toppings: Distribute the shredded chicken over the sauce, followed by the mozzarella cheese. Arrange the red onion and sliced bell peppers evenly on top.
- Bake the Pizza: Carefully transfer the pizza onto the preheated pizza stone or leave it on the baking sheet. Bake for 12-15 minutes, or until the crust is golden brown and the cheese is bubbly and melted.
- Garnish and Serve: Once baked, remove the pizza from the oven and sprinkle with fresh cilantro. Let it cool for a couple of minutes before slicing and serving.
Extra Tips:
For the best results, verify your pizza dough is at room temperature before rolling it out; this makes it easier to handle and results in a more even crust.
You can customize the pizza by adding your family’s favorite toppings, such as mushrooms or jalapeños, for extra zest. If you’re using leftover chicken, verify it’s well-cooked and seasoned before adding it to the pizza.
For a smokier flavor, consider grilling the chicken before shredding it. Remember, the key to a great BBQ Chicken Pizza is balancing the sweet, tangy sauce with savory toppings, so don’t be afraid to experiment with different barbecue sauce brands to find your family’s favorite.
Spaghetti and Meatballs
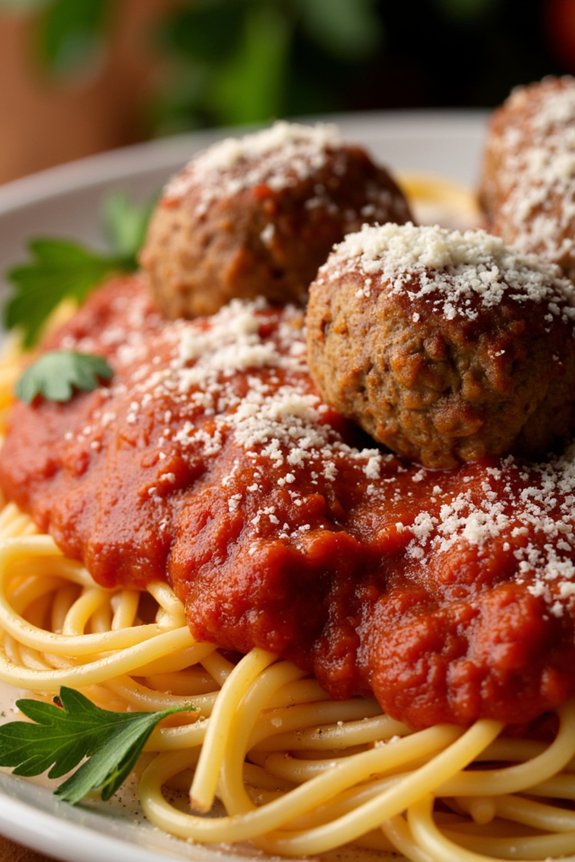
Preparing spaghetti and meatballs isn’t only enjoyable but also a great way to involve the kids in the kitchen. The recipe is simple enough for young helpers, who can roll the meatballs or stir the sauce while learning important cooking skills. The aroma of the sauce simmering on the stove is simply irresistible, and the anticipation builds as the meatballs and spaghetti come together for a delicious meal.
This recipe will serve 4-6 people, making it perfect for a family gathering or a small dinner party.
Ingredients:
- 1 pound ground beef
- 1/2 cup breadcrumbs
- 1/4 cup grated Parmesan cheese
- 1/4 cup chopped fresh parsley
- 1 egg
- 2 cloves garlic, minced
- Salt and pepper to taste
- 2 tablespoons olive oil
- 1 onion, chopped
- 1 can (28 ounces) crushed tomatoes
- 1 teaspoon dried oregano
- 1 teaspoon dried basil
- 1/2 teaspoon sugar
- 1 pound spaghetti
- Grated Parmesan cheese for serving
Cooking Instructions:
- Prepare the Meatballs: In a large bowl, combine ground beef, breadcrumbs, Parmesan cheese, parsley, egg, minced garlic, salt, and pepper. Mix well until all ingredients are incorporated. Roll the mixture into small balls, about 1 inch in diameter.
- Cook the Meatballs: Heat olive oil in a large skillet over medium heat. Add the meatballs in batches, making sure not to overcrowd the pan. Cook until they’re browned on all sides, about 5-7 minutes. Remove the meatballs and set them aside.
- Make the Sauce: In the same skillet, add chopped onion and sauté until translucent. Add crushed tomatoes, oregano, basil, sugar, salt, and pepper. Stir well, then add the browned meatballs back into the skillet. Let the sauce simmer on low heat for about 20-30 minutes, allowing the meatballs to cook through and the flavors to meld together.
- Cook the Spaghetti: While the sauce is simmering, bring a large pot of salted water to a boil. Add the spaghetti and cook according to package instructions until al dente. Drain the spaghetti and set aside.
- Combine and Serve: Add the cooked spaghetti to the skillet with the meatballs and sauce. Toss gently to coat the spaghetti in the sauce. Serve hot, topped with additional grated Parmesan cheese.
Extra Tips:
For the best results, use fresh ingredients whenever possible, particularly with herbs and Parmesan cheese. If you prefer a bit of spice, add a pinch of red pepper flakes to the sauce.
To make the meatballs extra tender, avoid over-mixing the meat mixture. If you have extra time, let the sauce simmer longer; this deepens the flavor and makes the dish even more delicious.
Additionally, always taste the sauce before serving to adjust seasonings to your family’s preferences.
Hearty Chicken Pot Pie

There’s nothing quite like a warm, homemade chicken pot pie to bring the family together around the dinner table. This classic dish combines tender chunks of chicken with a medley of vegetables, all enveloped in a rich, creamy sauce and encased in a flaky, golden crust.
It’s a comforting, satisfying meal that’s sure to delight both kids and adults alike. Whether you’re looking for a cozy weeknight dinner or a special meal for a family gathering, this Hearty Chicken Pot Pie is a perfect choice.
Creating this dish from scratch is simpler than you might think, and the result is well worth the effort. The key to a great chicken pot pie is balancing the flavors and textures. The creamy filling complements the crispness of the crust, while the savory chicken and fresh vegetables provide a hearty base.
This recipe serves 4-6 people, making it ideal for family dinners or leftovers for lunch the next day. Gather your ingredients and follow the steps below to make a pot pie that will have everyone asking for seconds.
Ingredients:
- 2 cups cooked chicken, diced
- 1 cup chicken broth
- 1 cup milk
- 1/2 cup butter
- 1/2 cup all-purpose flour
- 1 cup frozen peas
- 1 cup diced carrots
- 1 cup diced potatoes
- 1/2 cup diced celery
- 1 small onion, chopped
- 1 teaspoon salt
- 1/2 teaspoon black pepper
- 1/4 teaspoon dried thyme
- 1/4 teaspoon dried rosemary
- 1 package pie crust (enough for top and bottom crust)
- 1 egg, beaten (for egg wash)
Instructions:
- Preheat and Prepare: Start by preheating your oven to 425°F (220°C). While the oven is heating, prepare your pie crust according to package instructions and set aside.
- Cook the Vegetables: In a large saucepan over medium heat, melt the butter. Add the onions, celery, carrots, and potatoes, cooking until the vegetables are tender, about 5-7 minutes.
- Make the Sauce: Stir in the flour, salt, pepper, thyme, and rosemary until the flour is well incorporated and forms a paste. Gradually whisk in the chicken broth and milk, cooking and stirring until the mixture thickens and begins to bubble.
- Combine Ingredients: Gently stir the cooked chicken and peas into the sauce, ensuring everything is evenly coated. Remove the saucepan from heat.
- Assemble the Pie: Roll out the bottom pie crust and fit it into a pie dish. Pour the chicken and vegetable mixture into the crust. Cover with the top crust, sealing the edges. Cut slits in the top for steam to escape.
- Apply Egg Wash and Bake: Brush the top of the pie with the beaten egg to give it a glossy finish. Place the pie in the preheated oven and bake for 30-35 minutes, or until the crust is golden brown.
- Cool and Serve: Allow the pie to cool for about 10 minutes before serving. This helps the filling to set slightly, making it easier to slice.
Extra Tips:
For a richer flavor, consider using a mix of white and dark chicken meat. You can also add other veggies your kids love to make the dish even more nutritious.
If you prefer a homemade crust, prepare it ahead to save time. When reheating leftovers, cover the pie with foil and warm it in the oven to maintain the crust’s crispness. Enjoy your Hearty Chicken Pot Pie with a side salad for a complete meal!
Loaded Baked Potato Skins

Loaded Baked Potato Skins are a delightful and fun addition to any family dinner, especially one aimed at pleasing the little ones. These savory treats are the perfect combination of crispy potato shells filled with a hearty mix of cheese, bacon, and green onions, making them the ultimate comfort food.
Not only are they incredibly delicious, but they also offer a playful way for kids to enjoy their vegetables, cleverly disguised as a cheesy, flavorful snack. This recipe is designed for 4-6 people, guaranteeing there’s plenty to go around for the whole family.
Loaded Baked Potato Skins aren’t just a tasty treat but also a versatile dish that can easily be customized to suit different tastes. Whether served as a main course or a hearty appetizer, these potato skins are sure to become a family favorite.
Ingredients:
- 6 large russet potatoes
- Olive oil
- Salt
- 1 ½ cups shredded cheddar cheese
- 8 slices of bacon, cooked and crumbled
- 1 cup sour cream
- 4 green onions, chopped
- Black pepper
Instructions:
- Preheat the Oven: Begin by preheating your oven to 400°F (200°C). This guarantees that your potatoes will bake evenly and develop a nice, crispy skin.
- Prepare the Potatoes: Scrub the potatoes clean and pat them dry. Using a fork, prick each potato a few times to allow steam to escape during baking. Rub the potatoes all over with olive oil and sprinkle with salt. Place them directly on the oven rack and bake for about 50-60 minutes or until the skins are crispy and the insides are tender.
- Cool and Cut: Once baked, allow the potatoes to cool slightly until they’re easy to handle. Cut each potato in half lengthwise. Using a spoon, scoop out the flesh, leaving about ¼ inch of potato on the skin. Reserve the scooped-out potato for another use, like mashed potatoes.
- Bake the Skins: Brush the inside of the skins with a bit more olive oil and a sprinkle of salt. Place them cut side down on a baking sheet and return to the oven for about 5-7 minutes to crisp up.
- Fill and Bake Again: Remove the potato skins from the oven and turn them over. Fill each skin with shredded cheddar cheese and crumbled bacon. Return them to the oven for another 5-7 minutes, or until the cheese is melted and bubbly.
- Garnish and Serve: Remove the skins from the oven and let them cool for a minute. Top each one with a dollop of sour cream and a sprinkle of chopped green onions. Add a touch of black pepper if desired. Serve immediately while hot and enjoy!
Extra Tips: For an extra crispy texture, consider using a wire rack on top of your baking sheet when crisping up the potato skins. This allows air to circulate around the skins and helps them crisp evenly.
Don’t discard the scooped-out potato flesh; it can be mashed and seasoned for an easy side dish later. If your kids aren’t fans of onions or sour cream, these toppings can be served on the side, allowing everyone to customize their own potato skins.
Vegetable Stir-Fry With Tofu
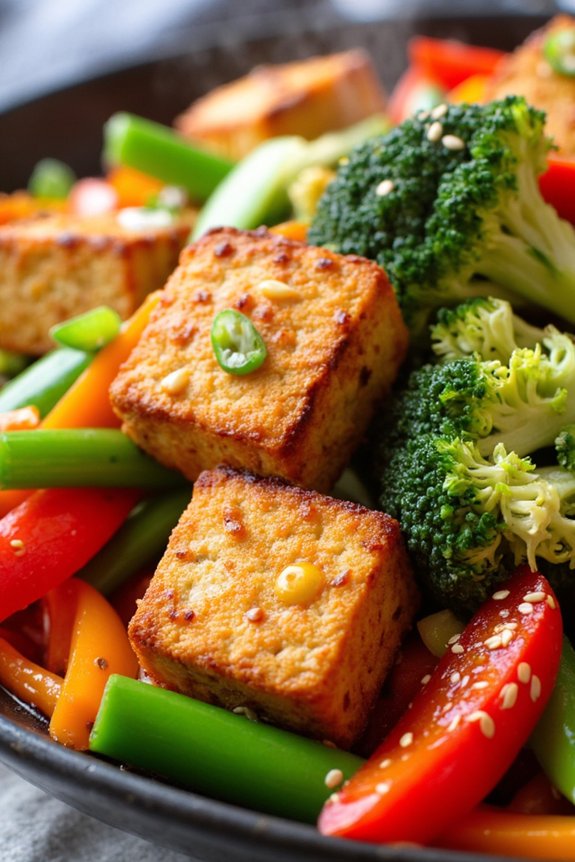
Vegetable Stir-Fry With Tofu is a delightful and nutritious dish that’s perfect for family dinners, especially if you want your kids to eat their veggies without a fuss. This vibrant dish combines colorful vegetables and protein-rich tofu, all tossed in a savory sauce that enhances the natural flavors of the ingredients.
It’s quick to prepare, making it ideal for busy weeknights when you want to serve something wholesome yet simple. Plus, it’s a great way to introduce kids to the idea of plant-based meals, encouraging them to appreciate a variety of textures and tastes.
This dish isn’t only visually appealing but also a great source of essential nutrients. The mix of fresh vegetables guarantees a healthy dose of vitamins and minerals, while tofu provides the necessary protein to keep everyone satisfied. Serve it over a bed of steaming rice or noodles for a complete meal that will have your family asking for seconds.
With its combination of flavors and the fun of using chopsticks, even picky eaters will be willing to give it a try.
Ingredients for 4-6 servings:
- 1 block (14 oz) firm tofu
- 2 tablespoons soy sauce
- 2 tablespoons cornstarch
- 2 tablespoons vegetable oil
- 1 red bell pepper, sliced
- 1 yellow bell pepper, sliced
- 1 cup broccoli florets
- 1 cup snap peas
- 1 carrot, julienned
- 2 cloves garlic, minced
- 1 tablespoon ginger, grated
- 3 tablespoons soy sauce
- 2 tablespoons hoisin sauce
- 1 tablespoon sesame oil
- 1 tablespoon rice vinegar
- 1 tablespoon honey or maple syrup
- 2 green onions, sliced
- Sesame seeds for garnish
Instructions:
- Prepare the Tofu: Drain the tofu and press it to remove excess moisture. Cut the tofu into cubes and toss with 2 tablespoons of soy sauce. Sprinkle with cornstarch, guaranteeing each piece is evenly coated.
- Cook the Tofu: In a large pan or wok, heat 1 tablespoon of vegetable oil over medium-high heat. Add the tofu cubes and cook until they’re golden and crispy on all sides, about 5-7 minutes. Remove the tofu from the pan and set aside.
- Stir-Fry the Vegetables: Add the remaining tablespoon of vegetable oil to the same pan. Add the garlic and ginger, cooking for about 30 seconds until fragrant. Add the bell peppers, broccoli, snap peas, and carrot. Stir-fry for 5-6 minutes until the vegetables are crisp-tender.
- Make the Sauce: In a small bowl, whisk together 3 tablespoons of soy sauce, hoisin sauce, sesame oil, rice vinegar, and honey or maple syrup.
- Combine Everything: Return the tofu to the pan with the vegetables. Pour the sauce over the mixture and toss everything to coat evenly. Cook for an additional 2-3 minutes until everything is heated through and the sauce is slightly thickened.
- Serve: Remove from heat and garnish with sliced green onions and sesame seeds. Serve immediately over rice or noodles.
Extra Tips:
For the best results, confirm the tofu is well-pressed to remove as much water as possible; this helps it achieve a nice crispy texture.
Feel free to substitute or add your family’s favorite vegetables like mushrooms or zucchini for variety. If your family enjoys a bit of heat, consider adding a pinch of red pepper flakes to the sauce.
Finally, using a non-stick pan or well-seasoned wok can prevent the tofu and vegetables from sticking, making the cooking process smoother.
Slow Cooker Chili
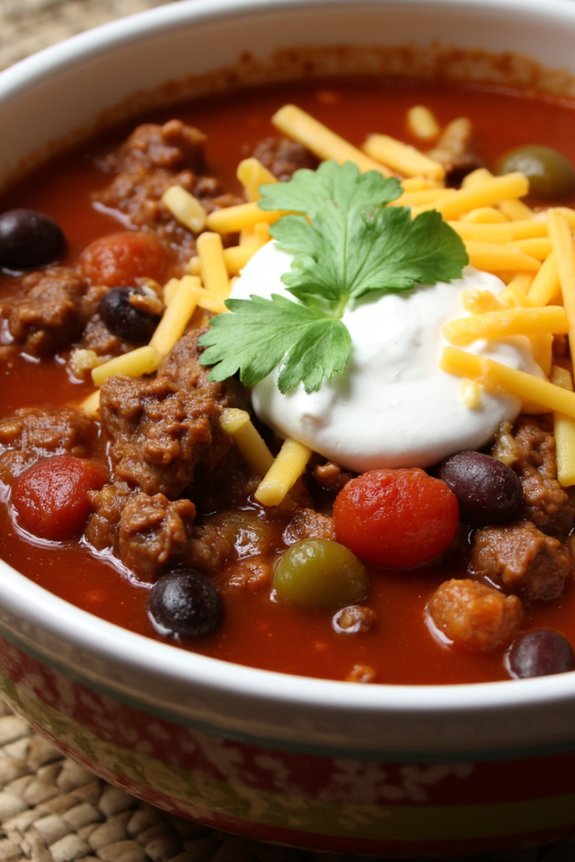
When it comes to cozy family dinners, nothing beats the hearty warmth of a delicious chili simmering away in the slow cooker. This family-friendly slow cooker chili isn’t only flavorful and comforting but also incredibly easy to make. It’s the perfect recipe to put together on a busy day, letting the slow cooker do all the hard work while you focus on spending quality time with your loved ones.
With its mild yet savory flavor, this dish is sure to be a hit with both kids and adults alike. The beauty of this slow cooker chili is its versatility. You can easily adjust the spice levels to suit your family’s palate, and it’s packed with nutritious ingredients that make it a wholesome meal.
Filled with tender ground beef, beans, and a medley of vegetables, this chili is both filling and satisfying. Serve it with warm cornbread or over a bed of rice, and watch as your family gathers around to enjoy this delightful dinner together.
Ingredients (Serves 4-6):
- 1 pound ground beef
- 1 large onion, chopped
- 2 cloves garlic, minced
- 1 red bell pepper, chopped
- 1 green bell pepper, chopped
- 1 can (15 ounces) kidney beans, drained and rinsed
- 1 can (15 ounces) black beans, drained and rinsed
- 1 can (28 ounces) crushed tomatoes
- 2 tablespoons tomato paste
- 1 tablespoon chili powder
- 1 teaspoon cumin
- 1 teaspoon paprika
- 1 teaspoon salt
- 1/2 teaspoon black pepper
- 1 cup beef broth
- Optional toppings: shredded cheese, sour cream, chopped cilantro
Cooking Instructions:
- Prepare Ingredients: Start by gathering all your ingredients. Chop the onion, mince the garlic, and chop both the red and green bell peppers. Drain and rinse the kidney and black beans.
- Brown the Beef: In a large skillet over medium heat, add the ground beef. Cook until browned, breaking it apart with a spoon, for about 5-7 minutes. Drain excess fat.
- Combine Ingredients: In the slow cooker, combine the browned beef, chopped onion, minced garlic, chopped bell peppers, kidney beans, black beans, crushed tomatoes, and tomato paste.
- Season the Chili: Add chili powder, cumin, paprika, salt, and black pepper to the slow cooker. Stir in the beef broth until all ingredients are well combined.
- Cook the Chili: Cover the slow cooker with its lid. Set it on low and let the chili cook for 6-8 hours, or on high for 3-4 hours. This slow cooking allows the flavors to meld beautifully.
- Serve: Once cooked, give the chili a good stir. Ladle it into bowls and top with your choice of shredded cheese, sour cream, and chopped cilantro if desired.
Extra Tips:
For a more robust flavor, consider browning the onions and garlic along with the beef before adding them to the slow cooker. If your family enjoys more heat, feel free to add a pinch of cayenne pepper or some chopped jalapeños.
This chili also freezes beautifully, so consider making a double batch to have on hand for a quick meal later. Finally, if you prefer a thicker chili, let it cook uncovered for the last 30 minutes to allow some of the liquid to evaporate.
Mini Meatloaf Muffins
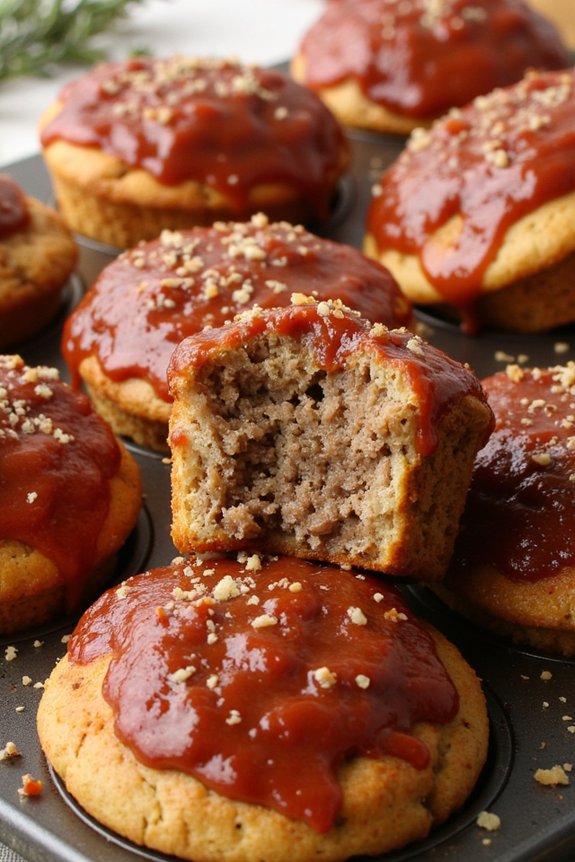
Mini Meatloaf Muffins are a fun and delicious twist on the classic meatloaf. These individual-sized portions are perfect for family dinners, especially when you have kids at the table. Not only do they cook faster than a traditional meatloaf, but their muffin form makes them easy to serve and portion. The savory flavors of the meatloaf paired with the sweetness of a ketchup glaze make these muffins irresistible, even to picky eaters.
These Mini Meatloaf Muffins are great for busy weeknights or weekend family gatherings. They’re packed with protein and can be paired with a variety of sides like mashed potatoes, steamed vegetables, or a fresh salad. The recipe is straightforward, allowing you to involve your children in the cooking process, making it a fun family activity. Let’s explore how you can make these delightful muffins for a serving size of 4-6 people.
Ingredients:
- 1 1/2 pounds ground beef
- 1 cup breadcrumbs
- 1/2 cup grated Parmesan cheese
- 1/2 cup milk
- 1 large egg
- 1 small onion, finely chopped
- 2 cloves garlic, minced
- 2 tablespoons Worcestershire sauce
- 1 teaspoon salt
- 1/2 teaspoon black pepper
- 1/2 teaspoon dried thyme
- 1/2 cup ketchup
- 2 tablespoons brown sugar
- Cooking spray
Instructions:
- Preheat the Oven: Start by preheating your oven to 375°F (190°C). This guarantees that the oven is at the right temperature when you’re ready to bake the muffins.
- Prepare the Muffin Tin: Lightly spray a standard muffin tin with cooking spray. This will help prevent the meatloaf muffins from sticking to the tin.
- Mix the Meatloaf Ingredients: In a large mixing bowl, combine ground beef, breadcrumbs, Parmesan cheese, milk, egg, onion, garlic, Worcestershire sauce, salt, pepper, and thyme. Mix everything together until well combined, but be careful not to overmix, as this can make the meatloaf tough.
- Form the Muffins: Divide the meat mixture evenly among the muffin cups, pressing lightly to confirm they hold together. Each cup should be filled to the top with the meat mixture.
- Prepare the Glaze: In a small bowl, mix together ketchup and brown sugar to make the glaze. Spoon about a tablespoon of this mixture over each meatloaf muffin, spreading it evenly on top.
- Bake the Muffins: Place the muffin tin in the preheated oven and bake for about 20-25 minutes. The internal temperature should reach 160°F (71°C) to confirm they’re fully cooked.
- Rest and Serve: Once done, remove the muffins from the oven and let them rest for a few minutes in the pan before serving. This helps them hold their shape when removed.
Extra Tips:
When preparing your meatloaf muffins, you can customize them by adding chopped vegetables such as bell peppers or carrots for extra nutrition and flavor.
If your family prefers a spicier kick, consider adding a dash of hot sauce or a pinch of cayenne pepper to the meat mixture.
Also, if you’re cooking for fewer people, these muffins freeze well. Simply place any leftovers in an airtight container and freeze for up to three months. Reheat them in the oven when ready to enjoy again.
Chicken and Rice Casserole

Chicken and rice casserole is a comforting dish that brings warmth and satisfaction to any family dinner table. This recipe combines tender chicken, fluffy rice, and a creamy sauce to create a meal that’s both hearty and delicious. It’s a perfect dish for busy weeknights or a cozy weekend dinner, as it can be prepared with minimal effort and is guaranteed to please both kids and adults alike.
The creamy texture and savory flavors make it an all-time favorite in many households. Not only is this casserole packed with flavor, but it’s also nutritious and filling, making it a well-rounded meal. The combination of protein from the chicken and carbohydrates from the rice assures that everyone gets a balanced meal.
This recipe is designed to serve 4-6 people, making it ideal for family gatherings or when you want to have leftovers for the next day. With its simple yet delicious ingredients, this chicken and rice casserole is bound to become a staple in your family’s menu rotation.
Ingredients (Serves 4-6):
- 2 cups cooked rice
- 2 cups cooked, shredded chicken
- 1 can (10.5 oz) cream of chicken soup
- 1 cup chicken broth
- 1 cup milk
- 1 cup frozen peas and carrots
- 1 cup shredded cheddar cheese
- 1 tablespoon olive oil
- 1 teaspoon garlic powder
- 1 teaspoon onion powder
- Salt and pepper to taste
- 1/2 cup breadcrumbs
Cooking Instructions:
- Preheat the Oven: Preheat your oven to 350°F (175°C) to make sure it’s ready once your casserole is assembled.
- Prepare the Casserole Dish: Lightly grease a 9×13-inch baking dish with olive oil to prevent sticking.
- Mix the Ingredients: In a large bowl, combine the cooked rice, shredded chicken, cream of chicken soup, chicken broth, milk, frozen peas and carrots, garlic powder, onion powder, salt, and pepper. Stir until all the ingredients are well combined.
- Assemble the Casserole: Pour the mixture into the prepared baking dish, spreading it evenly. Sprinkle the shredded cheddar cheese over the top, followed by an even layer of breadcrumbs.
- Bake the Casserole: Place the baking dish in the preheated oven and bake for 25-30 minutes, or until the cheese is melted and bubbly, and the breadcrumbs are golden brown.
- Cool and Serve: Remove the casserole from the oven and let it cool for a few minutes before serving. This will help the dish set slightly, making it easier to serve.
Extra Tips:
For added flavor, consider using a mix of different cheeses such as mozzarella or Parmesan along with the cheddar. You can also add sautéed onions or mushrooms for additional texture and taste.
If you prefer a spicier version, add a pinch of red pepper flakes to the mix. This dish can be prepared in advance and stored in the refrigerator, then baked when you’re ready to serve. Just add a few extra minutes to the baking time if baking from cold. Enjoy your cozy family dinner!
Veggie-Packed Quesadillas

Veggie-Packed Quesadillas are a delightful way to introduce more vegetables into your family’s diet while delivering a meal that kids will love. These quesadillas aren’t only colorful and packed with nutrients, but they’re also incredibly delicious and easy to make. The combination of melted cheese and a variety of vegetables tucked inside a crispy tortilla is irresistible to both kids and adults. Serve them with a side of salsa or guacamole for an extra burst of flavor.
This recipe is perfect for a family dinner, serving 4-6 people. It’s versatile, allowing you to use whatever vegetables you have on hand. Feel free to get creative with the fillings, but the key is to chop everything finely so that the vegetables cook evenly and meld together with the cheese. This quick and easy recipe is perfect for busy weeknights or laid-back weekends when you want something wholesome and satisfying.
Ingredients:
- 8 large whole wheat or flour tortillas
- 2 cups shredded cheese (such as cheddar or Monterey Jack)
- 1 cup corn kernels (fresh, frozen, or canned)
- 1 red bell pepper, finely chopped
- 1 zucchini, finely chopped
- 1 cup baby spinach, chopped
- 1 small red onion, finely chopped
- 1 tablespoon olive oil
- 1 teaspoon ground cumin
- Salt and pepper to taste
- Optional: Salsa or guacamole for serving
Instructions:
- Prepare the Vegetables: Start by washing and finely chopping the red bell pepper, zucchini, baby spinach, and red onion. Confirm the vegetables are chopped into small, uniform pieces for even cooking.
- Cook the Vegetables: In a large skillet, heat the olive oil over medium heat. Add the chopped red onion and sauté for 2-3 minutes until they start to soften. Add the red bell pepper, zucchini, corn kernels, and ground cumin. Stir well and cook for another 5 minutes until all the vegetables are tender. Season with salt and pepper to taste. Stir in the chopped spinach and cook for an additional 1-2 minutes until wilted. Remove from heat and set aside.
- Assemble the Quesadillas: Lay out the tortillas on a flat surface. Spread a generous amount of the vegetable mixture onto one half of each tortilla. Sprinkle an even layer of shredded cheese over the vegetables. Fold the tortillas in half to enclose the filling.
- Cook the Quesadillas: Heat a non-stick skillet or griddle over medium heat. Place the folded quesadillas onto the skillet, cooking each side for about 2-3 minutes until the tortillas are golden brown and the cheese has melted. Adjust the heat if necessary to prevent burning.
- Serve: Once cooked, remove the quesadillas from the skillet and let them cool slightly. Cut each quesadilla into wedges. Serve warm with a side of salsa or guacamole, if desired.
Extra Tips:
For a more robust flavor, consider adding a pinch of smoked paprika or chili powder to the vegetable mix. You can also experiment with different types of cheese for varied flavors. If you have picky eaters, try pureeing the vegetables before adding them to the quesadillas; this way, they get all the nutrients without noticing the veggies.
Additionally, these quesadillas can be made ahead of time and stored in the refrigerator, making them a convenient option for meal prep. Just reheat in the oven or on a skillet before serving to maintain their crispiness.