

As a busy mom who adores cooking, I understand the challenge of creating quick, tasty, and healthy meals that the whole family will love. That’s why I’m thrilled to share these 10 crispy, quick, and easy chicken oven recipes. Picture lemon herb roasted chicken with vibrant sides or the delightful aroma of garlic Parmesan thighs filling your kitchen. Excited? These dishes are sure to turn your weeknight dinners into flavorful family feasts.
Lemon Herb Roasted Chicken
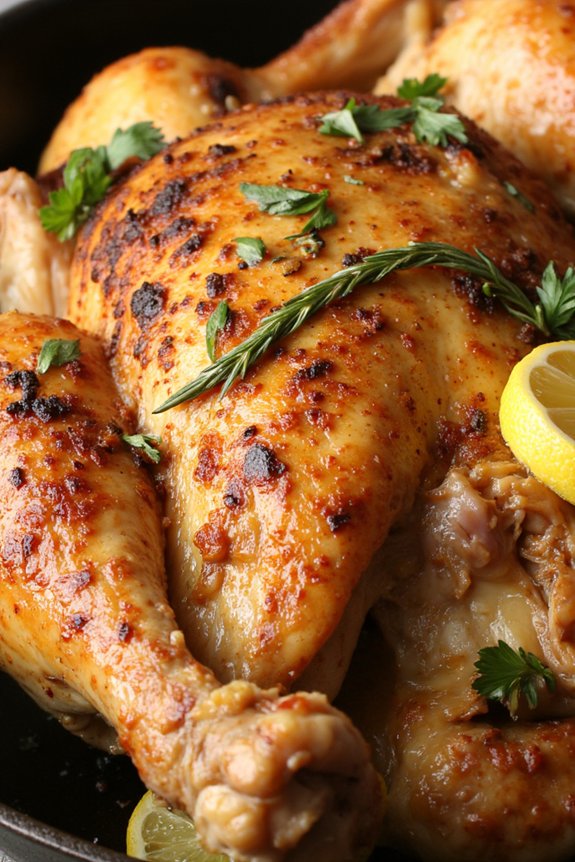
Lemon Herb Roasted Chicken is a delightful and easy-to-make dish that combines the zesty flavors of lemon with fragrant herbs to create a mouthwatering meal. This dish is perfect for those looking for a healthy yet flavorful dinner option that can be prepared in the oven, making it both convenient and delicious.
The lemon and herbs not only infuse the chicken with a revitalizing taste but also help keep it tender and juicy. Ideal for serving 4-6 people, this recipe is great for family dinners or small gatherings. The combination of fresh ingredients and simple cooking methods guarantees that you can enjoy a wholesome meal without spending hours in the kitchen.
With a few basic ingredients and straightforward instructions, you can create a meal that’s sure to impress your guests and satisfy your taste buds.
Ingredients:
- 1 whole chicken (about 4-5 pounds)
- 2 lemons, sliced
- 4 tablespoons olive oil
- 4 cloves garlic, minced
- 1 tablespoon fresh thyme, chopped
- 1 tablespoon fresh rosemary, chopped
- 1 tablespoon fresh parsley, chopped
- Salt and pepper to taste
- 1 cup chicken broth
- 1 onion, quartered
Cooking Instructions:
- Preheat the Oven: Preheat your oven to 375°F (190°C). This guarantees the oven is at the right temperature when the chicken is ready to be roasted.
- Prepare the Chicken: Rinse the chicken under cold water and pat it dry with paper towels. Removing excess moisture helps the skin become crispy during roasting.
- Season the Chicken: In a small bowl, mix olive oil, minced garlic, thyme, rosemary, parsley, salt, and pepper. Rub this mixture all over the chicken, making sure to get under the skin and inside the cavity for maximum flavor.
- Stuff the Chicken: Place lemon slices and onion quarters inside the cavity of the chicken. This adds additional flavor from the inside as it cooks.
- Place in Roasting Pan: Position the chicken breast-side up in a roasting pan. Pour chicken broth into the bottom of the pan; this will help keep the chicken moist and create a delicious base for a sauce or gravy.
- Roast the Chicken: Place the roasting pan in the preheated oven. Roast the chicken for about 1.5 to 2 hours, basting occasionally with the pan juices. The chicken is done when a meat thermometer inserted into the thickest part of the thigh reads 165°F (74°C).
- Rest the Chicken: Once cooked, remove the chicken from the oven and let it rest for about 10-15 minutes before carving. This allows the juices to redistribute throughout the meat, making it juicier.
Extra Tips:
For an extra burst of flavor, consider adding additional herbs like sage or tarragon. If you prefer a crispier skin, you can broil the chicken for the last 5-10 minutes of cooking, but keep a close eye on it to prevent burning.
Additionally, you can use the pan drippings to create a simple gravy by adding a bit of flour to thicken it. Remember to adjust the seasoning to your taste and enjoy your delicious Lemon Herb Roasted Chicken with your favorite side dishes.
Garlic Parmesan Baked Chicken Thighs
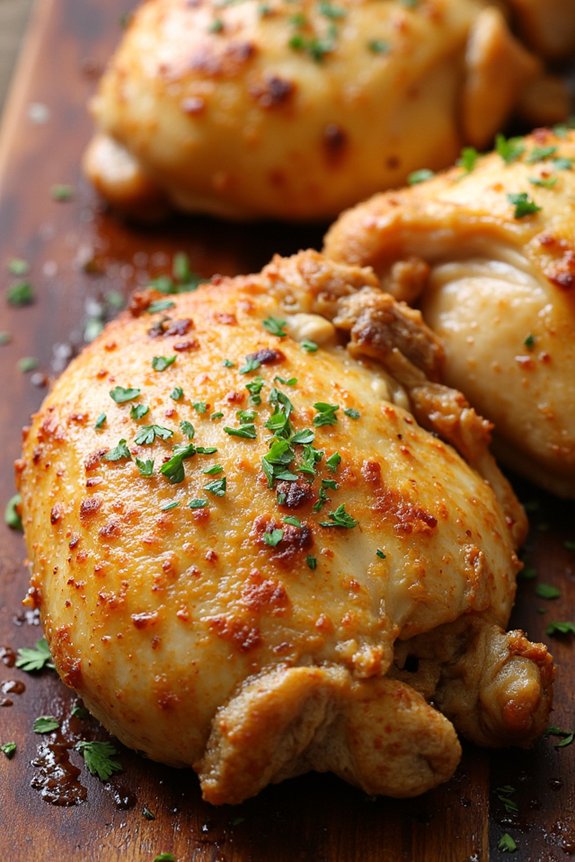
Garlic Parmesan Baked Chicken Thighs is a savory and delectable dish that combines the rich flavors of garlic and Parmesan cheese with tender, juicy chicken thighs. This is an easy-to-make recipe that promises to infuse your dinner table with an irresistible aroma and flavor.
Perfect for a family meal, this dish is satisfying and healthy, allowing you to enjoy a comforting dinner without compromising on nutrition. The oven-baked method guarantees that the chicken remains moist on the inside while achieving a wonderful golden-brown crust on the outside.
This recipe serves 4-6 people and is ideal for a weeknight dinner or a gathering with friends. The combination of garlic and Parmesan creates a mouthwatering crust that enhances the natural flavors of the chicken. Serve these delicious baked chicken thighs with a side of roasted vegetables or a simple green salad for a complete and balanced meal.
Whether you’re a novice or an experienced cook, this recipe provides an easy way to prepare a flavorful dish that everyone will love.
Ingredients:
- 8 bone-in, skin-on chicken thighs
- 1/2 cup grated Parmesan cheese
- 4 cloves garlic, minced
- 2 tablespoons olive oil
- 1 teaspoon dried oregano
- 1 teaspoon dried basil
- 1 teaspoon paprika
- 1 teaspoon salt
- 1/2 teaspoon black pepper
- 1 tablespoon fresh parsley, chopped (optional, for garnish)
Instructions:
- Preheat the Oven: Begin by preheating your oven to 400°F (200°C). This will confirm it’s at the right temperature for baking the chicken thighs evenly.
- Prepare the Chicken: Pat the chicken thighs dry with paper towels to remove excess moisture. This helps the skin become crispier during baking.
- Make the Garlic Parmesan Mixture: In a small bowl, combine the grated Parmesan cheese, minced garlic, olive oil, dried oregano, dried basil, paprika, salt, and black pepper. Mix until well combined to form a paste.
- Coat the Chicken: Rub the garlic Parmesan mixture evenly over each chicken thigh, making sure to coat both the skin and the meat underneath the skin for maximum flavor.
- Bake the Chicken: Arrange the chicken thighs in a single layer on a baking sheet or in a baking dish. Bake in the preheated oven for 35-40 minutes, or until the chicken is cooked through and the skin is golden brown and crispy. A meat thermometer should read 165°F (74°C) when inserted into the thickest part of the thigh.
- Rest and Serve: Remove the chicken from the oven and let it rest for a few minutes. Garnish with fresh parsley, if desired, before serving. Enjoy your Garlic Parmesan Baked Chicken Thighs with your favorite side dishes.
Extra Tips:
For an added layer of flavor, marinate the chicken thighs in the garlic Parmesan mixture for a few hours or overnight in the refrigerator before baking. This allows the flavors to penetrate deeper into the meat.
If you prefer a spicier kick, consider adding a pinch of cayenne pepper to the seasoning mixture. Additionally, confirm the chicken thighs are spaced evenly on the baking sheet to allow for even cooking and crisping.
If you’re using skinless chicken thighs, you might want to reduce the baking time slightly to prevent them from drying out.
Honey Mustard Glazed Chicken Breasts
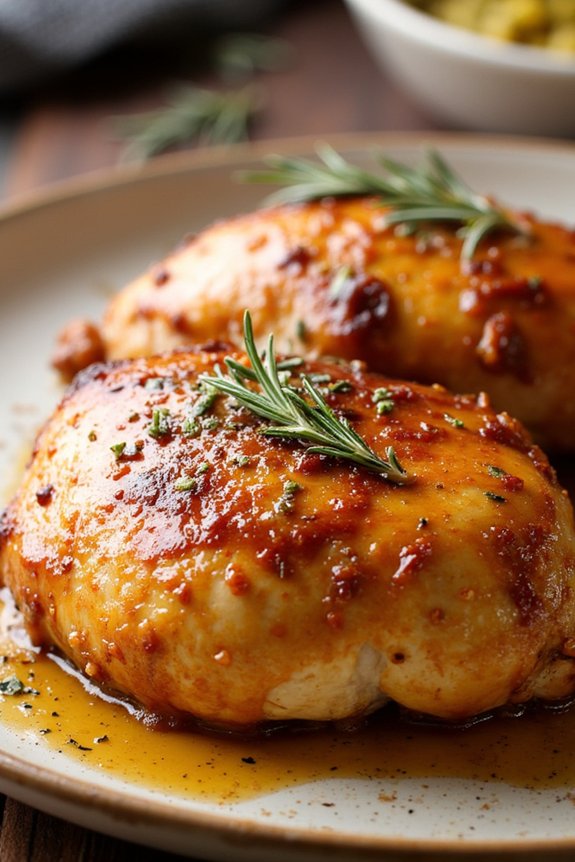
If you’re looking for a delicious and healthy chicken dinner that can be prepared with ease, this Honey Mustard Glazed Chicken Breasts recipe is a perfect choice. This dish combines the tangy sweetness of honey mustard with the savory flavor of tender, juicy chicken breasts.
It’s a simple yet elegant meal that’s sure to impress family and friends, making it a great option for both weeknight dinners and special occasions. Plus, it’s cooked entirely in the oven, which means less time spent over the stove and more time enjoying your meal.
The honey mustard glaze creates a beautiful caramelized coating on the chicken, enhancing its natural flavors without overpowering them. This recipe isn’t only quick to prepare but also low in fat and high in protein, making it a healthy addition to your meal rotation.
It’s suitable for a serving size of 4-6 people, so it’s perfect for a small gathering or a family dinner. With just a few ingredients and steps, you’ll have a delectable dish ready to serve that pairs well with a variety of sides, such as roasted vegetables or a fresh green salad.
Ingredients:
- 4-6 boneless, skinless chicken breasts
- 1/2 cup honey
- 1/4 cup Dijon mustard
- 2 tablespoons olive oil
- 2 tablespoons lemon juice
- 1 teaspoon garlic powder
- Salt and pepper to taste
- Fresh herbs (such as rosemary or thyme) for garnish, optional
Cooking Instructions:
1. Preheat the oven: Set your oven to 375°F (190°C) to make sure it’s hot and ready when your chicken is prepared.
2. Prepare the glaze: In a small bowl, whisk together the honey, Dijon mustard, olive oil, lemon juice, garlic powder, salt, and pepper until smooth and well combined. This mixture will serve as both a marinade and a glaze.
3. Marinate the chicken: Place the chicken breasts in a large resealable plastic bag or a shallow dish. Pour half of the honey mustard mixture over the chicken, reserving the rest for later. Make certain each piece is well coated.
Seal the bag or cover the dish, and refrigerate for at least 30 minutes to let the flavors meld.
4. Arrange the chicken for baking: Remove the chicken from the marinade and place it in a single layer on a baking sheet or in a baking dish. Discard the marinade used for soaking.
5. Bake the chicken: Place the chicken in the preheated oven and bake for 20-25 minutes. Halfway through, brush the reserved honey mustard glaze over the top of the chicken to enhance the flavor and give it a glossy finish.
6. Check for doneness: After 20-25 minutes, use a meat thermometer to confirm the internal temperature of the chicken has reached 165°F (74°C). If not, continue baking for an additional 5 minutes and check again.
7. Rest and serve: Once cooked, remove the chicken from the oven and let it rest for 5 minutes to allow the juices to redistribute. Garnish with fresh herbs if desired, and serve warm.
Extra Tips:
For best results, choose chicken breasts of similar size for even cooking. If the chicken breasts are particularly large, consider pounding them to a uniform thickness. This will make certain they cook evenly and remain juicy.
If you prefer a bit of crunch, you can add a light sprinkle of breadcrumbs before baking. Additionally, don’t skip letting the chicken rest after baking; this step is vital for keeping the meat juicy and tender.
Feel free to adjust the sweetness of the glaze by adding more or less honey according to your taste preference.
Crispy Baked Buffalo Chicken Drumsticks

If you’re looking for a delicious and healthy chicken oven dinner, these Crispy Baked Buffalo Chicken Drumsticks are perfect for you. This dish combines the classic flavors of buffalo sauce with the satisfying crunch of baked chicken drumsticks, making it a family favorite.
By baking the drumsticks instead of frying, you retain all the flavor while cutting down on unhealthy oils and fats. These drumsticks aren’t only easy to prepare but also pack a punch with their zesty, spicy taste. Ideal for a weeknight dinner or a casual get-together, the drumsticks are marinated and then baked to crispy perfection.
The key to achieving that perfect texture is the oven-baking method, which guarantees the chicken is cooked through while the skin becomes irresistibly crispy. Served with celery sticks and a side of ranch or blue cheese dressing, these drumsticks are sure to be a hit at the dinner table.
Ingredients (Serves 4-6):
- 10-12 chicken drumsticks
- 1 cup hot sauce (such as Frank’s RedHot)
- 2 tablespoons melted butter
- 1 tablespoon olive oil
- 1 teaspoon garlic powder
- 1 teaspoon onion powder
- 1 teaspoon smoked paprika
- 1 teaspoon salt
- 1/2 teaspoon black pepper
- 1/2 teaspoon cayenne pepper (optional, for extra heat)
- Celery sticks (for serving)
- Ranch or blue cheese dressing (for serving)
Cooking Instructions:
- Preheat the Oven: Preheat your oven to 400°F (200°C). While the oven is heating, line a baking sheet with aluminum foil and place a wire rack on top.
- Prepare the Chicken: Pat the chicken drumsticks dry with paper towels to remove excess moisture. This helps the skin become crispy during baking.
- Make the Marinade: In a large bowl, combine the hot sauce, melted butter, olive oil, garlic powder, onion powder, smoked paprika, salt, black pepper, and cayenne pepper. Mix well to combine.
- Marinate the Chicken: Add the drumsticks to the bowl with the marinade, making sure each piece is well-coated. Let the drumsticks marinate for at least 30 minutes, or up to 2 hours for more intense flavor. If marinating for longer, cover and refrigerate.
- Bake the Drumsticks: Arrange the marinated drumsticks on the wire rack, ensuring they’re spaced out for even cooking. Bake in the preheated oven for 35-40 minutes, turning once halfway through, until the chicken is cooked through and the skin is crispy.
- Serve: Once baked, remove the drumsticks from the oven and let them rest for a few minutes. Serve hot with celery sticks and your choice of ranch or blue cheese dressing for dipping.
Extra Tips:
For the crispiest drumsticks, make sure the chicken skin is completely dry before applying the marinade. If you prefer less spicy drumsticks, reduce the amount of hot sauce and omit the cayenne pepper.
Additionally, using a wire rack allows the heat to circulate around the drumsticks, guaranteeing even cooking and crispiness on all sides. For a smokier flavor, try adding a touch more smoked paprika to the marinade.
Finally, always use a meat thermometer to verify the chicken reaches an internal temperature of 165°F (74°C) for safe consumption.
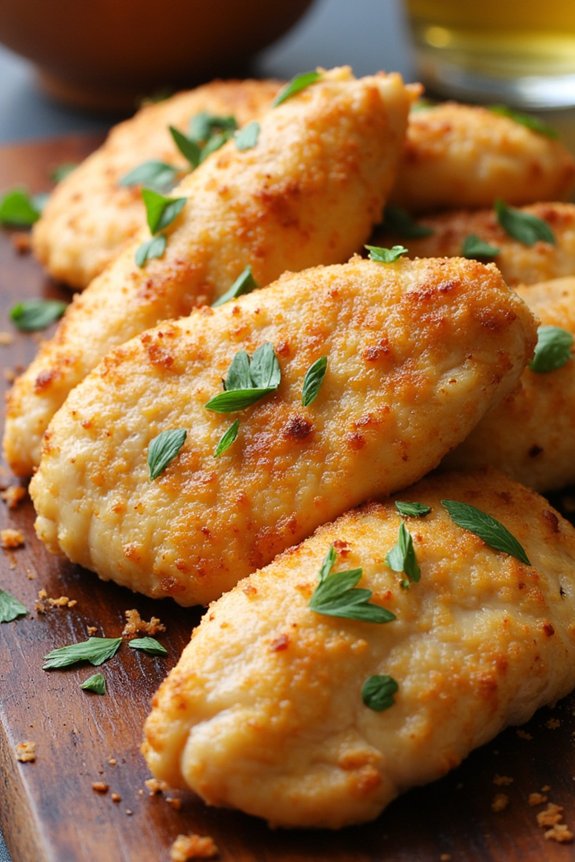
Herb-Crusted Chicken With Asparagus
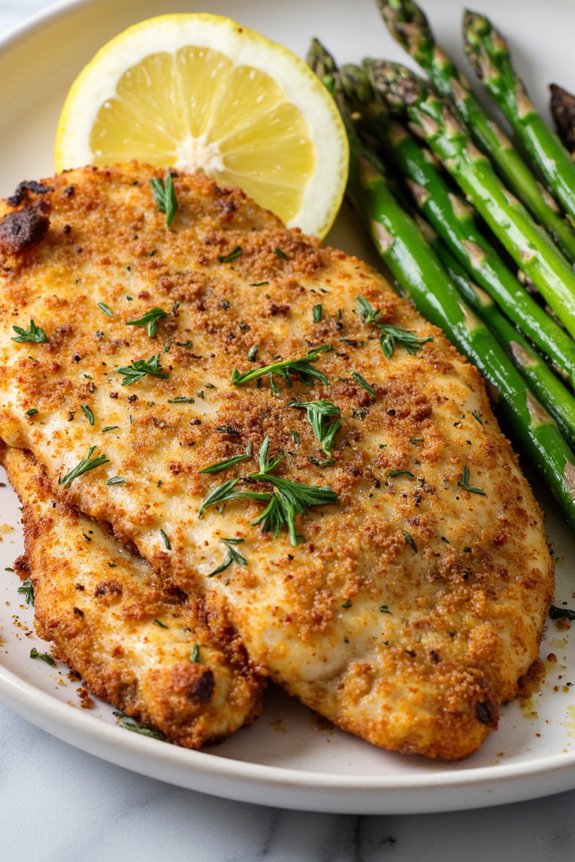
Herb-Crusted Chicken with Asparagus is a delightful and nutritious option for a wholesome dinner. This dish combines the savory flavors of herb-seasoned chicken with the fresh, crisp taste of asparagus.
Roasting in the oven guarantees the chicken remains juicy and tender while the asparagus retains its vibrant green color and slight crunch. It’s a perfect meal for family gatherings or a simple weeknight dinner, offering a balance of proteins and vegetables that satisfy both taste and health.
The preparation is straightforward, making it ideal for cooks of all skill levels. The herb crust on the chicken breast infuses the meat with aromatic flavors that complement the mild sweetness of roasted asparagus.
This dish not only looks appealing with its contrasting colors but also fills the kitchen with irresistible aromas. Serve it with a side of whole-grain rice or quinoa for a complete meal that everyone will enjoy.
Ingredients for 4-6 servings:
- 4 boneless, skinless chicken breasts
- 1 pound of fresh asparagus, trimmed
- 2 tablespoons olive oil
- 1 cup breadcrumbs
- 2 tablespoons mixed dried herbs (such as thyme, rosemary, and parsley)
- 1 teaspoon garlic powder
- Salt and pepper to taste
- 1 lemon, sliced (optional for serving)
Cooking Instructions:
- Preheat the Oven: Start by preheating your oven to 400°F (200°C) to guarantee it’s ready to roast the chicken and asparagus evenly.
- Prepare the Chicken: In a shallow dish, mix the breadcrumbs, dried herbs, garlic powder, salt, and pepper. Coat each chicken breast thoroughly with the breadcrumb mixture, pressing it onto the meat to guarantee it sticks well.
- Arrange the Ingredients: Lightly oil a baking sheet with 1 tablespoon of olive oil. Place the herb-crusted chicken breasts on one side of the baking sheet. Arrange the trimmed asparagus on the other side.
- Season the Asparagus: Drizzle the remaining tablespoon of olive oil over the asparagus, and season with a little salt and pepper. Toss it gently to guarantee they’re evenly coated.
- Roast in the Oven: Place the baking sheet in the preheated oven and roast for about 25-30 minutes. Check that the chicken is cooked through (internal temperature should reach 165°F or 74°C) and the asparagus is tender yet crisp.
- Serve: Once done, remove from the oven and let it rest for a few minutes. Serve the chicken and asparagus hot, garnished with slices of lemon if desired.
Extra Tips:
For the best results, choose chicken breasts that are uniform in size to guarantee even cooking. If you prefer a spicier dish, you can add a pinch of cayenne pepper to the breadcrumb mixture.
Additionally, to prevent the breadcrumbs from becoming soggy, guarantee the chicken is patted dry before coating. If asparagus is out of season or unavailable, you can substitute it with other vegetables like green beans or broccoli.
Enjoy your meal with a glass of white wine to complement the flavors beautifully!
Oven-Baked Chicken Fajitas
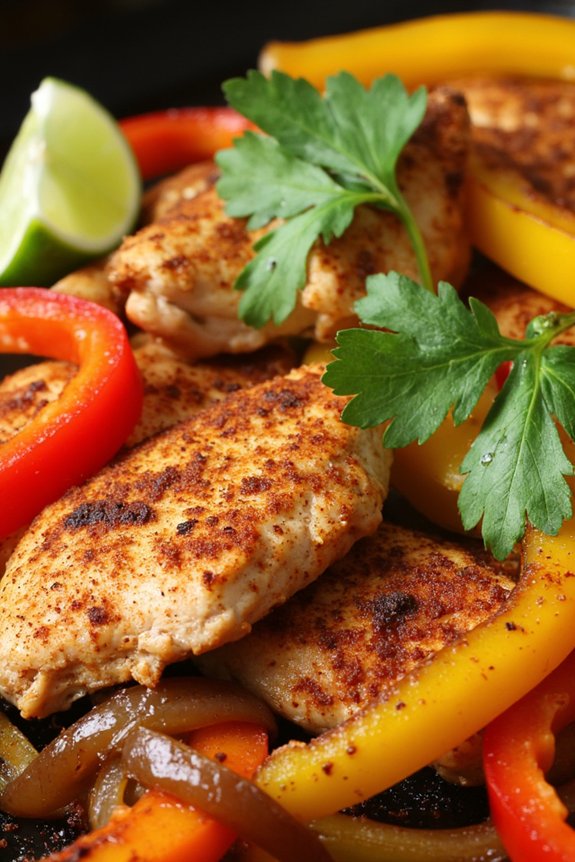
Oven-Baked Chicken Fajitas are a delightful and healthy dinner option that brings the vibrant flavors of Mexican cuisine straight to your dining table. This recipe is perfect for a quick weeknight meal or a fun gathering with family and friends. By baking the chicken and vegetables in the oven, you retain the juiciness of the meat while allowing the spices to meld beautifully, resulting in a dish that’s both succulent and flavorful.
Not only is it easy to prepare, but it also requires minimal cleanup, making it an ideal choice for busy households. This dish combines juicy strips of chicken breast with colorful bell peppers and onions, all seasoned with a blend of spices that bring out the classic fajita taste. The oven method guarantees even cooking and allows the flavors to develop fully.
Serve these fajitas with warm tortillas and your choice of toppings like guacamole, sour cream, and salsa for a complete and satisfying meal. This recipe serves 4-6 people, making it perfect for family dinners or small gatherings.
Ingredients:
- 1 1/2 pounds boneless, skinless chicken breasts
- 3 bell peppers (red, yellow, and green)
- 1 large onion
- 3 tablespoons olive oil
- 2 teaspoons chili powder
- 1 teaspoon paprika
- 1 teaspoon cumin
- 1 teaspoon garlic powder
- 1 teaspoon onion powder
- 1/2 teaspoon cayenne pepper (optional, for heat)
- Salt and pepper to taste
- Juice of 1 lime
- Fresh cilantro, chopped (for garnish)
- Flour tortillas
- Optional toppings: guacamole, sour cream, salsa
Instructions:
- Preheat the Oven: Start by preheating your oven to 400°F (200°C). This will guarantee the oven is hot and ready for baking the fajitas, which helps in cooking the chicken evenly.
- Prepare the Ingredients: Slice the chicken breasts into thin strips, approximately 1/2 inch wide. Slice the bell peppers and onion into thin strips as well. This uniformity in size helps in even cooking.
- Season the Chicken and Vegetables: In a large bowl, combine the chicken strips, bell pepper slices, and onion strips. Drizzle with olive oil, and then add chili powder, paprika, cumin, garlic powder, onion powder, cayenne pepper (if using), salt, and pepper. Toss everything together until the chicken and vegetables are well-coated with the spices.
- Arrange on a Baking Sheet: Spread the seasoned chicken and vegetables evenly on a large baking sheet. Make sure they’re in a single layer to allow proper roasting and even cooking.
- Bake the Fajitas: Place the baking sheet in the preheated oven and bake for 20-25 minutes, or until the chicken is cooked through and the vegetables are tender. Stir halfway through cooking to guarantee even baking.
- Add Lime Juice and Garnish: Once the chicken is cooked, remove the baking sheet from the oven. Squeeze the juice of one lime over the baked fajitas and sprinkle with fresh cilantro for added freshness and flavor.
- Serve: Warm the flour tortillas in the oven for the last 5 minutes of baking time or in a skillet over the stove. Serve the oven-baked chicken fajitas with the warm tortillas and your choice of optional toppings like guacamole, sour cream, and salsa.
Extra Tips:
For the best results, marinate the chicken and vegetables in the spice mixture for at least 30 minutes before baking. This allows the flavors to penetrate the meat deeply, enhancing the overall taste of the dish.
If you prefer a spicier version, feel free to increase the amount of cayenne pepper or add sliced jalapeños to the mix. Remember to slice all ingredients evenly to ensure they cook at the same rate, and don’t overcrowd the baking sheet, as this can lead to steaming rather than roasting. Enjoy your homemade fajitas with a side of Mexican rice or a fresh green salad for a complete meal.
Pesto Stuffed Chicken Breasts
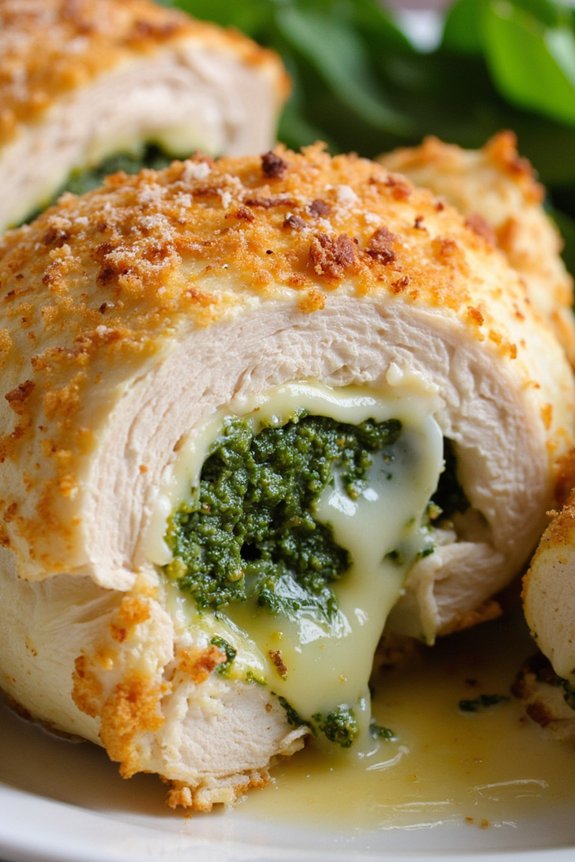
Pesto Stuffed Chicken Breasts are a delightful and healthy meal option that brings together the rich flavors of basil pesto with tender, juicy chicken. This dish is perfect for family dinners or a meal to impress guests, offering a savory and aromatic experience with every bite. Pesto, a classic Italian sauce made from fresh basil, garlic, Parmesan cheese, and pine nuts, pairs beautifully with chicken, creating a harmonious blend of flavors that elevate the dish to gourmet status.
In addition to being delicious, this recipe is also simple and quick to prepare, making it an ideal choice for home cooks of all skill levels. By baking the chicken in the oven, the dish maintains its healthiness, avoiding the need for excess oils or frying. The cooking process allows the chicken to remain moist while the pesto filling becomes a creamy, flavorful center. This dish serves 4-6 people, making it perfect for a family meal or small gathering.
Ingredients (for 4-6 servings):
- 4-6 boneless, skinless chicken breasts
- 1 cup basil pesto (store-bought or homemade)
- 1 cup shredded mozzarella cheese
- 1/2 cup grated Parmesan cheese
- Salt and pepper to taste
- 2 tablespoons olive oil
- Toothpicks or kitchen twine (for securing chicken)
Cooking Instructions:
- Preheat the Oven: Preheat your oven to 375°F (190°C). This guarantees that the chicken will cook evenly and thoroughly.
- Prepare the Chicken: Carefully slice each chicken breast horizontally to create a pocket, being cautious not to cut all the way through. This pocket will hold the pesto filling.
- Stuff the Chicken: Spoon approximately 2-3 tablespoons of basil pesto into each chicken pocket. Then, add a generous sprinkle of shredded mozzarella cheese. Secure each chicken breast with toothpicks or kitchen twine to keep the stuffing in place during cooking.
- Season the Chicken: Lightly season the outside of the chicken breasts with salt and pepper. This step enhances the flavor of the chicken itself, complementing the pesto filling.
- Sear the Chicken: Heat 2 tablespoons of olive oil in a large oven-safe skillet over medium-high heat. Add the stuffed chicken breasts and sear on each side for 3-4 minutes, or until golden brown. This step adds a nice crust to the chicken and locks in moisture.
- Bake the Chicken: Once seared, transfer the skillet to the preheated oven. Bake for 20-25 minutes, or until the chicken is cooked through and reaches an internal temperature of 165°F (74°C).
- Finish and Serve: Remove the chicken from the oven and sprinkle with grated Parmesan cheese. Allow it to rest for a few minutes before serving. This resting period helps the juices redistribute within the chicken, guaranteeing maximum flavor and tenderness.
Extra Tips:
For an even more flavorful dish, consider marinating the chicken breasts in a bit of olive oil, lemon juice, and garlic for an hour before stuffing and cooking.
If you prefer a bit of crunch, you can add a layer of breadcrumbs over the top of the chicken before baking. This will create a crispy topping, enhancing the texture of the dish.
Additionally, if you want to keep the chicken extra moist, try covering the skillet with foil when baking.
Don’t forget to remove the toothpicks or twine before serving to avoid any surprises at the dinner table!
Balsamic Glazed Chicken and Veggies
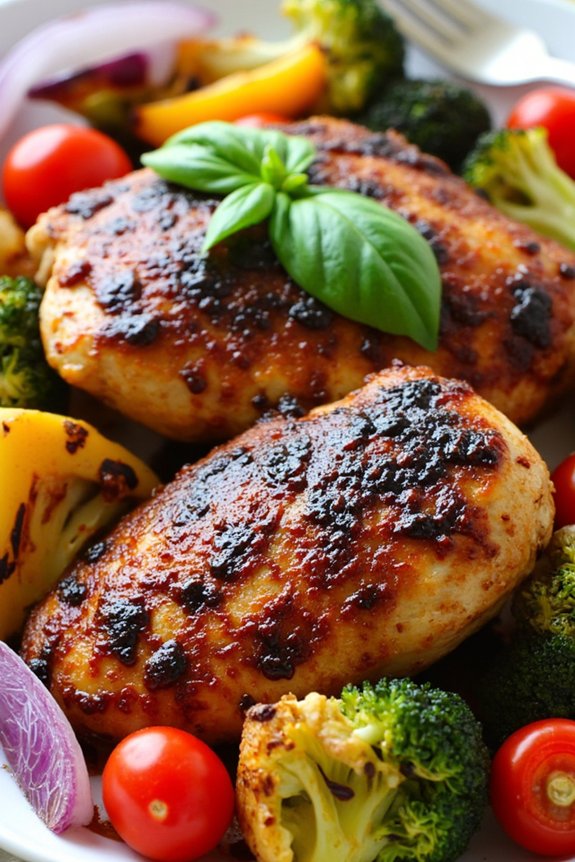
Balsamic Glazed Chicken and Veggies is a delicious and nutritious meal that combines tender chicken breasts with a medley of colorful vegetables, all coated in a tangy balsamic glaze. This dish is perfect for a healthy dinner option and is easy enough to prepare on a busy weeknight. The balsamic glaze adds a rich, savory flavor that complements the natural sweetness of the roasted vegetables, creating a harmonious blend of tastes and textures.
This recipe is designed to serve 4-6 people, making it ideal for family dinners or small gatherings. The combination of lean protein and nutrient-rich vegetables guarantees you have a balanced meal that’s both satisfying and nourishing. The preparation is straightforward, and the oven does most of the work, allowing you to enjoy a stress-free cooking experience.
Ingredients:
- 4 boneless, skinless chicken breasts
- 2 cups cherry tomatoes
- 1 red bell pepper, sliced
- 1 yellow bell pepper, sliced
- 1 red onion, cut into wedges
- 2 cups broccoli florets
- 3 tablespoons olive oil
- Salt and pepper to taste
- 1/2 cup balsamic vinegar
- 2 tablespoons honey
- 2 cloves garlic, minced
- 1 teaspoon dried Italian seasoning
- Fresh basil leaves for garnish
Cooking Instructions:
- Preheat the Oven: Begin by preheating your oven to 400°F (200°C). This guarantees that the oven is at the right temperature for roasting, allowing the chicken and vegetables to cook evenly.
- Prepare the Balsamic Glaze: In a small saucepan, combine the balsamic vinegar, honey, and minced garlic. Place the saucepan over medium heat and bring the mixture to a simmer. Let it simmer for about 5-7 minutes, or until it reduces and thickens slightly. Remove from heat and set aside.
- Prepare the Chicken and Vegetables: While the glaze is reducing, prepare the chicken and vegetables. Place the chicken breasts in a large baking dish. Arrange the cherry tomatoes, bell peppers, red onion, and broccoli florets around the chicken.
- Season and Drizzle: Drizzle the olive oil over the chicken and vegetables, then sprinkle with salt, pepper, and Italian seasoning. Toss the vegetables gently to guarantee they’re evenly coated with oil and seasoning.
- Apply the Glaze: Using a brush or spoon, evenly coat the chicken breasts with the prepared balsamic glaze. Reserve some glaze for serving.
- Roast in the Oven: Place the baking dish in the preheated oven and roast for 25-30 minutes, or until the chicken is cooked through and the vegetables are tender. The chicken should reach an internal temperature of 165°F (75°C).
- Garnish and Serve: Once cooked, remove the dish from the oven. Garnish with fresh basil leaves for added flavor and a pop of color. Serve the balsamic glazed chicken and veggies on a platter, drizzling additional glaze over the top if desired.
Extra Tips:
When preparing Balsamic Glazed Chicken and Veggies, it’s important to cut the vegetables into uniform sizes to guarantee even cooking.
Feel free to substitute or add your favorite vegetables, such as zucchini or asparagus, based on seasonal availability or personal preference.
If you prefer a thicker glaze, allow it to reduce further in the saucepan.
For additional flavor, marinate the chicken in the balsamic mixture for a few hours before roasting.
This dish pairs well with a side of quinoa or brown rice to soak up the delicious glaze.
Greek Yogurt Marinated Chicken Tenders
Greek Yogurt Marinated Chicken Tenders is a delightful and healthy dish that brings a burst of Mediterranean flavors to your dinner table. The creamy yogurt marinade not only tenderizes the chicken but also imparts a tangy richness that pairs perfectly with aromatic herbs and spices. This dish is easy to prepare and can be a hit for both family dinners and entertaining guests.
By using the oven, you allow the chicken to cook evenly, resulting in juicy and flavorful tenders that are certain to please everyone at your table. This recipe serves 4-6 people, making it an ideal choice for a family meal or a small gathering. The marinade is the star of the show here, made with Greek yogurt and a mix of spices that infuse the chicken with a depth of flavor.
The chicken tenders are then baked to perfection, guaranteeing a healthy meal that’s both nutritious and satisfying. With minimal prep time and simple ingredients, this dish is a great addition to any weekly meal plan.
Ingredients:
- 2 pounds of chicken tenders
- 1 cup of Greek yogurt
- 2 tablespoons olive oil
- 2 tablespoons lemon juice
- 4 cloves garlic, minced
- 1 tablespoon dried oregano
- 1 teaspoon paprika
- 1 teaspoon salt
- 1/2 teaspoon black pepper
- 1/2 teaspoon cumin
- Fresh parsley, chopped (for garnish)
Cooking Instructions:
- Prepare the Marinade: In a large mixing bowl, combine Greek yogurt, olive oil, lemon juice, minced garlic, oregano, paprika, salt, pepper, and cumin. Stir well until all the ingredients are thoroughly combined.
- Marinate the Chicken: Add the chicken tenders to the bowl with the marinade, making sure each piece is well-coated. Cover the bowl with plastic wrap and refrigerate for at least 1 hour, or overnight for best results, to allow the flavors to fully penetrate the chicken.
- Preheat the Oven: Preheat your oven to 400°F (200°C). Line a baking sheet with parchment paper or lightly grease it with cooking spray to prevent sticking.
- Arrange the Chicken: Remove the marinated chicken tenders from the refrigerator and arrange them in a single layer on the prepared baking sheet. Discard any excess marinade.
- Bake the Chicken: Place the baking sheet in the preheated oven and bake for 20-25 minutes, or until the chicken tenders are cooked through and reach an internal temperature of 165°F (74°C). The edges should be slightly golden brown.
- Garnish and Serve: Once the chicken is done, remove it from the oven and let it rest for a few minutes. Garnish with freshly chopped parsley before serving. Enjoy these tenders with a side of vegetables or a light salad for a complete meal.
Extra Tips:
When preparing the marinade, feel free to customize the spices to your preference. Adding a pinch of cayenne pepper can give the dish a slight kick if you prefer a spicier flavor.
If you’re short on time, marinating for at least 30 minutes will still yield delicious results, though longer marination enhances the taste. Make sure not to overcrowd the baking sheet to allow even cooking.
Using a meat thermometer to check for doneness is a foolproof way to avoid under or overcooking the chicken tenders.
Spicy Paprika Oven-Roasted Chicken
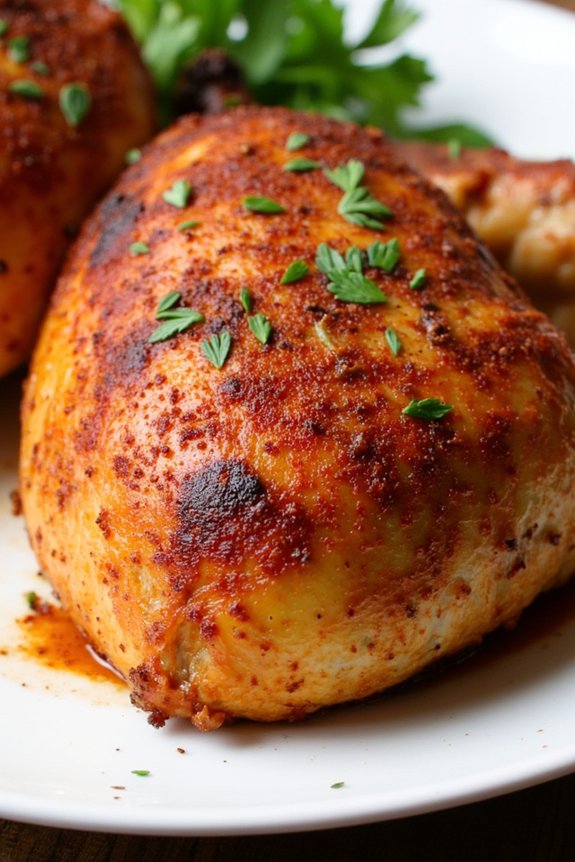
Spicy Paprika Oven-Roasted Chicken is a delightful dish that brings bold flavors to your dinner table without much effort. This recipe combines the smoky, spicy flavor of paprika with the natural goodness of chicken to create a satisfying and healthy meal. Perfect for a family dinner or a small gathering with friends, this dish is both nutritious and delicious, making sure everyone leaves the table with a smile.
The recipe calls for a balance of spices that enhance the chicken’s flavor without being overpowering. By roasting the chicken in the oven, you achieve a crispy skin with tender, juicy meat inside. This cooking method locks in the flavors and keeps the chicken moist, making it a reliable dish for both novice and experienced cooks.
Let’s explore the ingredients and steps needed to create this mouthwatering meal for 4-6 people.
Ingredients (serving size: 4-6 people):
- 4-6 chicken thighs or drumsticks
- 3 tablespoons paprika
- 1 teaspoon cayenne pepper
- 1 tablespoon garlic powder
- 1 tablespoon onion powder
- 1 teaspoon salt
- 1 teaspoon black pepper
- 2 tablespoons olive oil
- 1 lemon, juiced
- Fresh parsley for garnish (optional)
Cooking Instructions:
- Preheat the oven: Set your oven to 400°F (200°C) and allow it to preheat while you prepare the chicken. This guarantees that the chicken will cook evenly and develop a crispy skin.
- Prepare the spice mix: In a small bowl, combine the paprika, cayenne pepper, garlic powder, onion powder, salt, and black pepper. Mix well to make certain all spices are evenly distributed.
- Season the chicken: Pat the chicken thighs or drumsticks dry with paper towels to remove excess moisture. This helps the spices adhere better. Rub the olive oil over the chicken pieces, then generously coat them with the spice mix. Make sure each piece is evenly covered for maximum flavor.
- Arrange in a baking dish: Place the seasoned chicken pieces in a single layer in a baking dish. Squeeze the lemon juice over the top to add a fresh, tangy flavor that complements the spices.
- Roast the chicken: Place the baking dish in the preheated oven and roast for 35-45 minutes, or until the internal temperature of the chicken reaches 165°F (74°C) and the skin is crispy and golden brown.
- Rest and serve: Once cooked, remove the chicken from the oven and let it rest for about 5 minutes. This allows the juices to redistribute throughout the meat, making sure each bite is tender and juicy. Garnish with fresh parsley if desired before serving.
Extra Tips: For an even bolder flavor, consider marinating the chicken in the spice mix and olive oil for a few hours or overnight in the refrigerator before cooking. This allows the spices to penetrate deeper into the meat.
Additionally, if you prefer a less spicy dish, you can reduce the amount of cayenne pepper or substitute it with a milder chili powder. Always verify the chicken is cooked to the recommended internal temperature to guarantee it’s safe to eat.
Enjoy your Spicy Paprika Oven-Roasted Chicken with a side of roasted vegetables or a fresh salad for a complete and balanced meal.