

Hey there, lovely readers! I’ve just discovered a collection of 14 light, quick, and easy low-carb dinner recipes that have completely changed the way my family eats. These recipes are bursting with flavor and nutrition, making them perfect for those busy nights when you’re short on time. From a zesty lemon herb chicken stir-fry to mouthwatering spicy Thai beef lettuce wraps, there’s a little something for everyone. Ready to see how these meals can elevate your dinner routine?
Zesty Lemon Herb Chicken Stir-Fry
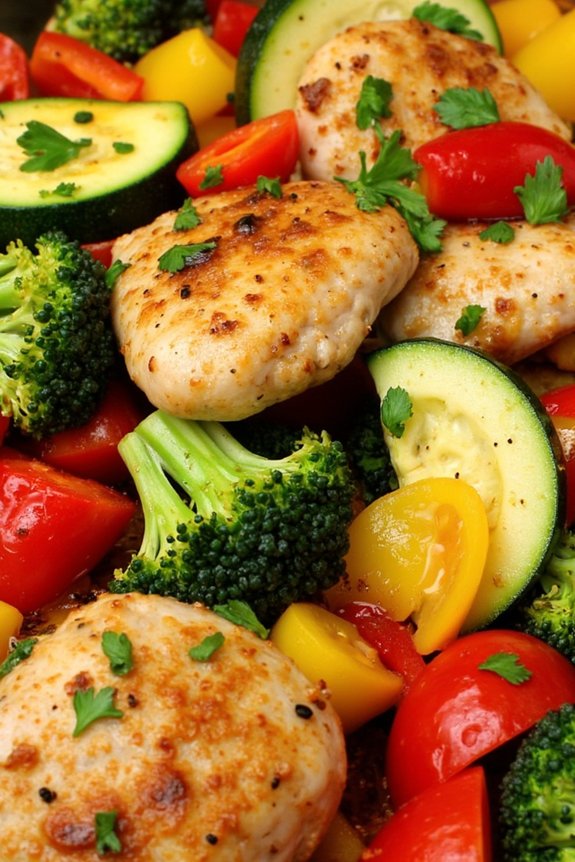
Looking for a tasty and healthy dinner option that won’t derail your low-carb diet? This Zesty Lemon Herb Chicken Stir-Fry is the perfect solution. Packed with flavor and incredibly easy to prepare, this dish combines succulent pieces of chicken with vibrant vegetables, all tossed in a tangy lemon herb sauce. It’s a satisfying meal that will delight your taste buds and keep you feeling full without the extra carbs.
Whether you’re cooking for family or friends, this stir-fry is sure to be a hit. The fresh herbs and zesty lemon add a bright and revitalizing touch, while the variety of colorful vegetables not only makes the dish visually appealing but also adds a range of textures and nutrients. Plus, this recipe can be easily adjusted to suit your personal preferences or dietary needs.
Ingredients for 4-6 servings:
- 1.5 pounds of boneless, skinless chicken breasts
- 2 tablespoons olive oil
- 1 medium red bell pepper
- 1 medium yellow bell pepper
- 1 medium zucchini
- 1 cup broccoli florets
- 3 cloves garlic, minced
- 1 tablespoon fresh lemon juice
- 2 teaspoons lemon zest
- 1 teaspoon dried oregano
- 1 teaspoon dried thyme
- Salt and pepper to taste
- Fresh parsley for garnish
Cooking Instructions:
- Prepare the Ingredients: Start by cutting the chicken breasts into bite-sized pieces. Dice the red and yellow bell peppers, slice the zucchini into half-moons, and chop the broccoli into small florets.
- Heat the Oil: In a large skillet or wok, heat the olive oil over medium-high heat. Once the oil is hot, add the minced garlic and sauté until fragrant, about 30 seconds.
- Cook the Chicken: Add the chicken pieces to the skillet, seasoning with salt and pepper to taste. Cook, stirring occasionally, until the chicken is golden brown and cooked through, approximately 6-8 minutes.
- Add Vegetables: Once the chicken is cooked, add the bell peppers, zucchini, and broccoli to the skillet. Stir-fry the vegetables with the chicken for about 5 minutes, or until they’re tender-crisp.
- Add Lemon and Herbs: Reduce the heat to low and add the lemon juice, lemon zest, dried oregano, and dried thyme. Stir everything together to verify the chicken and vegetables are well-coated with the lemon herb mixture.
- Finish and Serve: Continue cooking for another 2 minutes to allow the flavors to meld. Remove from heat, garnish with fresh parsley, and serve immediately.
Extra Tips:
For added flavor, consider marinating the chicken in lemon juice, olive oil, and herbs for at least 30 minutes before cooking. If you prefer a little heat, add a pinch of red pepper flakes to the stir-fry.
You can also swap out the vegetables for your favorites, such as snap peas or asparagus, to customize the dish to your liking. Remember, the key to a great stir-fry is to keep everything moving in the pan to verify even cooking and to maintain the crispness of the vegetables. Enjoy your delicious and healthy meal!
Cauliflower Rice and Shrimp Skillet
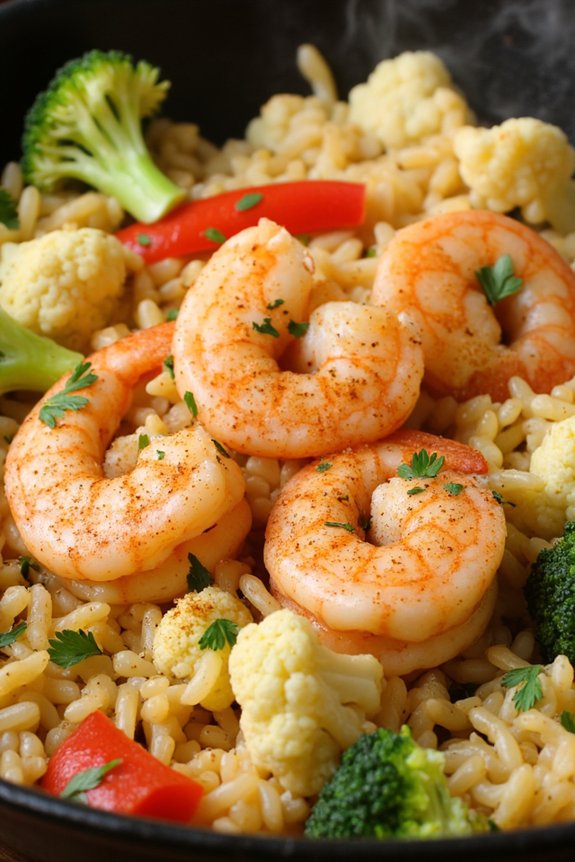
Cauliflower Rice and Shrimp Skillet is a delightful low-carb dinner option that’s both nutritious and delicious. This dish combines the tender sweetness of shrimp with the subtle nuttiness of cauliflower rice, infused with aromatic spices and fresh herbs. By using cauliflower rice instead of traditional rice, you reduce the carb content considerably while still enjoying a hearty and satisfying meal.
It’s an ideal choice for those looking to manage their carb intake without compromising on flavor. This one-pan meal is perfect for busy weeknights, as it comes together quickly and requires minimal cleanup. The combination of juicy shrimp, crisp-tender vegetables, and fluffy cauliflower rice creates a symphony of textures and flavors.
The dish is versatile, allowing you to adjust the seasonings and vegetables to your taste preferences. Make sure to have all your ingredients prepped and ready before you start cooking, as the process moves swiftly once it begins.
Ingredients (Serves 4-6):
- 1 large head of cauliflower, riced
- 1 pound large shrimp, peeled and deveined
- 2 tablespoons olive oil
- 1 medium onion, finely chopped
- 3 cloves garlic, minced
- 1 bell pepper, diced
- 1 cup broccoli florets
- 1 tablespoon soy sauce (or tamari for gluten-free)
- 1 teaspoon smoked paprika
- Salt and pepper to taste
- 1/2 lemon, juiced
- Fresh parsley, chopped for garnish
Cooking Instructions:
- Prepare the Cauliflower Rice: Begin by cutting the cauliflower into florets and placing them in a food processor. Pulse until the cauliflower resembles rice-like grains. Set aside.
- Cook the Shrimp: In a large skillet over medium heat, heat 1 tablespoon of olive oil. Add the shrimp to the skillet, seasoning with salt and pepper. Cook the shrimp for about 2-3 minutes on each side until they’re pink and opaque. Remove the shrimp from the skillet and set aside.
- Sauté the Aromatics: In the same skillet, add the remaining tablespoon of olive oil. Sauté the chopped onion and minced garlic until they’re translucent and fragrant, about 2-3 minutes.
- Add Vegetables: Stir in the diced bell pepper and broccoli florets, cooking for an additional 3-4 minutes until the vegetables are tender but still crisp.
- Incorporate the Cauliflower Rice: Add the riced cauliflower to the skillet, mixing well with the vegetables. Pour in the soy sauce and sprinkle with smoked paprika, stirring to combine. Cook for 5-7 minutes until the cauliflower rice is tender.
- Combine Shrimp and Finish: Return the cooked shrimp to the skillet, mixing it with the cauliflower rice and vegetables. Squeeze the lemon juice over the mixture, stirring gently to combine all ingredients. Adjust the seasoning with salt and pepper to taste.
- Garnish and Serve: Once everything is heated through, remove the skillet from the heat. Garnish with freshly chopped parsley before serving.
Extra Tips:
For the best results, make sure that the cauliflower rice isn’t over-processed; it should have a texture similar to couscous. If you prefer a bit more spice, consider adding a pinch of red pepper flakes or a dash of hot sauce.
For added flavor, you can marinate the shrimp in advance with a bit of garlic and lemon juice. To save time, pre-riced cauliflower is available in many grocery stores. Adjust the quantity of vegetables based on personal preference or what you have on hand.
Garlic Butter Zucchini Noodles With Grilled Chicken
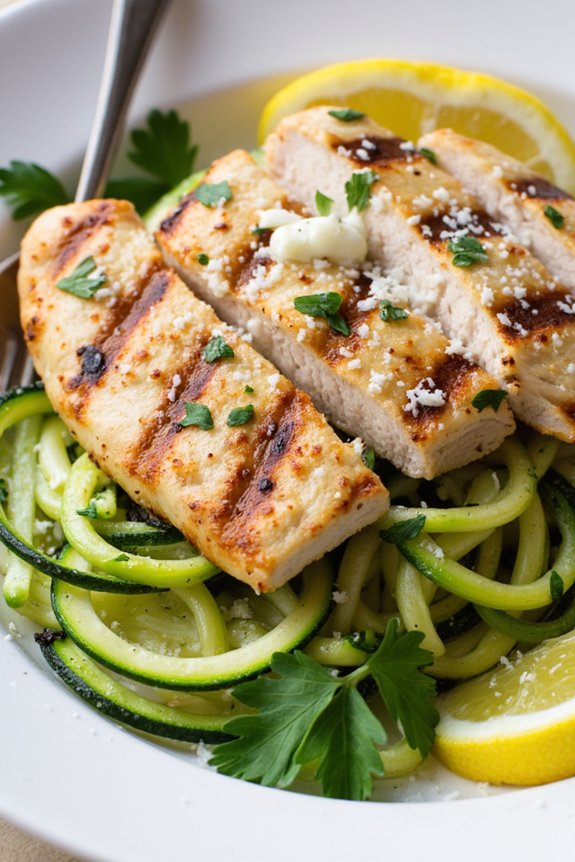
Garlic Butter Zucchini Noodles With Grilled Chicken is a flavorful and healthy low carb dinner option that’s sure to satisfy your cravings. This dish combines tender, juicy grilled chicken with spiralized zucchini noodles tossed in a rich garlic butter sauce. It’s a delightful way to enjoy a hearty meal while keeping carbs to a minimum.
The zucchini noodles, often referred to as “zoodles,” provide a revitalizing and light alternative to traditional pasta, making this dish perfect for those watching their carb intake or looking for a gluten-free option.
The key to this recipe is the balance of flavors and textures. The grilled chicken is seasoned to perfection, providing a savory and satisfying protein component, while the garlic butter sauce infuses the zucchini noodles with a rich and aromatic taste.
This dish not only makes for a great weeknight dinner but also impresses guests with its vibrant colors and delicious taste. Whether you’re a seasoned chef or a novice in the kitchen, this recipe is simple to follow and sure to become a favorite in your low carb recipe repertoire.
Ingredients (Serves 4-6):
- 4 medium zucchinis
- 4 boneless, skinless chicken breasts
- 3 tablespoons olive oil
- Salt and pepper to taste
- 1 teaspoon paprika
- 1 teaspoon garlic powder
- 6 tablespoons unsalted butter
- 4 cloves garlic, minced
- 1/4 cup grated Parmesan cheese
- 2 tablespoons chopped fresh parsley
- 1 lemon, cut into wedges
Cooking Instructions:
- Prepare the Chicken: Begin by seasoning the chicken breasts with olive oil, salt, pepper, paprika, and garlic powder. Make sure the chicken is evenly coated with the seasoning on both sides.
- Grill the Chicken: Preheat your grill to medium-high heat. Once heated, place the chicken breasts on the grill and cook for about 6-7 minutes on each side, or until the internal temperature reaches 165°F (75°C). Once cooked, remove the chicken from the grill and let it rest for a few minutes before slicing it into strips.
- Spiralize the Zucchini: While the chicken is grilling, use a spiralizer to create zucchini noodles. If you don’t have a spiralizer, you can use a julienne peeler or a mandoline slicer as an alternative.
- Prepare the Garlic Butter Sauce: In a large skillet, melt the butter over medium heat. Add the minced garlic and sauté for about 1-2 minutes, until fragrant. Make sure not to burn the garlic.
- Cook the Zucchini Noodles: Add the zucchini noodles to the skillet with the garlic butter sauce. Toss the noodles gently to coat them in the sauce. Cook for about 3-4 minutes, or until the zucchini is just tender but still crisp.
- Combine and Serve: Add the grilled chicken strips to the skillet with the zucchini noodles. Toss everything together to combine. Sprinkle with Parmesan cheese and chopped parsley. Serve with lemon wedges on the side.
Extra Tips:
For the best results, make sure not to overcook the zucchini noodles as they can become mushy if left on the heat for too long. Cooking them until just tender will guarantee they maintain a pleasant texture.
Additionally, it’s important to let the grilled chicken rest before slicing, as this will help retain its juices, keeping the meat succulent and flavorful. If you prefer a bit of heat, consider adding a pinch of red pepper flakes to the garlic butter sauce.
Enjoy your Garlic Butter Zucchini Noodles With Grilled Chicken warm, and feel free to customize the seasoning to your own taste preferences.
Spicy Thai Beef Lettuce Wraps
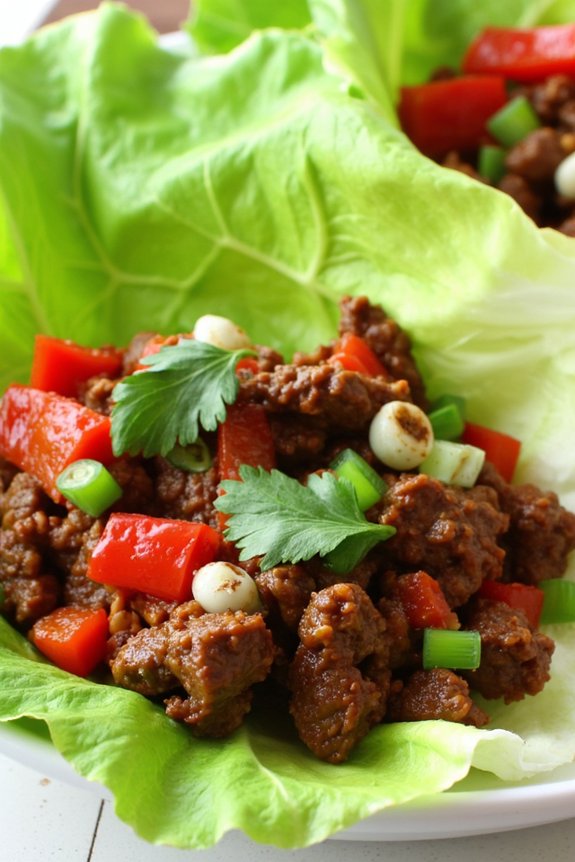
Spicy Thai Beef Lettuce Wraps are a flavorful and satisfying low-carb dish that’s perfect for a light dinner or appetizer. This recipe captures the essence of Thai cuisine with its combination of savory beef, fresh herbs, and a hint of heat, all nestled in crisp lettuce leaves. It’s a great option for those looking to enjoy a healthy meal without sacrificing taste. The spicy beef mixture is balanced by the coolness of the lettuce, making each bite a revitalizing experience.
This dish isn’t only delicious but also quick and easy to prepare, making it ideal for busy weeknights. The ingredients are simple and can be found in most grocery stores, which means you don’t have to spend hours hunting for exotic items. Whether you’re cooking for your family or entertaining guests, these Spicy Thai Beef Lettuce Wraps are sure to impress with their vibrant flavors and appealing presentation.
Ingredients (serves 4-6):
- 1 1/2 pounds ground beef
- 2 tablespoons vegetable oil
- 3 cloves garlic, minced
- 1 tablespoon fresh ginger, minced
- 2 tablespoons soy sauce
- 1 tablespoon fish sauce
- 2 tablespoons sriracha or Thai chili paste
- 1 tablespoon brown sugar (optional for added sweetness)
- 1 red bell pepper, diced
- 1/4 cup chopped green onions
- 1/4 cup chopped fresh cilantro
- 1/4 cup chopped fresh mint
- 1 lime, juiced
- Salt and pepper to taste
- 1 head of butter lettuce or iceberg lettuce, leaves separated for wrapping
Cooking Instructions:
- Prepare the Ingredients: Start by mincing the garlic and ginger, dicing the red bell pepper, and chopping the green onions, cilantro, and mint. Juice the lime and set aside.
- Cook the Beef: Heat the vegetable oil in a large skillet over medium-high heat. Add the ground beef and cook until browned, breaking it up with a spoon as it cooks. This should take about 5-7 minutes.
- Add Aromatics: Once the beef is browned, reduce the heat to medium and add the minced garlic and ginger to the skillet. Stir and cook for another 1-2 minutes until fragrant.
- Season the Beef: Add the soy sauce, fish sauce, sriracha or Thai chili paste, and brown sugar to the beef mixture. Stir well to guarantee the beef is thoroughly coated with the sauce. Cook for another 2-3 minutes.
- Add Vegetables: Incorporate the diced red bell pepper into the skillet and cook for an additional 2 minutes so the pepper retains some crunch. Stir in the green onions, cilantro, and mint.
- Finish with Lime: Squeeze the lime juice over the beef mixture and stir well. Season with salt and pepper to taste, adjusting the spice level with additional sriracha if desired.
- Assemble the Wraps: To serve, spoon the beef mixture onto the center of each lettuce leaf. Wrap the leaf around the filling and enjoy immediately.
Extra Tips:
When making Spicy Thai Beef Lettuce Wraps, it’s important to use fresh and crisp lettuce for the best texture. Butter lettuce is a great choice due to its soft, pliable leaves, but iceberg lettuce works well too if you prefer a little more crunch.
Be cautious with the heat level, especially if you’re sensitive to spice; you can always adjust the amount of sriracha or chili paste to suit your taste. Additionally, preparing all the ingredients beforehand (mise en place) will make the cooking process smoother and more efficient.
Creamy Spinach and Mushroom Stuffed Bell Peppers
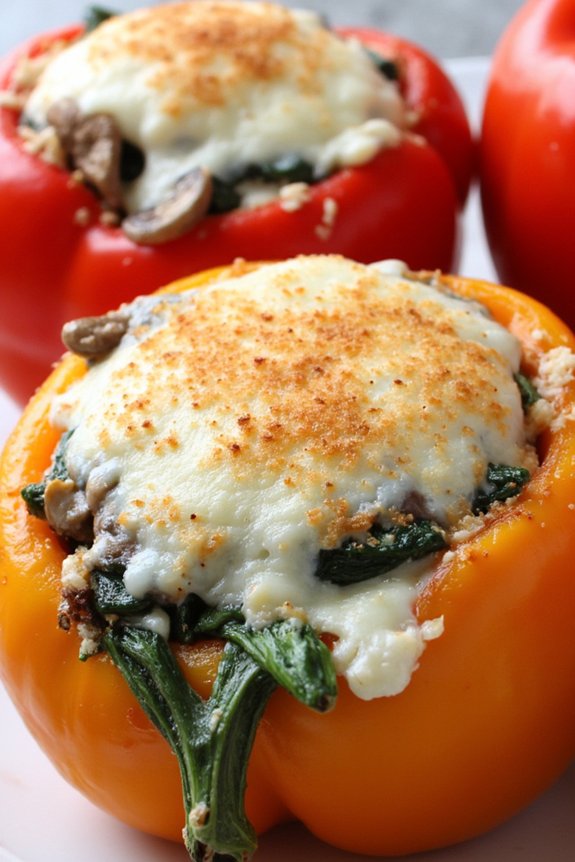
Creamy Spinach and Mushroom Stuffed Bell Peppers are a delightful low-carb dinner option that brings together the earthy flavors of mushrooms and spinach with the sweetness of bell peppers. This dish is perfect for those seeking a nutritious meal that doesn’t skimp on flavor. The creamy filling, enhanced by the richness of cheese and a hint of garlic, is balanced by the freshness of the bell peppers, making it a hearty and satisfying dish suitable for any night of the week.
Not only is this recipe easy to prepare, but it also offers a beautiful presentation that will impress your family or guests. The vibrant colors of the bell peppers contrast beautifully with the creamy filling, making it a feast for both the eyes and the palate. This dish can be enjoyed on its own or paired with a simple side salad for a complete meal.
Whether you’re following a low-carb diet or just looking for a delicious new recipe to try, these stuffed peppers are sure to become a favorite.
Ingredients (for 4-6 people):
- 4 large bell peppers, any color
- 1 tablespoon olive oil
- 1 medium onion, chopped
- 3 cloves garlic, minced
- 8 ounces mushrooms, sliced
- 5 ounces fresh spinach
- 8 ounces cream cheese, softened
- 1 cup shredded mozzarella cheese
- 1/2 cup grated Parmesan cheese
- Salt and pepper to taste
- Optional: 1 teaspoon Italian seasoning
Cooking Instructions:
- Preheat the Oven: Preheat your oven to 375°F (190°C) to guarantee it’s ready for baking the stuffed peppers later.
- Prepare the Bell Peppers: Slice the tops off the bell peppers and remove the seeds and membranes. Place the peppers in a baking dish and set aside.
- Cook the Vegetables: In a large skillet, heat the olive oil over medium heat. Add the chopped onion and sauté until translucent, about 3-4 minutes. Add the minced garlic and sliced mushrooms, and continue to cook for another 5 minutes until the mushrooms have released their moisture and are tender.
- Wilt the Spinach: Add the fresh spinach to the skillet and cook until wilted, stirring occasionally. This should take about 2-3 minutes.
- Create the Creamy Mixture: Reduce the heat to low and add the softened cream cheese to the skillet. Stir until the cream cheese is fully melted and combined with the vegetables. Season with salt, pepper, and Italian seasoning (if using).
- Stuff the Peppers: Evenly divide the creamy spinach and mushroom mixture among the prepared bell peppers. Top each stuffed pepper with shredded mozzarella and grated Parmesan cheese.
- Bake the Peppers: Place the baking dish in the preheated oven and bake for 25-30 minutes, or until the peppers are tender and the cheese is bubbly and golden brown.
- Serve: Remove the stuffed peppers from the oven and let them cool for a few minutes before serving.
Extra Tips:
For best results, choose bell peppers that are uniform in size so they cook evenly. If you prefer a bit of spice, consider adding a dash of red pepper flakes to the filling.
You can also experiment with different types of cheese for a unique flavor profile. To make this dish even heartier, consider adding cooked ground turkey or beef to the filling.
Finally, if you’re short on time, you can microwave the bell peppers for a few minutes before stuffing them to reduce the overall baking time.
Low-Carb Mexican Chicken Soup
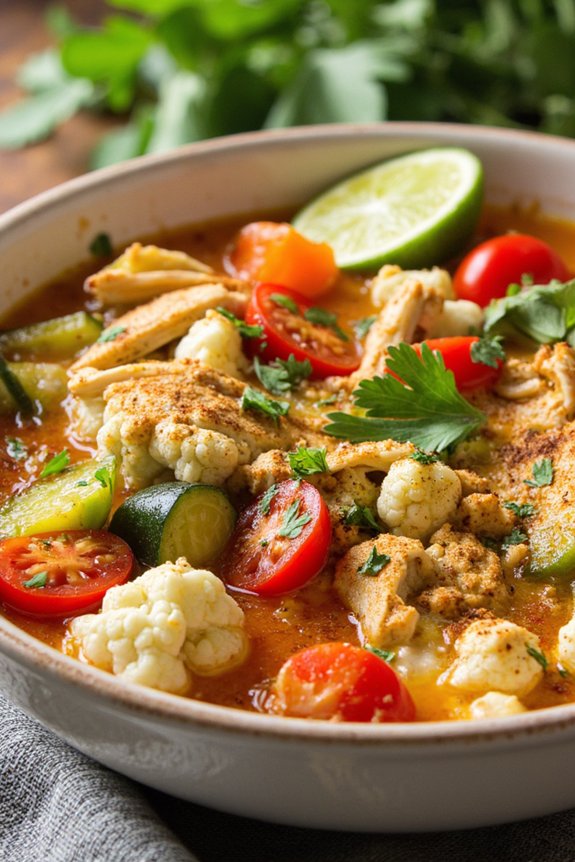
Warm up your dinner table with a comforting bowl of Low-Carb Mexican Chicken Soup, a flavorful dish that combines the zest of traditional Mexican spices with the wholesome goodness of lean chicken and fresh vegetables.
This soup isn’t only delicious but also fits perfectly into a low-carb lifestyle, making it a great choice for those looking to maintain a balanced diet without sacrificing flavor.
With a combination of tender chicken, aromatic herbs, and a medley of vegetables, this soup is sure to be a hit with the whole family.
Perfect for a cozy dinner or a satisfying lunch, this Low-Carb Mexican Chicken Soup serves 4-6 people. It’s easy to prepare and can be made in a single pot, making cleanup a breeze.
Whether you’re a seasoned chef or a cooking novice, this recipe is straightforward and can be customized to suit your taste preferences.
Let’s explore the ingredients and cooking instructions so you can enjoy this delightful dish in your own home.
Ingredients:
- 1 tablespoon olive oil
- 1 medium onion, chopped
- 2 cloves garlic, minced
- 1 medium bell pepper, chopped
- 1 teaspoon ground cumin
- 1 teaspoon chili powder
- 1/2 teaspoon paprika
- 1/2 teaspoon salt
- 1/4 teaspoon black pepper
- 4 cups chicken broth
- 1 can (14.5 oz) diced tomatoes
- 2 cups cooked, shredded chicken
- 1 zucchini, diced
- 1 cup cauliflower florets
- 1 jalapeño, seeded and minced
- 1/4 cup fresh cilantro, chopped
- 1 lime, cut into wedges
Instructions:
- Prepare the Vegetables: Begin by heating the olive oil in a large pot over medium heat. Add the chopped onion and minced garlic, sautéing them until the onion becomes translucent and fragrant, about 3-4 minutes.
- Season the Base: Add the chopped bell pepper to the pot and cook for an additional 2 minutes. Stir in the ground cumin, chili powder, paprika, salt, and black pepper, ensuring the spices coat the vegetables evenly.
- Build the Soup: Pour in the chicken broth and add the can of diced tomatoes, including the juice. Stir everything together and bring the mixture to a simmer.
- Add Chicken and Vegetables: Once the soup is simmering, add the shredded chicken, diced zucchini, cauliflower florets, and minced jalapeño. Stir well to combine all the ingredients.
- Simmer: Reduce the heat to low and let the soup simmer uncovered for 20-25 minutes, or until the vegetables are tender and the flavors have melded together.
- Finish the Soup: Just before serving, stir in the chopped cilantro. Taste and adjust seasoning if necessary. Serve hot with lime wedges on the side for an extra burst of flavor.
Extra Tips:
For an even more intense flavor, consider roasting the bell pepper before adding it to the soup.
You can also substitute the chicken with turkey or tofu for a different protein option.
If you prefer a spicier soup, feel free to add more jalapeño or a dash of hot sauce.
To make the soup more filling, garnish with avocado slices or a dollop of sour cream.
Remember, this dish is highly adaptable, allowing you to adjust the ingredients to your liking while maintaining its low-carb profile.
Enjoy your culinary creation!
Baked Salmon With Asparagus and Cherry Tomatoes
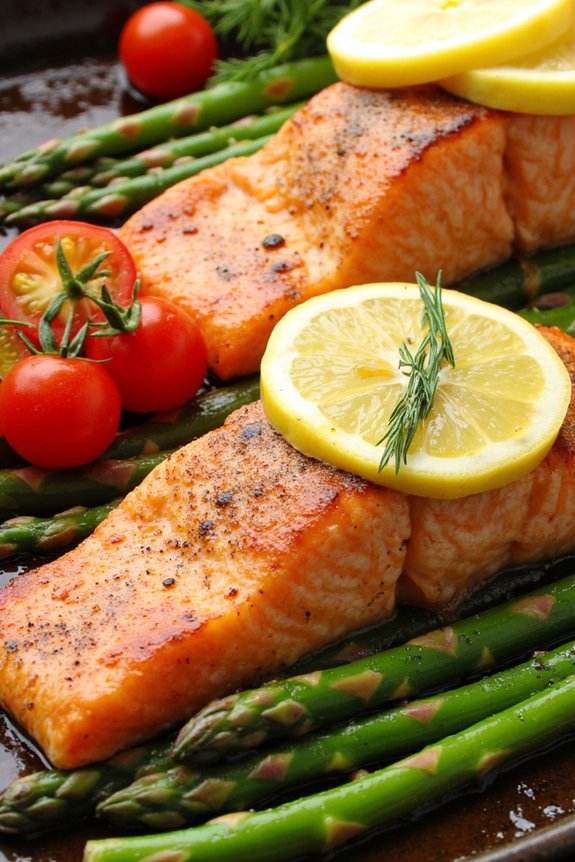
Baked Salmon With Asparagus and Cherry Tomatoes is a delicious low-carb dinner option that’s both flavorful and nutritious. The combination of tender salmon, fresh asparagus, and sweet cherry tomatoes creates a harmonious blend of flavors and textures. This dish is perfect for those looking to maintain a healthy lifestyle without sacrificing taste.
Additionally, it’s a versatile meal that can be served for both casual family dinners and more formal gatherings. This recipe is simple to prepare and requires minimal ingredients, making it an ideal choice for busy weeknights. The salmon is seasoned to perfection and baked alongside vibrant vegetables that complement its rich taste.
Not only is this dish quick to prepare, but it also guarantees you’re getting ample nutrients from the fresh produce and omega-3 fatty acids from the salmon. Serve it with a side salad or your favorite low-carb bread for a complete meal that will satisfy both your hunger and your taste buds.
Ingredients (Serves 4-6):
- 4-6 salmon fillets (about 6 ounces each)
- 1 pound asparagus, trimmed
- 1 pint cherry tomatoes, halved
- 3 tablespoons olive oil
- 2 cloves garlic, minced
- 1 lemon, sliced
- Salt and pepper to taste
- Fresh dill or parsley for garnish (optional)
Cooking Instructions:
- Preheat the Oven: Preheat your oven to 400°F (200°C). This will guarantee that the salmon and vegetables cook evenly.
- Prepare the Baking Sheet: Line a large baking sheet with parchment paper or lightly grease it with olive oil. This prevents the salmon and vegetables from sticking to the pan.
- Season the Salmon: Place the salmon fillets on the prepared baking sheet. Drizzle with 1 tablespoon of olive oil, and season with salt, pepper, and half of the minced garlic. Arrange lemon slices on top of the salmon.
- Prepare the Vegetables: In a large bowl, combine asparagus and cherry tomatoes. Add the remaining olive oil, minced garlic, salt, and pepper. Toss until the vegetables are well-coated.
- Arrange on the Baking Sheet: Spread the seasoned asparagus and cherry tomatoes around the salmon on the baking sheet. Make sure they’re in a single layer for even cooking.
- Bake the Dish: Place the baking sheet in the preheated oven and bake for 15-20 minutes, or until the salmon is cooked through and flakes easily with a fork. The asparagus should be tender but still slightly crisp.
- Garnish and Serve: Once cooked, remove from the oven and let it rest for a few minutes. Garnish with fresh dill or parsley if desired before serving.
Extra Tips:
For an added layer of flavor, consider marinating the salmon in olive oil, lemon juice, and herbs for about 30 minutes before baking. This will enhance the taste and tenderness of the fish.
Also, verify the asparagus stalks are uniform in size to guarantee they cook evenly. If you have particularly thick stalks, you may want to peel the lower part of the asparagus to guarantee they’re tender.
Finally, if you prefer a bit of a kick, sprinkle some red pepper flakes over the dish before serving.
Turkey and Vegetable Stuffed Cabbage Rolls

Turkey and Vegetable Stuffed Cabbage Rolls are a delicious and healthy option for a low-carb dinner. This dish combines savory, seasoned ground turkey with a variety of vegetables, all wrapped in tender cabbage leaves. The cabbage acts as a natural, low-carb wrap, making it an ideal choice for those looking to reduce their carbohydrate intake without sacrificing flavor.
Turkey and Vegetable Stuffed Cabbage Rolls aren’t only nutritious but also filling, making them a perfect evening meal for the whole family. The combination of turkey and vegetables guarantees a balanced meal packed with protein and vitamins.
The rolls are simmered in a rich tomato sauce, enhancing the flavors and keeping the rolls moist. This dish is versatile and can be adapted with different spices and vegetables according to personal preferences. Whether you’re looking to impress your dinner guests or simply enjoy a comforting homemade meal, these stuffed cabbage rolls are sure to satisfy.
Ingredients for 4-6 servings:
- 1 large head of cabbage
- 1 pound ground turkey
- 1 cup finely chopped onions
- 1 cup grated carrots
- 1 cup chopped bell peppers
- 2 cloves garlic, minced
- 1 teaspoon ground cumin
- 1 teaspoon dried oregano
- Salt and pepper to taste
- 1 1/2 cups tomato sauce
- 1 tablespoon olive oil
- 1 tablespoon fresh parsley, chopped
Cooking Instructions:
1. Prepare the Cabbage: Carefully peel off about 12-15 cabbage leaves. Bring a large pot of water to a boil and gently blanch the leaves for 2-3 minutes until they’re pliable. Remove them from the water and let them cool.
2. Cook the Filling: In a large skillet, heat olive oil over medium heat. Add onions and garlic, sautéing until they’re translucent. Stir in the grated carrots and bell peppers, cooking for another 3-4 minutes.
Add the ground turkey, breaking it apart with a spatula, and cook until browned. Season with cumin, oregano, salt, and pepper. Mix well and remove from heat.
3. Assemble the Rolls: Take a blanched cabbage leaf and place about 2 tablespoons of the turkey mixture in the center. Fold the sides over the filling and roll up tightly from the bottom. Repeat with remaining leaves and filling.
4. Prepare the Sauce: In a saucepan, heat the tomato sauce over medium heat and season with a pinch of salt and pepper. Simmer for 5 minutes.
5. Cook the Rolls: Preheat the oven to 350°F (175°C). Pour a thin layer of tomato sauce at the bottom of a baking dish. Place the cabbage rolls seam-side down in the dish. Pour the remaining tomato sauce over the rolls. Cover with aluminum foil and bake for 30-35 minutes.
6. Serve: Once baked, remove from the oven and let them cool slightly. Garnish with fresh parsley before serving.
Extra Tips:
For an additional layer of flavor, consider adding a splash of Worcestershire sauce or a sprinkle of Parmesan cheese to the tomato sauce. When choosing cabbage, opt for a head that’s firm with tightly packed leaves, as this will make for easier rolling.
If you prefer more spice, add a pinch of chili flakes to the turkey mixture. Remember to taste the filling before rolling to adjust seasoning according to your preference. Enjoy your Turkey and Vegetable Stuffed Cabbage Rolls with a side salad or a light soup for a complete meal.
Pesto Grilled Pork Chops With Roasted Veggies

Pesto Grilled Pork Chops with Roasted Veggies is a delightful low-carb dinner option that combines the robust flavors of herby pesto with the succulent taste of grilled pork chops. This dish is perfect for any night of the week when you want something satisfying yet healthy. The pesto not only adds a burst of flavor but also maintains the pork chops juicy and tender.
Paired with a medley of roasted vegetables, this meal is a complete feast that’s both nutritious and delicious. The roasted veggies complement the pork chops perfectly, offering a balance of textures and flavors. By roasting the vegetables, you enhance their natural sweetness and create a delightful caramelized surface that pairs beautifully with the savory pesto.
This recipe isn’t only easy to prepare but it also requires minimal cleanup, making it ideal for busy families or anyone looking to enjoy a wholesome meal without spending hours in the kitchen.
Ingredients (Serves 4-6):
- 4-6 pork chops, bone-in or boneless
- 1 cup of basil pesto (store-bought or homemade)
- 2 tablespoons of olive oil
- 1 teaspoon of salt
- 1/2 teaspoon of black pepper
- 1 pound of mixed vegetables (such as bell peppers, zucchini, and cherry tomatoes)
- 1 teaspoon of garlic powder
- 1 tablespoon of balsamic vinegar
Cooking Instructions:
- Preheat the Oven and Grill: Start by preheating your oven to 425°F (220°C) for the roasted vegetables. If using an outdoor grill, preheat it to medium-high heat.
- Prepare the Vegetables: Wash and chop the mixed vegetables into bite-sized pieces. In a large bowl, toss them with olive oil, salt, pepper, garlic powder, and balsamic vinegar until evenly coated.
- Roast the Vegetables: Spread the seasoned vegetables in a single layer on a baking sheet. Place them in the preheated oven and roast for 20-25 minutes, or until they’re tender and slightly caramelized.
- Prepare the Pork Chops: While the vegetables are roasting, rub the pork chops with salt and pepper. Generously coat each chop with pesto on both sides.
- Grill the Pork Chops: Place the pesto-coated pork chops on the preheated grill. Grill for about 4-5 minutes on each side or until the internal temperature reaches 145°F (63°C).
- Rest the Pork Chops: Once cooked, remove the pork chops from the grill and let them rest for 5 minutes. This allows the juices to redistribute for a juicier bite.
- Serve: Plate the grilled pork chops alongside the roasted vegetables. Optionally, drizzle any extra pesto over the top for added flavor.
Extra Tips:
For the best results, allow the pork chops to come to room temperature before grilling. This maintains even cooking and prevents the meat from becoming tough.
If you’re making your own pesto, consider adding a little lemon juice for a zesty kick. Additionally, you can customize the vegetables based on what’s in season or your personal preferences. Just be sure to cut them to a uniform size for even cooking.
Enjoy this dish with a side salad or a light soup for a complete meal.
Eggplant Lasagna With Ricotta and Marinara

Eggplant Lasagna With Ricotta and Marinara is a delicious low-carb alternative to traditional lasagna, perfect for those looking to enjoy a comforting meal without the added carbohydrates from pasta. This dish layers tender slices of eggplant with creamy ricotta cheese and robust marinara sauce, creating a flavor-packed meal that’s both satisfying and nutritious.
The use of eggplant not only reduces carbs but also adds a unique texture and taste to the dish, making it an excellent choice for both vegetarians and meat-lovers alike. This version of lasagna captures the essence of the classic Italian dish while keeping it light and healthy.
The rich tomato sauce, combined with the creamy texture of ricotta and the delicate flavor of eggplant, creates a harmonious blend that’s sure to delight your taste buds. This dish is perfect for a family dinner or a gathering, offering a hearty meal that serves 4-6 people.
Ingredients (for 4-6 servings):
- 2 large eggplants
- 1 tablespoon olive oil
- Salt and pepper to taste
- 2 cups marinara sauce
- 1 1/2 cups ricotta cheese
- 1 cup shredded mozzarella cheese
- 1/2 cup grated Parmesan cheese
- 1 egg
- 2 cloves garlic, minced
- 1 teaspoon dried oregano
- 1 teaspoon dried basil
Cooking Instructions:
- Prepare the Eggplant: Preheat your oven to 400°F (200°C). Slice the eggplants lengthwise into 1/4-inch thick slices. Arrange them on a baking sheet, brush lightly with olive oil, and season with salt and pepper. Bake for 20 minutes until tender, flipping halfway through.
- Prepare the Ricotta Mixture: In a medium bowl, combine the ricotta cheese, egg, minced garlic, oregano, basil, and a pinch of salt and pepper. Mix well until smooth and set aside.
- Assemble the Lasagna: In a 9×13 inch baking dish, spread a small amount of marinara sauce on the bottom. Layer the eggplant slices over the sauce, followed by a layer of the ricotta mixture. Add another thin layer of marinara sauce, then sprinkle some mozzarella and Parmesan cheese on top.
- Repeat Layers: Repeat the layering process until all the ingredients are used, finishing with a layer of marinara sauce topped with mozzarella and Parmesan cheese.
- Bake the Lasagna: Cover the dish with aluminum foil and bake in the preheated oven for 25 minutes. Remove the foil and bake for an additional 10-15 minutes until the cheese is bubbly and golden brown.
- Rest and Serve: Allow the lasagna to rest for about 10 minutes before serving. This helps it set and makes cutting easier.
Extra Tips:
To add more flavor, consider roasting the eggplant slices with a sprinkle of garlic powder or Italian seasoning before assembling the lasagna.
If you prefer a meatier dish, you can add cooked ground turkey or beef between the layers. Additionally, make sure to let the lasagna rest before serving to help the layers hold together better.
This dish can be prepared a day in advance and stored in the refrigerator, enhancing the flavors as they meld together overnight.
Asian-Inspired Chicken Cabbage Stir-Fry
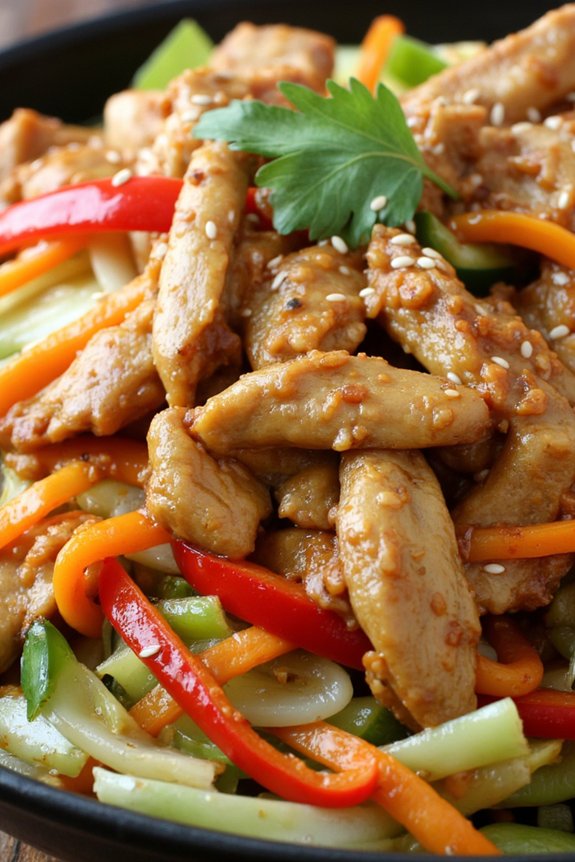
Looking for a delicious and healthy dinner option that satisfies your cravings without compromising your low-carb diet? This Asian-Inspired Chicken Cabbage Stir-Fry is the perfect choice. Packed with flavor and loaded with nutritious vegetables, it’s a quick and easy dish that transforms simple ingredients into something extraordinary. The combination of tender chicken, crunchy cabbage, and aromatic spices will leave your taste buds delighted and your stomach satisfied.
This stir-fry isn’t only low in carbohydrates but also high in protein and fiber, making it a well-balanced meal for anyone looking to maintain a healthy lifestyle. It’s ideal for a weeknight dinner when you’re pressed for time but still want something tasty and fulfilling. The dish serves 4-6 people, making it perfect for family meals or meal prepping for the week.
Ingredients (Serves 4-6):
- 1.5 pounds of boneless, skinless chicken breasts
- 1 small head of green cabbage
- 2 medium carrots
- 1 red bell pepper
- 4 green onions
- 3 cloves of garlic
- 1 tablespoon fresh ginger
- 3 tablespoons soy sauce
- 2 tablespoons sesame oil
- 1 tablespoon olive oil
- 1 tablespoon rice vinegar
- 1 tablespoon oyster sauce
- 1 teaspoon sriracha sauce (optional for heat)
- Salt and pepper to taste
- Sesame seeds for garnish
- Fresh cilantro for garnish
Cooking Instructions:
- Prepare the Ingredients: Start by slicing the chicken breasts into thin strips. Shred the cabbage, julienne the carrots, and slice the red bell pepper into strips. Chop the green onions and mince the garlic and ginger. Having everything prepped and ready will make the cooking process smoother and quicker.
- Cook the Chicken: In a large skillet or wok, heat the olive oil over medium-high heat. Add the sliced chicken and season with salt and pepper. Stir-fry the chicken for about 5-7 minutes until it’s cooked through and lightly browned. Remove the chicken from the skillet and set it aside.
- Stir-Fry the Vegetables: In the same skillet, add the sesame oil. Toss in the garlic, ginger, and the white parts of the green onions. Stir-fry for 1 minute until fragrant. Add the cabbage, carrots, and red bell pepper to the skillet. Stir-fry for 5-6 minutes until the vegetables are tender-crisp.
- Combine Ingredients: Return the cooked chicken to the skillet with the vegetables. Pour in the soy sauce, rice vinegar, oyster sauce, and sriracha sauce (if using). Stir everything together to guarantee the chicken and vegetables are well-coated with the sauce. Cook for an additional 2-3 minutes to heat through.
- Serve: Garnish the stir-fry with sesame seeds, the green parts of the green onions, and fresh cilantro. Serve immediately while it’s hot.
Extra Tips:
For an added crunch, you can toss in a handful of chopped nuts like cashews or almonds towards the end of cooking.
If you prefer your stir-fry to be spicier, feel free to increase the amount of sriracha or add a sliced chili pepper.
To make this dish gluten-free, substitute the soy sauce for tamari. Remember to adjust the seasoning according to your taste, and enjoy the vibrant flavors of this healthy, low-carb meal!
Broccoli and Cheese Stuffed Chicken Breasts

Broccoli and Cheese Stuffed Chicken Breasts are a delightful low-carb dinner option that combines the savory flavors of tender chicken, creamy cheese, and nutritious broccoli. This dish is perfect for those seeking a meal that’s both satisfying and health-conscious. The chicken breasts are carefully prepared and stuffed with a delicious mixture of broccoli, cheese, and seasoning, which not only enhances their flavor but also keeps them moist and juicy.
Once baked to perfection, these stuffed chicken breasts make an impressive presentation and a scrumptious meal that’s sure to please both family and guests alike.
Preparing Broccoli and Cheese Stuffed Chicken Breasts is straightforward and doesn’t require elaborate ingredients, making it an excellent choice for a weeknight dinner or a special occasion. The key to success with this recipe lies in the careful seasoning and the balance of the stuffing ingredients.
By following these simple steps, you can create a dish that’s rich in flavor and texture, while also being mindful of carbohydrate intake. Let’s explore the ingredients and the step-by-step preparation method to bring this delicious meal to your table.
Ingredients (Serves 4-6)
- 4 large boneless, skinless chicken breasts
- 1 cup broccoli florets, finely chopped
- 1 cup shredded cheddar cheese
- 1/4 cup cream cheese, softened
- 1 teaspoon garlic powder
- 1 teaspoon onion powder
- 1 teaspoon paprika
- Salt and pepper, to taste
- 2 tablespoons olive oil
- Toothpicks or kitchen twine
Cooking Instructions
- Preheat the Oven: Preheat your oven to 375°F (190°C) to make sure it’s ready for baking once the chicken breasts are prepared.
- Prepare the Chicken Breasts: Place the chicken breasts on a cutting board. Using a sharp knife, carefully slice a pocket into each chicken breast, being cautious not to cut all the way through.
- Make the Cheese and Broccoli Filling: In a mixing bowl, combine the chopped broccoli, shredded cheddar cheese, softened cream cheese, garlic powder, onion powder, paprika, salt, and pepper. Mix well until all ingredients are evenly incorporated.
- Stuff the Chicken Breasts: Spoon the broccoli and cheese mixture into the pocket of each chicken breast. Use toothpicks or kitchen twine to secure the openings and prevent the filling from spilling out during cooking.
- Season the Chicken: Rub the outside of each chicken breast with olive oil and sprinkle with additional salt, pepper, and paprika for added flavor.
- Bake the Chicken: Place the stuffed chicken breasts on a baking sheet or in a baking dish. Bake in the preheated oven for 25-30 minutes or until the chicken is cooked through and reaches an internal temperature of 165°F (74°C).
- Rest and Serve: Remove the chicken from the oven and let it rest for a few minutes before removing the toothpicks or twine. Serve hot, with your choice of side dishes or salads.
Extra Tips
When cooking Broccoli and Cheese Stuffed Chicken Breasts, make sure not to overstuff the chicken, as this could cause the filling to spill out during cooking. If you’re having trouble keeping the filling inside, you can use a bit more kitchen twine to secure the openings more tightly.
Additionally, feel free to experiment with different types of cheese or add a bit of cooked bacon to the filling for an extra flavor boost. Finally, for a crispier exterior, you can sear the stuffed chicken breasts in a skillet over medium-high heat for a few minutes on each side before baking.
Avocado and Bacon Cauliflower Salad
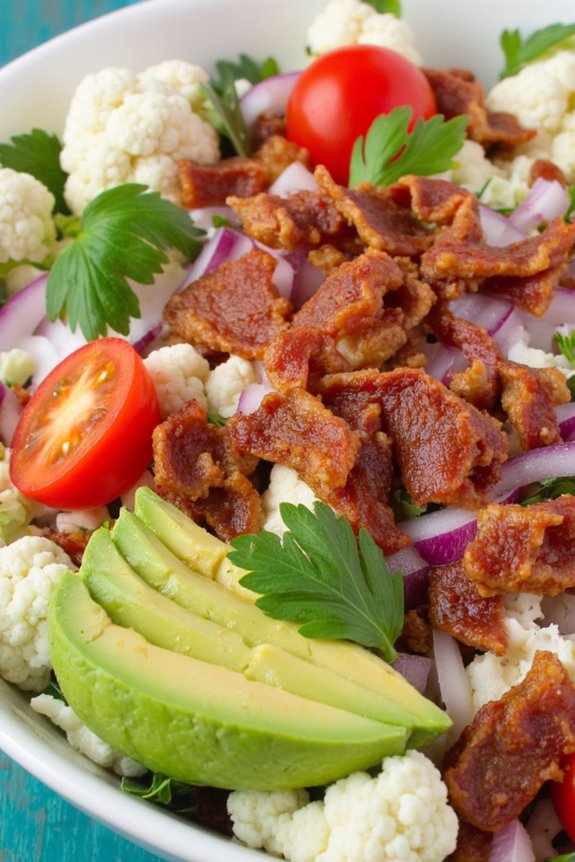
Avocado and Bacon Cauliflower Salad is a delightful low-carb dish that combines the creamy richness of avocados with the smoky, crispy flavor of bacon, all mixed with nutritious cauliflower. This salad is perfect for those looking to enjoy a healthy meal without sacrificing flavor.
It’s a great option for dinner, whether you’re hosting a gathering or enjoying a quiet night at home. The combination of textures and flavors in this salad makes it a satisfying and filling meal.
The key to this salad is using fresh ingredients to guarantee the best taste and nutritional value. The cauliflower provides a hearty base, while the avocado adds creaminess and healthy fats. The bacon gives a delicious crunch and umami flavor, balanced by a light, tangy dressing that ties everything together.
This recipe serves 4-6 people, making it ideal for a family dinner or a small gathering with friends.
Ingredients (serves 4-6):
- 1 large head of cauliflower
- 2 ripe avocados
- 6 slices of bacon
- 1/2 cup cherry tomatoes, halved
- 1/4 cup red onion, finely chopped
- 1/4 cup fresh parsley, chopped
- 2 tablespoons lemon juice
- 2 tablespoons olive oil
- Salt and pepper to taste
Instructions:
- Prepare the Cauliflower: Wash and cut the cauliflower into small florets. Bring a large pot of water to a boil, add a pinch of salt, and blanch the cauliflower florets for about 3-4 minutes until tender yet still crisp. Drain and rinse with cold water to stop the cooking process, then set aside to cool.
- Cook the Bacon: In a skillet over medium heat, cook the bacon until crispy. Remove the bacon from the skillet and place it on a paper towel-lined plate to drain excess fat. Once cooled, crumble the bacon into small pieces.
- Prepare the Dressing: In a small bowl, whisk together the lemon juice, olive oil, salt, and pepper. Adjust the seasoning according to your taste preference.
- Assemble the Salad: In a large mixing bowl, combine the cooled cauliflower florets, crumbled bacon, halved cherry tomatoes, chopped red onion, and parsley. Gently toss the ingredients together.
- Add the Avocados: Cut the avocados in half, remove the pits, and scoop out the flesh. Cut the avocado into cubes and add them to the salad. Gently fold them into the mixture to avoid mashing the avocado.
- Dress the Salad: Pour the lemon and olive oil dressing over the salad. Toss everything together carefully to guarantee all ingredients are well coated with the dressing.
- Serve: Transfer the salad to a serving dish and enjoy immediately, or refrigerate for 30 minutes to allow the flavors to meld together before serving.
Extra Tips:
For the best texture and flavor, choose ripe but firm avocados; they should give slightly to gentle pressure. If you prefer your salad on the creamier side, you can mash one avocado into the dressing before combining it with the rest of the ingredients.
Feel free to experiment with additional toppings like toasted nuts or seeds for an extra crunch. For those who enjoy a bit more heat, a pinch of red pepper flakes can be added to the dressing for a spicy kick.
Zucchini and Beef Enchilada Skillet

The Zucchini and Beef Enchilada Skillet is a delightful low-carb dinner option that brings together the rich flavors of beef enchilada into a skillet dish that’s easy to prepare and perfect for any weeknight meal. The dish uses zucchini slices in place of tortillas, making it a lighter yet satisfying version of the classic enchilada.
This recipe combines the fresh crunch of zucchini with the savory taste of seasoned beef and melted cheese, all smothered in a tangy enchilada sauce. It’s a one-pan wonder that delivers comfort food vibes without the carbs.
Perfect for feeding a family or hosting friends, this recipe serves 4-6 people and is an excellent way to enjoy a wholesome meal without compromising on taste. The zucchini not only adds a nutritional boost but also absorbs the flavors of the sauce and beef, creating a delightful blend of textures and tastes.
With minimal prep and a short cooking time, this dish is ideal for those busy nights when you want a hearty meal without spending hours in the kitchen.
Ingredients (Serving Size: 4-6 people):
- 1 pound ground beef
- 2 large zucchinis, sliced into thin rounds
- 1 cup enchilada sauce
- 1 medium onion, diced
- 2 cloves garlic, minced
- 1 teaspoon chili powder
- 1 teaspoon ground cumin
- 1 cup shredded cheddar cheese
- 1 tablespoon olive oil
- Salt and pepper to taste
- Optional toppings: chopped cilantro, sour cream, sliced jalapeños, diced tomatoes
Cooking Instructions:
- Prepare the Ingredients: Begin by washing the zucchinis and slicing them into thin rounds. Dice the onion and mince the garlic to have them ready for cooking.
- Cook the Beef: In a large skillet, heat the olive oil over medium heat. Add the diced onion and minced garlic, cooking until the onion becomes translucent. Add the ground beef to the skillet, breaking it apart with a spatula, and cook until it’s browned. Drain any excess fat.
- Season the Beef: Sprinkle the chili powder, ground cumin, salt, and pepper over the browned beef. Stir well to guarantee the spices are evenly distributed throughout the meat.
- Add the Zucchini: Layer the sliced zucchini over the beef in the skillet, making sure they’re spread out evenly. Pour the enchilada sauce over the zucchini and beef, ensuring everything is well-coated.
- Simmer the Skillet: Cover the skillet and let the mixture simmer for about 10-15 minutes, or until the zucchini is tender and the flavors have melded together.
- Melt the Cheese: Uncover the skillet and sprinkle the shredded cheddar cheese over the top. Replace the cover and let it cook for an additional 3-5 minutes, or until the cheese has melted.
- Garnish and Serve: Remove from heat and top with optional garnishes like chopped cilantro, sour cream, sliced jalapeños, or diced tomatoes. Serve hot and enjoy!
Extra Tips: When making this dish, make sure not to overcook the zucchini, as it can become too soft and lose its texture. It’s best to slice the zucchini evenly to guarantee they cook through at the same rate.
If you prefer a spicier dish, consider adding extra jalapeños or a dash of cayenne pepper to the beef mixture. For added flavor, you can also experiment with different types of cheese, such as Monterey Jack or a Mexican blend. Enjoy your Zucchini and Beef Enchilada Skillet with a side salad for a complete low-carb meal.