

As a fan of both cooking and budgeting, I’ve discovered that feeding a family of six can be delicious and affordable. Think about a warm beef and vegetable stew on the stove or a creamy chicken Alfredo pasta bake in the oven. These meals are more than just about eating—they’re about sharing special moments at the dinner table. Ready to explore more budget-friendly recipes?
Hearty Beef and Vegetable Stew
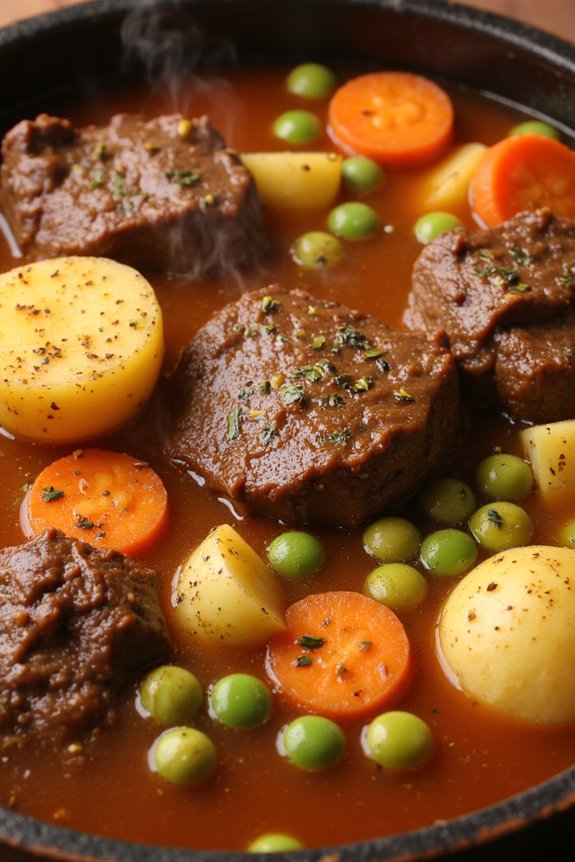
If you’re looking for a comforting and budget-friendly dinner option that can satisfy the whole family, this Hearty Beef and Vegetable Stew is the perfect choice. Packed with tender chunks of beef, rich and savory broth, and a medley of fresh vegetables, this stew is designed to warm your soul and fill your belly. It’s an ideal meal for those chilly evenings when you crave something wholesome and nutritious without breaking the bank.
This stew recipe is specifically tailored for a family of six, ensuring everyone has a generous portion to enjoy. The combination of beef, potatoes, carrots, and peas creates a well-rounded meal that’s both filling and flavorful. The slow-cooked beef becomes melt-in-your-mouth tender, while the vegetables soak up all the savory goodness of the broth. Not only is this dish delicious, but it’s also straightforward to prepare, making it a staple for busy weeknights or lazy weekends.
Ingredients for 4-6 people:
- 2 pounds beef chuck, cut into 1-inch cubes
- 3 tablespoons vegetable oil
- 1 large onion, chopped
- 3 cloves garlic, minced
- 4 cups beef broth
- 1 cup water
- 2 tablespoons tomato paste
- 2 teaspoons Worcestershire sauce
- 1 teaspoon dried thyme
- 2 bay leaves
- 4 large carrots, sliced
- 4 medium potatoes, peeled and cubed
- 1 cup frozen peas
- Salt and pepper to taste
Cooking Instructions:
- Prepare the Beef: Start by patting the beef cubes dry with paper towels. This helps them brown better. Season the beef with salt and pepper.
- Brown the Beef: Heat 2 tablespoons of vegetable oil in a large pot or Dutch oven over medium-high heat. Add the beef in batches, making sure not to overcrowd the pot. Brown the beef on all sides, about 5 minutes per batch. Remove the beef and set it aside.
- Sauté the Aromatics: In the same pot, add the remaining tablespoon of vegetable oil. Add the chopped onion and garlic, and sauté until the onion is translucent, about 5 minutes.
- Combine Ingredients: Return the beef to the pot. Stir in the tomato paste, Worcestershire sauce, dried thyme, and bay leaves. Pour in the beef broth and 1 cup of water. Stir well to combine.
- Simmer the Stew: Bring the mixture to a boil, then reduce the heat to low. Cover the pot and let it simmer for about 1.5 hours, or until the beef is tender.
- Add Vegetables: Add the carrots and potatoes to the pot. Continue to simmer for another 30 minutes, or until the vegetables are tender.
- Finish with Peas: Stir in the frozen peas and let them cook for an additional 5 minutes. Taste and adjust the seasoning with salt and pepper as needed.
- Serve: Remove the bay leaves before serving. Ladle the stew into bowls, garnishing with fresh parsley if desired.
Extra Tips:
For the best flavor, try to prepare the stew a day in advance. The flavors meld together beautifully overnight, resulting in an even richer taste.
If you’re short on time, you can use a pressure cooker to speed up the cooking process. Additionally, feel free to substitute or add other vegetables like celery or green beans based on your family’s preferences.
This stew pairs beautifully with crusty bread or a side salad for a complete meal.
Chicken Alfredo Pasta Bake
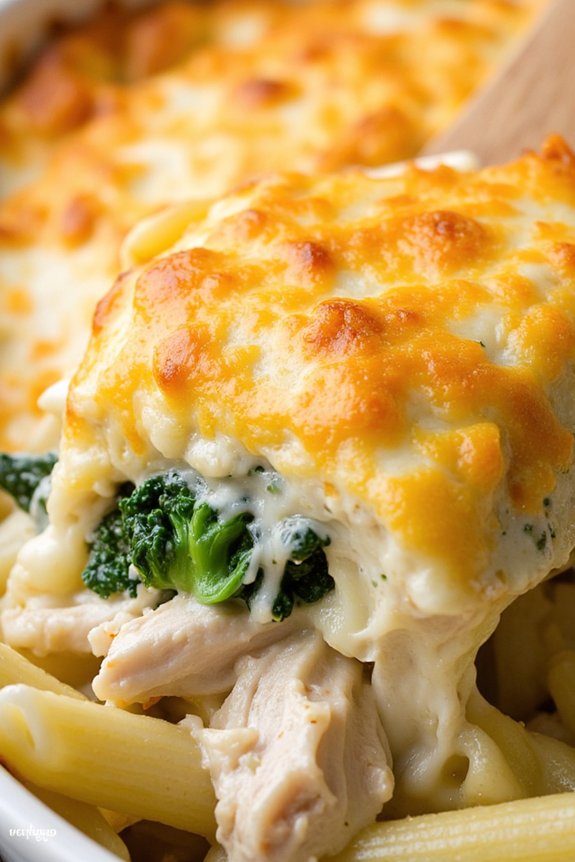
Chicken Alfredo Pasta Bake is a delicious and budget-friendly meal perfect for feeding a family of six. This hearty dish combines tender chicken, creamy Alfredo sauce, and perfectly cooked pasta, all baked together with a layer of melted cheese on top. It’s a comforting meal that’s certain to satisfy even the pickiest eaters in your family.
Plus, it’s easy to prepare and can be made with simple ingredients you likely already have in your kitchen. This recipe is great for busy weeknights, as it can be prepared in advance and baked right before serving. The creamy Alfredo sauce pairs wonderfully with the juicy chicken and pasta, making it a hit with both kids and adults alike.
It’s also a versatile dish, allowing you to add your favorite vegetables or spices to suit your taste. With this Chicken Alfredo Pasta Bake, you can enjoy a restaurant-quality meal at home without breaking the bank.
Ingredients (serving size: 4-6 people):
- 1 pound boneless, skinless chicken breasts
- 12 ounces penne pasta
- 2 cups Alfredo sauce (store-bought or homemade)
- 1 cup shredded mozzarella cheese
- 1/2 cup grated Parmesan cheese
- 1 tablespoon olive oil
- 2 cloves garlic, minced
- Salt and pepper to taste
- Optional: 1 cup broccoli florets or spinach
Cooking Instructions:
- Preheat the Oven: Begin by preheating your oven to 350°F (175°C). This guarantees that the oven is ready to bake the dish by the time you finish preparing it.
- Cook the Pasta: In a large pot of boiling salted water, cook the penne pasta according to package instructions until al dente. Once cooked, drain and set aside.
- Prepare the Chicken: While the pasta is cooking, heat olive oil in a large skillet over medium heat. Add the chicken breasts and season with salt and pepper. Cook the chicken for about 5-7 minutes per side, or until golden brown and cooked through. Remove from the skillet, let it cool slightly, then chop into bite-sized pieces.
- Sauté Garlic: In the same skillet, add minced garlic and sauté for about 1 minute, or until fragrant. If using, add broccoli or spinach and cook until tender.
- Combine Ingredients: In a large mixing bowl, combine the cooked pasta, chopped chicken, sautéed garlic (and vegetables, if using), and Alfredo sauce. Stir until everything is well coated with the sauce.
- Assemble the Bake: Transfer the pasta mixture into a greased 9×13-inch baking dish. Sprinkle the mozzarella and Parmesan cheeses evenly over the top.
- Bake the Dish: Place the baking dish in the preheated oven and bake for 25-30 minutes, or until the cheese is melted and bubbly. For a golden brown top, you can broil it for an additional 2-3 minutes, keeping a close eye to prevent burning.
- Serve: Remove from the oven and let it cool for a few minutes before serving. This will allow the flavors to meld together and make it easier to portion out.
Extra Tips:
For a richer flavor, consider using a mix of cheeses such as cheddar or Gruyère in addition to mozzarella and Parmesan. If you have leftover rotisserie chicken, you can use that instead of cooking fresh chicken breasts to save time.
For a healthier twist, try using whole wheat pasta and adding more vegetables like bell peppers or mushrooms. Remember, you can always adjust the seasoning to your family’s preference, and the dish can be stored in the refrigerator for up to 3 days, making it ideal for meal prep.
Vegetarian Chili With Cornbread
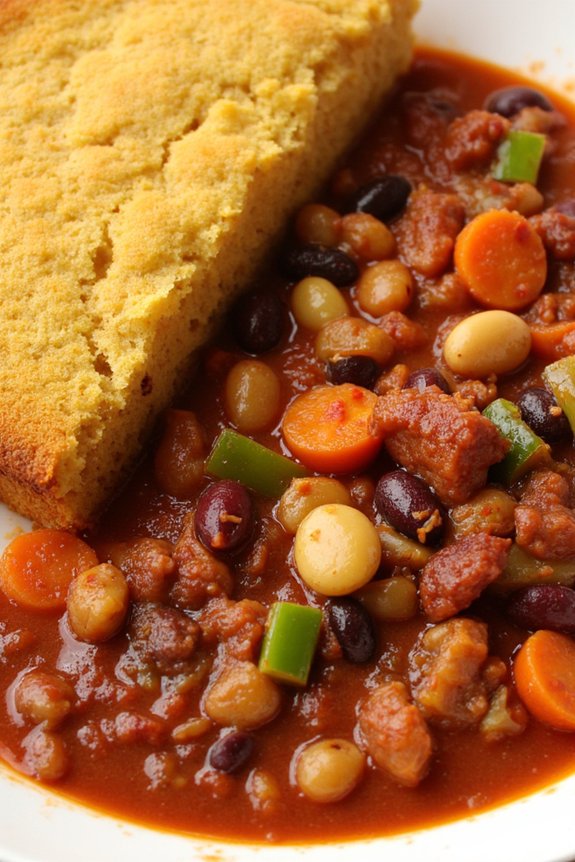
Vegetarian Chili With Cornbread is a hearty and satisfying meal that caters to both vegetarians and meat-lovers alike. This dish combines a rich, flavorful chili packed with beans, vegetables, and spices, served alongside a warm, slightly sweet cornbread. Perfect for a family of six, this recipe isn’t only affordable but also easy to prepare, making it ideal for a weeknight dinner.
The chili is a one-pot wonder that requires minimal cleanup, while the cornbread adds a delightful contrast with its crumbly texture and subtle sweetness. This Vegetarian Chili With Cornbread recipe is a great way to introduce more plant-based meals into your family’s diet without sacrificing taste or satisfaction.
The chili itself can be customized with your choice of vegetables and beans, ensuring you can make use of whatever you have on hand. The cornbread, on the other hand, is a classic recipe that pairs beautifully with the chili, offering a comforting touch to the meal. Whether you’re a seasoned vegetarian or simply looking for a meatless meal option, this recipe is sure to please everyone at the table.
Ingredients (Serving Size: 4-6 People):
*For the Vegetarian Chili:*
- 2 tablespoons olive oil
- 1 large onion, diced
- 3 cloves garlic, minced
- 2 bell peppers (any color), chopped
- 2 carrots, diced
- 1 zucchini, diced
- 1 can (15 oz) black beans, drained and rinsed
- 1 can (15 oz) kidney beans, drained and rinsed
- 1 can (28 oz) crushed tomatoes
- 2 tablespoons tomato paste
- 1 tablespoon chili powder
- 1 teaspoon cumin
- 1 teaspoon smoked paprika
- Salt and pepper to taste
- 1 cup vegetable broth
- 1 cup corn kernels (fresh or frozen)
- Fresh cilantro for garnish (optional)
For the Cornbread:
- 1 cup cornmeal
- 1 cup all-purpose flour
- 1/4 cup sugar
- 1 tablespoon baking powder
- 1/2 teaspoon salt
- 1 cup milk
- 1/4 cup vegetable oil
- 1 large egg
Cooking Instructions:
- Prepare the Chili:
- In a large pot over medium heat, add olive oil. Once hot, sauté the diced onion until translucent, about 5 minutes.
- Add the minced garlic, chopped bell peppers, diced carrots, and diced zucchini. Cook for an additional 5 minutes, stirring occasionally.
- Stir in the black beans, kidney beans, crushed tomatoes, and tomato paste. Mix well to combine.
- Add the chili powder, cumin, smoked paprika, salt, and pepper. Stir the spices in thoroughly to coat the vegetables and beans.
- Pour in the vegetable broth and bring the mixture to a simmer. Reduce the heat to low, cover, and let it simmer for about 20 minutes.
- Add the corn kernels to the chili and cook for an additional 5 minutes. Taste and adjust seasoning as necessary.
- Prepare the Cornbread:
- Preheat your oven to 400°F (200°C). Grease a 9×9 inch baking dish or a similar size pan.
- In a large bowl, combine the cornmeal, flour, sugar, baking powder, and salt.
- In a separate bowl, whisk together the milk, vegetable oil, and egg.
- Pour the wet ingredients into the dry ingredients and mix until just combined. Be careful not to overmix.
- Pour the batter into the prepared baking dish and smooth the top with a spatula.
- Bake in the preheated oven for 20-25 minutes, or until the top is golden brown and a toothpick inserted into the center comes out clean.
- Serve:
- Ladle the chili into bowls and garnish with fresh cilantro if desired. Serve alongside slices of warm cornbread.
Extra Tips:
For an even richer flavor, prepare the chili a day ahead and let it sit in the refrigerator overnight; the flavors will meld and intensify. You can also add other vegetables like mushrooms or sweet potatoes to the chili for added texture and nutrition.
If you prefer a spicier chili, add a pinch of cayenne pepper or diced jalapeños. For the cornbread, consider adding a handful of shredded cheese or chopped jalapeños to the batter for an extra kick.
Easy One-Pan Sausage and Peppers

Easy One-Pan Sausage and Peppers is a delightful meal that combines flavors and convenience, making it perfect for busy weeknights. This dish brings together juicy sausages, colorful bell peppers, and aromatic onions in a single pan, creating a symphony of flavors that will please even the pickiest eaters.
Not only is it budget-friendly, but it’s also quick to prepare and requires minimal cleanup, making it an excellent choice for families looking to enjoy a home-cooked meal without spending hours in the kitchen.
The beauty of this recipe lies in its simplicity and versatility. You can customize it by using different types of sausages, such as spicy Italian, mild chicken, or even vegetarian options, to suit your family’s preferences.
Serve it over rice, pasta, or with a side of crusty bread to soak up the delicious juices. This Easy One-Pan Sausage and Peppers dish is sure to become a family favorite, offering a satisfying and wholesome meal that everyone will love.
Ingredients for 4-6 people:
- 1 ½ pounds of sausages (Italian, chicken, or preferred type)
- 3 large bell peppers (red, yellow, green), sliced
- 2 medium onions, sliced
- 2 tablespoons olive oil
- 3 cloves garlic, minced
- 1 teaspoon dried oregano
- 1 teaspoon dried basil
- Salt and pepper to taste
- ½ cup chicken broth or water
- Fresh basil or parsley for garnish (optional)
Cooking Instructions:
- Preheat the Oven: Set your oven to 400°F (200°C) to warm up while you prepare the ingredients. This will guarantee the sausages cook evenly and the vegetables roast nicely.
- Prepare the Ingredients: Slice the bell peppers and onions into strips, and mince the garlic. Set them aside. If using whole sausages, you can keep them as is or cut them into bite-sized pieces depending on preference.
- Sauté the Sausages: In a large oven-safe skillet or pan, heat 1 tablespoon of olive oil over medium heat. Add the sausages and cook for about 4-5 minutes, turning occasionally until browned on all sides. Remove sausages from the pan and set them aside.
- Cook the Vegetables: In the same pan, add the remaining tablespoon of olive oil. Toss in the sliced onions and bell peppers, cooking them for about 5 minutes until they start to soften. Add the minced garlic, oregano, basil, salt, and pepper, and stir to combine.
- Combine and Bake: Return the browned sausages to the pan with the vegetables. Pour in the chicken broth or water, and gently stir to mix everything together. Transfer the pan to the preheated oven and bake for 20-25 minutes until the sausages are fully cooked and the vegetables are tender.
- Serve: Once done, remove the pan from the oven. Let it rest for a few minutes before serving. Garnish with fresh basil or parsley if desired, and serve with your choice of rice, pasta, or bread.
Extra Tips:
For an extra layer of flavor, consider adding a splash of balsamic vinegar or a sprinkle of red pepper flakes before baking.
If you prefer your vegetables to have a little crunch, reduce the oven time by 5 minutes. This dish can easily be made ahead of time and reheated, making it perfect for meal prepping.
Feel free to add other vegetables such as zucchini or mushrooms to the mix for added nutrition and flavor.
Classic Tuna Casserole

Classic Tuna Casserole is a delightful and budget-friendly option for feeding a family of six. This comforting dish combines tender pasta, flavorful tuna, and a creamy sauce, all baked to perfection for a satisfying meal. It’s a nostalgic recipe that many remember from their childhood, and its simplicity and heartiness make it a staple in many households.
Perfect for busy weeknights, this casserole can be prepared in advance and heated up when needed. Not only is the Classic Tuna Casserole quick to assemble, but it also uses pantry staples, making it an economical choice. With a few basic ingredients, you can have a warm and delicious meal on the table in no time.
The beauty of this recipe lies in its versatility; you can easily adapt it with additional vegetables or different types of cheese to suit your family’s tastes. Whether you’re a seasoned cook or new to the kitchen, this dish is sure to become a family favorite.
Ingredients for 4-6 Servings:
- 12 oz (340g) egg noodles
- 2 cans (5 oz each) of tuna, drained
- 1 can (10.5 oz) cream of mushroom soup
- 1 cup milk
- 1 cup frozen peas
- 1 cup shredded cheddar cheese
- 1/2 cup crushed potato chips
- 1/4 cup chopped onion
- Salt and pepper to taste
- 2 tablespoons butter
Cooking Instructions:
- Preheat the Oven: Preheat your oven to 350°F (175°C) to guarantee it’s ready for baking once the casserole is assembled.
- Cook the Noodles: Bring a large pot of salted water to a boil. Add the egg noodles and cook according to the package instructions until al dente. Drain and set aside.
- Prepare the Sauce: In a large mixing bowl, combine the cream of mushroom soup, milk, and melted butter. Stir in the chopped onion, salt, and pepper. Mix well until smooth.
- Combine Ingredients: Add the drained tuna, cooked noodles, and frozen peas into the sauce mixture. Stir until all ingredients are well combined and evenly coated with the sauce.
- Transfer to Baking Dish: Pour the mixture into a greased 9×13 inch baking dish, spreading it out evenly.
- Add Toppings: Sprinkle the shredded cheddar cheese over the top of the casserole, followed by an even layer of crushed potato chips.
- Bake: Place the casserole in the preheated oven and bake for 25-30 minutes, or until the cheese is melted and the top is golden brown.
- Serve: Remove from the oven and allow it to cool slightly before serving. Enjoy your Classic Tuna Casserole warm.
Extra Tips:
To add more flavor to your Classic Tuna Casserole, consider sautéing the onions in a little butter before adding them to the sauce. This will bring out their sweetness and add depth to the dish.
If you prefer a bit of crunch, you can also add sliced almonds or breadcrumbs as a topping along with the potato chips. For a more veggie-packed version, feel free to include chopped carrots, celery, or bell peppers.
Adjust the seasoning to taste, and remember that the casserole can be prepared ahead of time and refrigerated until you’re ready to bake it. This makes it even more convenient for a quick weeknight dinner.
Savory Lentil and Rice Pilaf
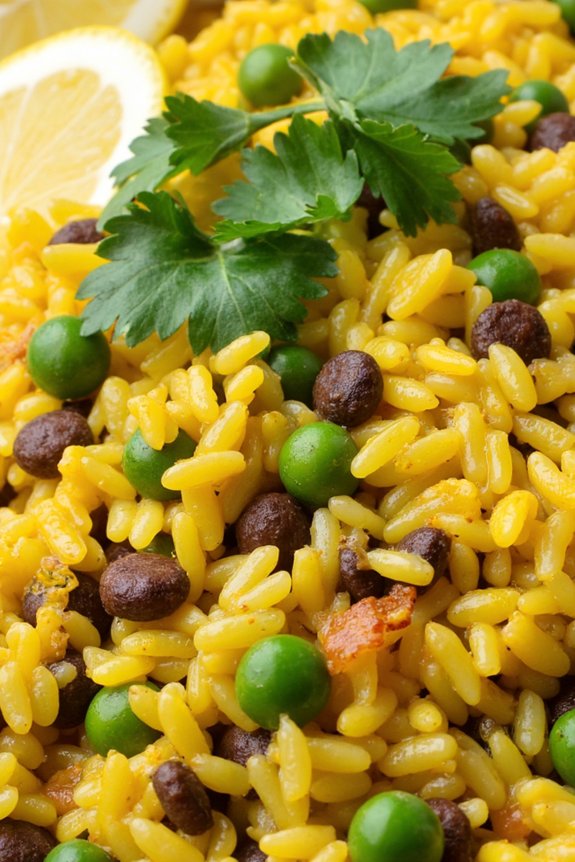
Savory Lentil and Rice Pilaf is an ideal dish for families looking for a wholesome, budget-friendly meal. This hearty and nutritious recipe combines lentils and rice, seasoned with aromatic spices, to create a satisfying main course that’s both filling and flavorful. The dish isn’t only easy to prepare but also versatile, allowing you to add your favorite vegetables or proteins to customize it to your family’s liking.
Perfect for busy weeknights, this one-pot meal won’t only save you time in the kitchen but also keep your grocery bills low.
Lentils are an excellent source of protein and dietary fiber, making them an essential component of a balanced diet. When paired with rice, they create a complete protein, providing all the essential amino acids your body needs. This Savory Lentil and Rice Pilaf is designed to serve a family of six, ensuring everyone gets a generous portion of this delicious and nutritious meal.
The spices used in this recipe, such as cumin and coriander, enhance the flavor of the dish without overpowering its natural goodness.
Ingredients (Serves 4-6):
- 1 cup dried green or brown lentils
- 1 cup long-grain white or brown rice
- 2 tablespoons olive oil
- 1 medium onion, finely chopped
- 3 cloves garlic, minced
- 1 teaspoon ground cumin
- 1 teaspoon ground coriander
- 1 teaspoon turmeric
- Salt and pepper to taste
- 4 cups vegetable or chicken broth
- 1 bay leaf
- 1 cup frozen peas
- 1/4 cup chopped fresh parsley or cilantro
- Lemon wedges for serving
Cooking Instructions:
- Prepare the Lentils and Rice: Rinse the lentils and rice under cold water until the water runs clear. This will help remove any excess starch and debris.
- Sauté the Aromatics: In a large pot, heat the olive oil over medium heat. Add the chopped onion and sauté for about 3-4 minutes until translucent. Add the minced garlic and continue to sauté for another minute until fragrant.
- Add Spices: Stir in the cumin, coriander, turmeric, salt, and pepper. Cook for another 1-2 minutes to allow the spices to release their aroma.
- Cook the Pilaf: Add the rinsed lentils and rice to the pot, stirring to coat them with the spiced oil and onions. Pour in the vegetable or chicken broth, add the bay leaf, and bring to a boil. Once boiling, reduce the heat to low, cover the pot, and let it simmer for 20-25 minutes or until the lentils and rice are tender and have absorbed most of the liquid.
- Add Vegetables: In the last 5 minutes of cooking, stir in the frozen peas. Cover and allow them to cook until they’re heated through.
- Finish the Dish: Remove the pot from the heat and let it sit, covered, for about 5 minutes to allow the flavors to meld. Discard the bay leaf, fluff the pilaf with a fork, and stir in the chopped parsley or cilantro.
- Serve: Serve the pilaf warm with lemon wedges on the side for an extra burst of freshness.
Extra Tips:
When cooking Savory Lentil and Rice Pilaf, it’s important to keep an eye on the liquid levels in the pot. Depending on your stove and pot, you may need to add a little more broth if you notice the rice and lentils aren’t fully cooked after the initial 25 minutes.
If you prefer a creamier texture, you can stir in a tablespoon of butter or a splash of coconut milk at the end of cooking. Additionally, feel free to customize the dish by adding diced carrots, bell peppers, or spinach for extra nutrition and color. Enjoy experimenting with different herbs and spices to suit your family’s taste preferences.
Creamy Potato and Leek Soup
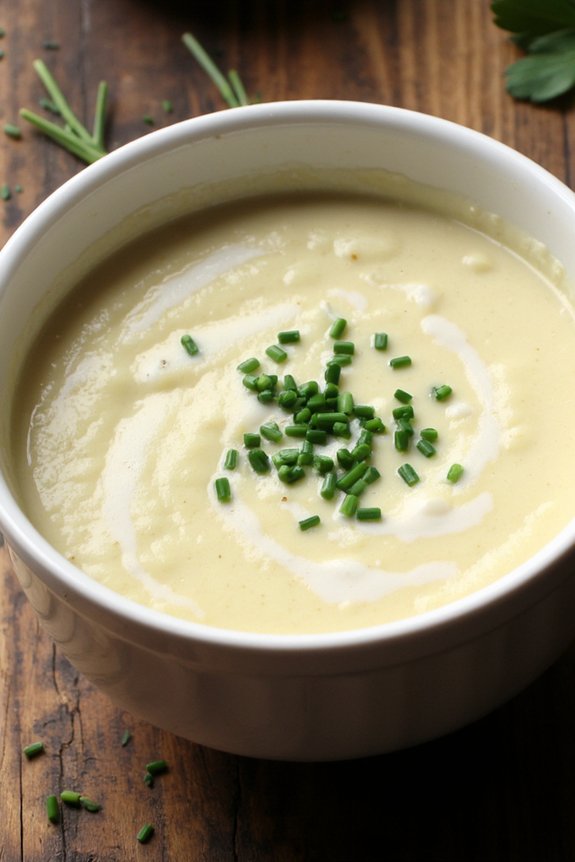
Creamy Potato and Leek Soup is an ideal choice for a comforting and budget-friendly family meal. This hearty soup combines the mild, sweet flavor of leeks with the earthy richness of potatoes. The creamy texture is achieved without heavy cream, making it a healthier option while still offering a satisfying mouthfeel. Perfect for chilly evenings, this soup can be enjoyed as a starter or a main course when paired with crusty bread.
To create a wholesome meal for a family of six, this recipe relies on simple ingredients that are often already in your pantry or easy to find at any grocery store. The process is straightforward, allowing you to prepare a delicious homemade soup in under an hour. With a few easy steps, you’ll have a pot of warming soup ready to serve, delighting both adults and children alike with its comforting flavor.
Ingredients (Serves 4-6):
- 4 large potatoes, peeled and diced
- 3 medium leeks, thoroughly cleaned and sliced
- 1 large onion, chopped
- 3 cloves garlic, minced
- 6 cups chicken or vegetable broth
- 2 tablespoons olive oil
- 1 cup milk
- Salt and pepper to taste
- Fresh chives or parsley for garnish
Cooking Instructions:
- Prepare the Vegetables: Start by peeling and dicing the potatoes into small cubes. Clean the leeks thoroughly, as they often have dirt trapped between the layers. Slice the leeks and chop the onion. Mince the garlic and set everything aside.
- Sauté the Aromatics: In a large pot, heat the olive oil over medium heat. Add the chopped onion and sliced leeks, cooking until they become soft and translucent, about 5-7 minutes. Stir in the minced garlic and cook for an additional minute until fragrant.
- Add Potatoes and Broth: Add the diced potatoes to the pot and pour in the chicken or vegetable broth. Bring the mixture to a boil, then reduce the heat to a simmer. Cover the pot and let it cook for about 20 minutes, or until the potatoes are tender.
- Blend the Soup: Once the potatoes are soft, use an immersion blender to puree the soup until smooth. If you don’t have an immersion blender, carefully transfer the soup in batches to a countertop blender and blend until smooth. Return the soup to the pot.
- Incorporate Milk and Season: Stir in the milk to add creaminess to the soup. Season with salt and pepper to taste, adjusting the seasoning as needed. Let the soup simmer for another 5 minutes to guarantee it’s heated through.
- Serve: Ladle the soup into bowls and garnish with freshly chopped chives or parsley. Serve hot with crusty bread or a side salad for a complete meal.
Extra Tips: When making Creamy Potato and Leek Soup, be sure to clean the leeks thoroughly to avoid any grit in your soup. Adjust the consistency by adding more broth or milk if you prefer a thinner soup. For added depth of flavor, consider including a pinch of nutmeg or a splash of white wine while cooking. If you want to make this dish vegetarian, use vegetable broth instead of chicken broth. Remember to taste and adjust the seasoning before serving to verify the flavors are balanced.
BBQ Chicken and Pineapple Quesadillas

BBQ Chicken and Pineapple Quesadillas are a delicious and budget-friendly meal that can quickly become a family favorite. These quesadillas combine the savory flavors of barbecue chicken with the sweetness of pineapple, all melted together with gooey cheese in a crispy tortilla.
Perfect for a family of six, this dish isn’t only satisfying but also easy to prepare. It’s an excellent way to use up leftover chicken and can be made in less than 30 minutes, making it an ideal option for busy weeknights.
To make BBQ Chicken and Pineapple Quesadillas, you’ll start by preparing the chicken, which can be cooked fresh or use leftovers for convenience. The pineapple adds a rejuvenating twist, balancing the barbecue sauce’s tanginess and the cheese’s richness.
The best part about this dish is its adaptability; you can customize the filling by adding vegetables or different cheese types to match your family’s preferences. Serve these quesadillas with a side of salsa, sour cream, or a simple green salad for a complete meal.
Ingredients (serves 4-6):
- 2 cups cooked chicken, shredded
- 1 cup barbecue sauce
- 1 cup pineapple chunks, drained
- 2 cups shredded Monterey Jack or cheddar cheese
- 8 large flour tortillas
- 2 tbsp olive oil or butter
- Optional: sliced green onions, chopped cilantro, or jalapeños for garnish
Cooking Instructions:
- Prepare the Chicken Filling:
- In a medium bowl, combine the shredded chicken with the barbecue sauce. Mix well until the chicken is evenly coated.
- Assemble the Quesadillas:
- Lay one tortilla flat on a clean surface. Sprinkle a quarter cup of shredded cheese over half of the tortilla. Add a generous amount of the BBQ chicken mixture, a few pineapple chunks, and additional cheese on top if desired. Fold the tortilla in half to enclose the filling.
- Cook the Quesadillas:
- Heat 1 tablespoon of olive oil or butter in a large skillet over medium heat. Place the folded quesadilla in the skillet and cook for 3-4 minutes on each side, or until the tortilla is golden brown and the cheese has melted. Adjust the heat as necessary to prevent burning.
- Repeat with the remaining tortillas and filling.
- Serve:
- Once cooked, remove the quesadilla from the pan and let it cool for a minute. Cut into wedges and serve warm. Garnish with green onions, cilantro, or jalapeños if desired.
Extra Tips:
For a crispy texture, confirm the pan is adequately heated before adding the quesadilla. If you prefer a spicier version, consider adding chopped jalapeños or a dash of hot sauce to the chicken mixture.
When using fresh pineapple, make sure to drain excess juice to avoid soggy quesadillas. If you’re using a non-stick skillet, you might need less oil or butter.
Feel free to experiment with different cheese combinations like pepper jack or mozzarella to give the quesadillas a unique twist.
Spaghetti Aglio E Olio With Shrimp
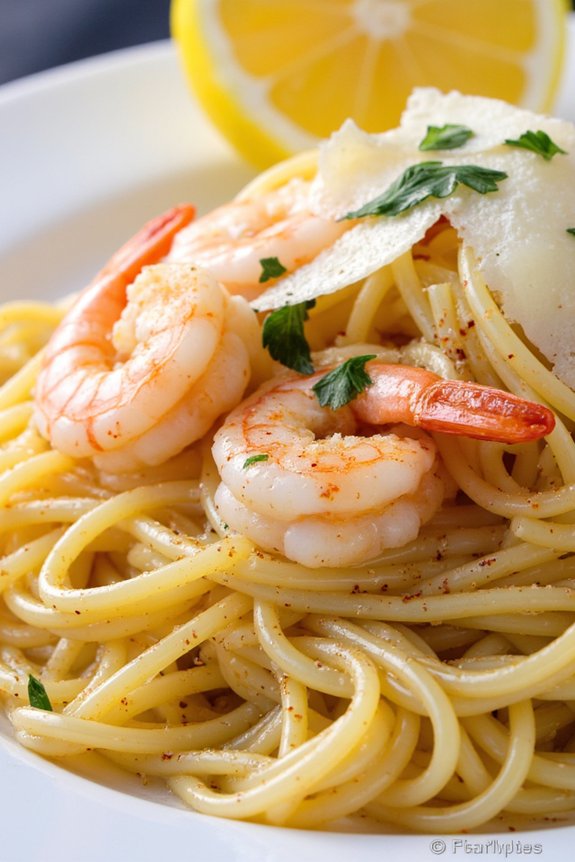
Spaghetti Aglio E Olio With Shrimp is a delightful and cost-effective dinner option that brings the flavors of Italy to your family table. This dish combines the simplicity of garlic, olive oil, and red pepper flakes with the succulent taste of shrimp, creating a meal that’s both delicious and satisfying. The addition of shrimp elevates this classic pasta dish, making it a perfect choice for a special family dinner that won’t break the bank.
This recipe is designed to serve 4-6 people, making it ideal for a family gathering or a cozy dinner with friends. The ingredients are simple and affordable, yet they come together in a way that’s sure to impress. Whether you’re a seasoned cook or a beginner in the kitchen, this recipe is straightforward and easy to follow, ensuring that you can enjoy a restaurant-quality meal at home without the hefty price tag.
Ingredients (Serves 4-6)
- 1 pound (450g) spaghetti
- 1/2 cup (120ml) extra virgin olive oil
- 6 cloves garlic, thinly sliced
- 1 teaspoon red pepper flakes
- 1 pound (450g) large shrimp, peeled and deveined
- Salt, to taste
- Freshly ground black pepper, to taste
- 1/4 cup (60ml) chopped fresh parsley
- 1/4 cup (60ml) freshly grated Parmesan cheese
- 1 lemon, cut into wedges
Instructions
- Cook the Pasta: Bring a large pot of salted water to a boil. Add the spaghetti and cook according to package instructions until al dente. Reserve 1 cup of pasta water, then drain the pasta and set aside.
- Prepare the Shrimp: While the pasta is cooking, heat 1/4 cup of olive oil in a large skillet over medium heat. Add the shrimp to the skillet, seasoning them with salt and pepper. Cook the shrimp for about 2-3 minutes on each side, or until they’re pink and opaque. Remove the shrimp from the skillet and set aside.
- Sauté Garlic and Red Pepper Flakes: In the same skillet, add the remaining 1/4 cup of olive oil and reduce the heat to low. Add the sliced garlic and red pepper flakes, cooking gently until the garlic is lightly golden, about 2 minutes. Be careful not to burn the garlic, as it can become bitter.
- Combine Everything: Return the cooked shrimp to the skillet and add the cooked spaghetti. Toss everything together, adding reserved pasta water a little at a time until the pasta is evenly coated with the oil and garlic mixture.
- Finish and Serve: Stir in the chopped parsley and freshly grated Parmesan cheese. Adjust seasoning with additional salt and pepper if needed. Serve the pasta hot, with lemon wedges on the side for squeezing over the dish.
Tips
For the best results, use fresh, high-quality ingredients, especially the olive oil and shrimp. If you prefer, you can substitute the shrimp with chicken or keep it vegetarian by adding more vegetables like spinach or cherry tomatoes.
Be mindful not to overcook the garlic, as its flavor can quickly turn from sweet to bitter. Also, take care not to overcook the shrimp, as they can become rubbery. The reserved pasta water is key to achieving a silky sauce, so add it gradually and adjust as needed.
Baked Ziti With Spinach and Ricotta
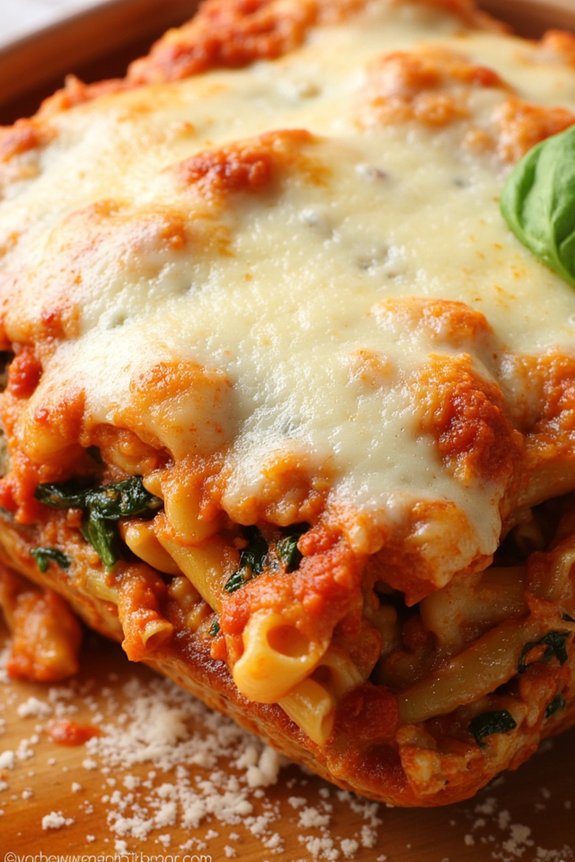
Baked Ziti With Spinach and Ricotta is a classic Italian-American dish that’s perfect for feeding a family of six. It’s an easy-to-make, comforting meal that combines tender pasta with a creamy ricotta and spinach mixture, all enveloped in a rich tomato sauce and topped with gooey melted cheese.
This dish isn’t only budget-friendly but also a great way to sneak in some greens for picky eaters. Whether it’s a busy weeknight or a leisurely weekend supper, this baked ziti is sure to be a hit with everyone at the table.
The combination of ricotta and spinach makes this dish both flavorful and nutritious. Ricotta cheese adds creaminess without making the dish too heavy, while spinach provides a boost of vitamins and minerals.
This baked ziti recipe is versatile and can be easily customized to suit your family’s tastes. Feel free to add cooked sausage or ground beef for extra protein, or swap out spinach for kale or Swiss chard if you prefer. The best part is, once you’ve assembled the dish, the oven does most of the work, giving you time to relax or prepare a simple side salad to accompany your meal.
Ingredients (serves 4-6):
- 1 pound ziti pasta
- 1 tablespoon olive oil
- 3 cloves garlic, minced
- 1 (28-ounce) can crushed tomatoes
- 1 teaspoon dried Italian seasoning
- Salt and pepper, to taste
- 1 (15-ounce) container ricotta cheese
- 1 egg
- 1 cup grated Parmesan cheese
- 2 cups fresh spinach, chopped
- 2 cups shredded mozzarella cheese
Cooking Instructions:
- Preheat the Oven: Set your oven to 375°F (190°C) to guarantee it’s hot and ready for baking your ziti once assembled.
- Cook the Pasta: In a large pot of boiling salted water, cook the ziti according to package instructions until al dente. Drain and set aside.
- Prepare the Sauce: In a large skillet over medium heat, heat the olive oil. Add the minced garlic and sauté for about 1 minute until fragrant. Stir in the crushed tomatoes and Italian seasoning. Season with salt and pepper to taste. Let it simmer for 10 minutes, stirring occasionally.
- Mix the Ricotta Filling: In a medium bowl, combine the ricotta cheese, egg, half of the Parmesan cheese, and chopped spinach. Mix until well combined.
- Assemble the Ziti: In a large baking dish, spread a thin layer of tomato sauce on the bottom. Add half of the cooked ziti, followed by half of the ricotta mixture. Pour over half of the remaining sauce, then sprinkle with half of the mozzarella cheese. Repeat the layers with the remaining ingredients, finishing with mozzarella cheese on top.
- Bake the Ziti: Cover the dish with foil and bake in the preheated oven for 20 minutes. Remove the foil and bake for an additional 10-15 minutes, or until the cheese is bubbling and golden brown.
- Serve: Let the baked ziti cool for a few minutes before serving. Garnish with the remaining Parmesan cheese.
Extra Tips: To guarantee even cooking, it’s important to spread the ingredients evenly in the baking dish. You can prepare this dish a day in advance and refrigerate it; just be sure to add a few extra minutes to the baking time if it’s cold from the fridge.
For a bit of spice, consider adding some red pepper flakes to the tomato sauce. If you prefer a meatier dish, browned sausage or ground beef can be layered with the pasta and cheese. Enjoy your delicious and comforting Baked Ziti With Spinach and Ricotta!