

Isn’t there something so comforting about having breakfast for dinner? It’s like wrapping yourself in a cozy, warm hug after a long day. I’ve gathered 15 soft, quick, and easy breakfast-for-dinner recipes that are sure to delight every family member. From fluffy buttermilk pancakes to a cheesy spinach omelet, these dishes are simple yet oh-so-satisfying. Can you already smell the delicious aroma wafting through your kitchen?
Fluffy Buttermilk Pancakes
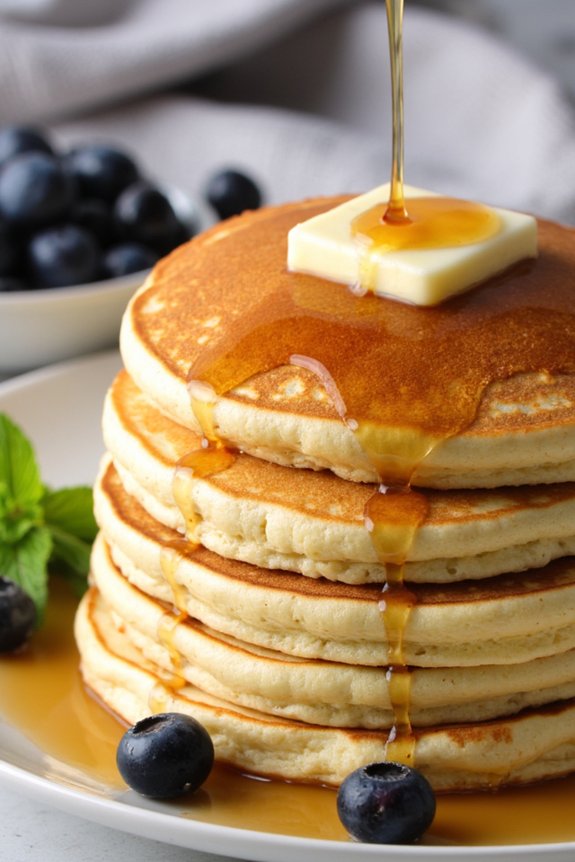
Breakfast for dinner can be a delightful change of pace, and one of the most comforting options is a stack of fluffy buttermilk pancakes. These pancakes are light and airy, with a slight tang from the buttermilk that pairs perfectly with maple syrup and butter.
Whether you’re cooking for a family or hosting a brunch-style dinner, these pancakes are sure to be a hit. Making fluffy buttermilk pancakes from scratch is easier than you might think. The secret to achieving that perfect fluffiness is all in the mixing technique and using the right ingredients.
By following this recipe, you’ll learn how to make pancakes that are soft, light, and incredibly satisfying. Let’s plunge into how you can bring this classic breakfast favorite to your dinner table.
Ingredients (Serves 4-6)
- 2 cups all-purpose flour
- 2 tablespoons granulated sugar
- 2 teaspoons baking powder
- 1 teaspoon baking soda
- 1/2 teaspoon salt
- 2 cups buttermilk
- 2 large eggs
- 1/4 cup unsalted butter, melted
- 1 teaspoon vanilla extract
- Additional butter or oil for cooking
Cooking Instructions
- Prepare the Dry Ingredients: In a large bowl, whisk together the flour, sugar, baking powder, baking soda, and salt. This guarantees that all dry ingredients are evenly distributed.
- Mix the Wet Ingredients: In a separate bowl, whisk together the buttermilk, eggs, melted butter, and vanilla extract until well combined.
- Combine Wet and Dry Ingredients: Pour the wet ingredients into the dry ingredients. Gently stir with a spatula or wooden spoon until just combined. The batter should be slightly lumpy—overmixing can lead to dense pancakes.
- Preheat the Griddle: Heat a non-stick griddle or frying pan over medium heat. Coat with a thin layer of butter or oil to prevent sticking.
- Cook the Pancakes: Pour about 1/4 cup of batter onto the griddle for each pancake. Cook until bubbles form on the surface and the edges look set, about 2-3 minutes. Flip and cook for an additional 1-2 minutes until golden brown.
- Serve: Transfer cooked pancakes to a warm plate and cover loosely with foil to keep warm while you cook the remaining batter. Serve with butter, syrup, and any additional toppings of your choice.
Extra Tips
For the fluffiest pancakes, make sure not to overmix the batter; a few lumps are completely fine.
If you don’t have buttermilk on hand, you can make a substitute by adding 2 tablespoons of lemon juice or vinegar to 2 cups of milk and letting it sit for 5 minutes before using.
Always keep the griddle at a consistent medium heat to guarantee even cooking and prevent burning. Finally, consider adding mix-ins like blueberries or chocolate chips for a fun twist!
Cheesy Spinach and Mushroom Omelet
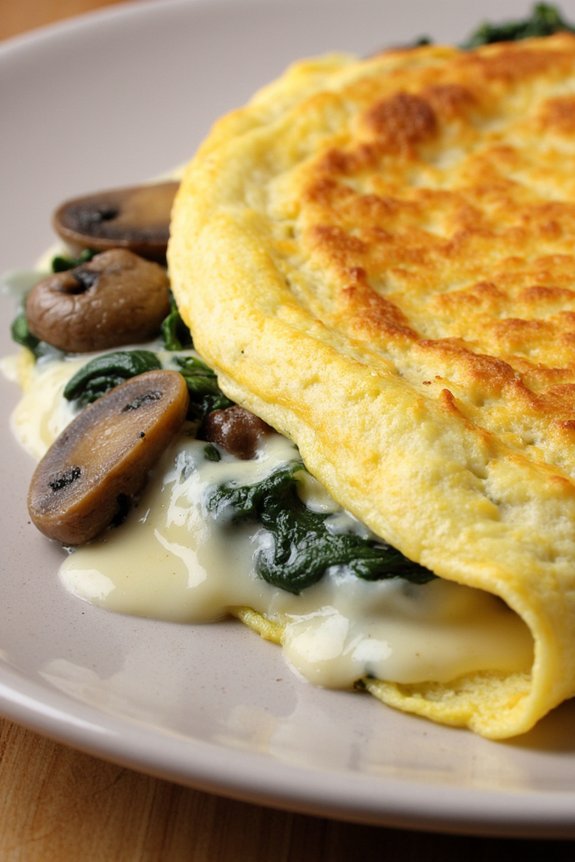
Cheesy Spinach and Mushroom Omelet is a delicious and satisfying dish perfect for breakfast, lunch, or dinner. It’s a quick and easy meal that combines the earthy flavors of mushrooms with fresh spinach, all enveloped in a fluffy egg omelet. The addition of cheese adds a creamy richness that complements the vegetables perfectly.
This dish isn’t only nutritious but also versatile enough to be enjoyed any time of the day, making it an excellent option for a breakfast-for-dinner treat.
This particular recipe serves 4-6 people, making it ideal for a family meal or a small gathering. It’s a one-pan dish that doesn’t require a lot of fuss, yet delivers an impressive result. The key to a great Cheesy Spinach and Mushroom Omelet is in the preparation and the quality of the ingredients. Fresh eggs, vibrant spinach, and your favorite cheese will make all the difference in achieving a flavorful and satisfying dish.
Ingredients (serving size: 4-6 people):
- 8 large eggs
- 1 cup fresh spinach, chopped
- 1 cup mushrooms, sliced
- 1 cup shredded cheese (cheddar, mozzarella, or your choice)
- 1/4 cup milk
- 2 tablespoons butter
- Salt and pepper to taste
- 1 tablespoon olive oil
Cooking Instructions:
- Preparation: Begin by cracking the eggs into a large bowl. Add the milk, salt, and pepper. Whisk until the mixture is well-blended and slightly frothy. Set aside.
- Sauté the Vegetables: Heat olive oil in a large non-stick skillet over medium heat. Add the sliced mushrooms and sauté until they’re golden brown, about 5-7 minutes. Add the chopped spinach and continue to cook for another 2-3 minutes, until the spinach is wilted. Remove the vegetables from the skillet and set aside.
- Cook the Omelet: In the same skillet, melt the butter over medium heat. Pour in the egg mixture, tilting the pan to guarantee the eggs cover the bottom evenly. Let the eggs cook undisturbed for about 2-3 minutes, or until the edges begin to set.
- Add the Fillings: Once the edges are set, sprinkle the sautéed vegetables over one half of the omelet. Top with the shredded cheese.
- Fold and Finish Cooking: Using a spatula, carefully fold the other half of the omelet over the fillings. Continue cooking for another 2-3 minutes, or until the cheese is melted and the eggs are fully cooked. If needed, cover the skillet with a lid to help the cheese melt.
- Serve: Slide the omelet onto a large plate and cut into portions. Serve immediately while warm.
Extra Tips:
When making a Cheesy Spinach and Mushroom Omelet, use fresh ingredients for the best flavor. You can also customize the dish by adding additional ingredients like diced tomatoes or bell peppers.
If you prefer a spicier omelet, consider adding a pinch of red pepper flakes or a splash of hot sauce to the egg mixture. Remember to cook the omelet on medium heat to prevent the eggs from browning too quickly, and don’t be afraid to experiment with different types of cheese to find your perfect flavor combination.
Classic French Toast
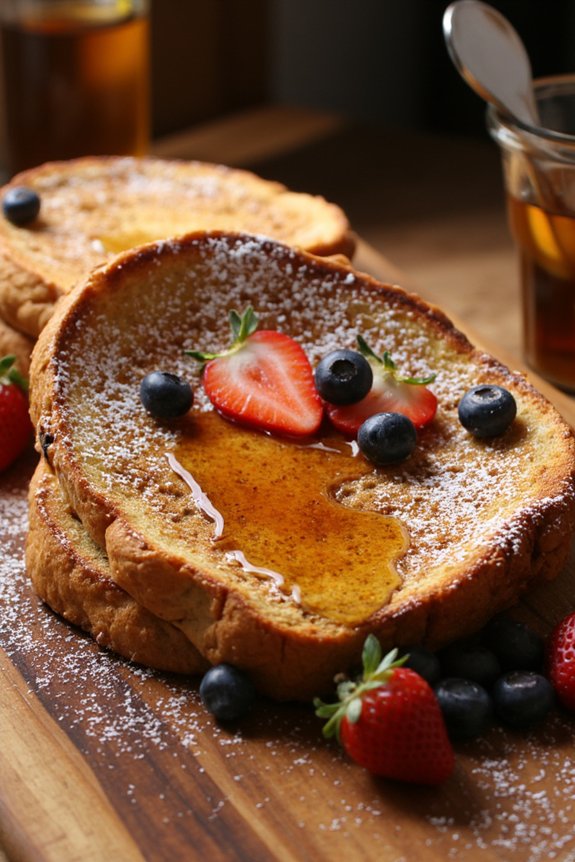
French toast is a delightful and versatile dish that can be enjoyed at any time of the day. When you’re looking for a comforting breakfast-for-dinner option, classic French toast is a perfect choice. This recipe combines the richness of eggs and milk with a hint of vanilla and cinnamon to create a dish that’s both satisfying and easy to prepare. Serve it with your favorite toppings, such as fresh fruit, syrup, or a sprinkle of powdered sugar, to elevate the experience.
The beauty of classic French toast lies in its simplicity; it requires only a handful of ingredients and can be prepared in less than 30 minutes. Ideal for a family dinner or a cozy night in, this recipe serves 4-6 people, making it perfect for sharing. Whether you’re a novice cook or a seasoned chef, this recipe will guide you through the process of making French toast that’s golden and crispy on the outside, yet soft and flavorful on the inside.
Ingredients (Serves 4-6):
- 6 large eggs
- 1 cup whole milk
- 1 teaspoon vanilla extract
- 1 teaspoon ground cinnamon
- 12 slices of thick-cut bread (such as brioche or challah)
- Butter or cooking spray for the pan
- Maple syrup, fresh fruit, powdered sugar (optional, for serving)
Cooking Instructions:
- Prepare the Egg Mixture: In a large mixing bowl, whisk together the eggs, milk, vanilla extract, and cinnamon until well combined. Make sure the mixture is smooth and the cinnamon is evenly dispersed.
- Preheat the Pan: Heat a large non-stick skillet or griddle over medium heat. Add a small amount of butter or spray with cooking spray to lightly coat the surface.
- Soak the Bread: Dip a slice of bread into the egg mixture, ensuring both sides are well coated. Allow the bread to soak for about 20 seconds per side to absorb the liquid, but don’t let it become too soggy.
- Cook the French Toast: Place the soaked bread onto the preheated skillet. Cook for 3-4 minutes on each side, or until golden brown and crispy. Avoid overcrowding the pan by cooking in batches if necessary.
- Serve Immediately: Once cooked, transfer the French toast to a serving platter. Repeat the soaking and cooking process with the remaining slices of bread. Serve the French toast warm with maple syrup, fresh fruit, or a dusting of powdered sugar.
Extra Tips:
For the best results, use day-old bread, as it’s slightly drier and will absorb the egg mixture more effectively without falling apart. If you prefer a richer flavor, substitute half-and-half for the milk.
Additionally, feel free to experiment with different spices such as nutmeg or cardamom to customize the taste to your liking. If desired, you can keep cooked French toast warm in an oven set to low heat while you finish cooking the rest.
Breakfast Burrito With Avocado Salsa

Breakfast Burrito With Avocado Salsa is a delightful and satisfying meal that combines the best of breakfast and dinner into one delicious dish. The warmth of the burrito filled with scrambled eggs, cheese, and a variety of other savory ingredients pairs perfectly with the cool, creamy avocado salsa. This dish isn’t only easy to make but also customizable, allowing you to add your favorite ingredients to suit your taste. Perfect for a weeknight meal or a weekend brunch, this recipe is sure to become a family favorite.
Whether you’re looking for a quick meal to whip up after a long day or a fun dish to serve at a gathering, Breakfast Burrito With Avocado Salsa covers all the bases. The burrito itself is packed with protein and flavor, while the avocado salsa adds a fresh and tangy twist. This combination guarantees a balanced meal that’s both filling and nutritious. Let’s explore the details of making this delightful dish for a serving size of 4-6 people.
Ingredients:
- 6 large eggs
- 1/4 cup milk
- Salt and pepper to taste
- 1 tablespoon olive oil
- 1 pound breakfast sausage, crumbled
- 1 cup shredded cheddar cheese
- 6 large flour tortillas
- 2 ripe avocados, diced
- 1/2 cup cherry tomatoes, chopped
- 1/4 cup red onion, finely chopped
- 1/4 cup cilantro, chopped
- Juice of 1 lime
Cooking Instructions:
- Prepare the Eggs: In a bowl, whisk together the eggs, milk, salt, and pepper until well combined. This mixture will guarantee the eggs are fluffy and flavorful.
- Cook the Sausage: Heat olive oil in a large skillet over medium heat. Add the crumbled sausage and cook until browned and cooked through, about 5-7 minutes. Remove the sausage from the skillet and set aside.
- Scramble the Eggs: In the same skillet, pour in the egg mixture. Stir gently with a spatula, cooking over medium-low heat until the eggs are softly scrambled and just set. Remove from heat.
- Assemble the Burritos: Lay out the flour tortillas on a clean surface. Evenly distribute the scrambled eggs, cooked sausage, and shredded cheddar cheese among the tortillas. Roll each tortilla tightly to form a burrito.
- Prepare the Avocado Salsa: In a medium bowl, combine the diced avocados, cherry tomatoes, red onion, cilantro, and lime juice. Gently mix to combine, taking care not to mash the avocados.
- Serve: Serve the burritos warm, topped with a generous spoonful of avocado salsa on the side or inside the burrito as preferred.
Extra Tips:
For an added layer of flavor, consider adding a spoonful of sour cream or a sprinkle of hot sauce inside the burrito before rolling. If you prefer a vegetarian version, you can easily substitute the sausage with sautéed mushrooms or bell peppers.
To keep the burritos warm while preparing the salsa, you can wrap them in foil and place them in a low-temperature oven. Additionally, the avocado salsa can be made up to an hour in advance and stored in the fridge to allow the flavors to meld together beautifully.
Soft and Savory Egg Muffins

Soft and Savory Egg Muffins are the perfect way to bring a touch of breakfast to your dinner table. These muffins are packed with protein and flavor, making them a versatile dish that can be served as a main course or a hearty side.
They’re incredibly easy to prepare, requiring minimal effort and cooking time, yet they offer a delightful culinary experience with every bite. Perfect for busy weeknights, these egg muffins are a definite hit for both children and adults alike.
The beauty of Soft and Savory Egg Muffins lies in their adaptability. You can customize them with your favorite mix-ins such as cheese, vegetables, and meats, allowing you to tailor the recipe to your family’s preferences.
The muffins are baked to golden perfection, creating a slightly crispy exterior with a tender, flavorful inside. Whether you’re looking to use up leftover ingredients or simply enjoy a light, nutritious meal, these egg muffins are the ideal solution for breakfast for dinner.
Ingredients (for 4-6 servings):
- 10 large eggs
- 1 cup shredded cheddar cheese
- 1 cup diced bell peppers (any color)
- 1/2 cup chopped cooked bacon or ham
- 1/4 cup chopped green onions
- 1/2 cup milk
- Salt and pepper to taste
- Non-stick cooking spray
Cooking Instructions:
- Preheat the Oven: Begin by preheating your oven to 350°F (175°C). This will guarantee that your muffins bake evenly and reach the right texture.
- Prepare the Muffin Tin: Spray a standard 12-cup muffin tin with non-stick cooking spray to prevent the muffins from sticking and to make cleanup easier.
- Whisk the Eggs: In a large mixing bowl, crack the eggs and whisk them together with the milk, salt, and pepper until well combined. This mixture will be the base of your muffins.
- Add Mix-Ins: Stir in the diced bell peppers, chopped bacon or ham, shredded cheddar cheese, and green onions into the egg mixture. Mix well to distribute the ingredients evenly.
- Fill the Muffin Cups: Carefully pour the egg mixture into the prepared muffin cups, filling each about 3/4 full. Be sure to distribute the mix-ins evenly among the cups to make sure each muffin is packed with flavor.
- Bake the Muffins: Place the muffin tin in the preheated oven and bake for 20-25 minutes, or until the muffins are set and a toothpick inserted into the center comes out clean.
- Cool and Serve: Allow the muffins to cool in the tin for a few minutes before carefully removing them. Serve warm for the best texture and flavor.
Extra Tips:
For the best results, use fresh eggs for a fluffier texture. You can substitute the milk with cream for a richer taste.
Feel free to experiment with different cheeses or add herbs like thyme or basil for more depth of flavor. If you want to make these muffins ahead of time, they store well in the refrigerator for up to 3 days or can be frozen for longer storage.
Simply reheat them in the oven or microwave before serving.
Banana Nut Waffles With Maple Syrup
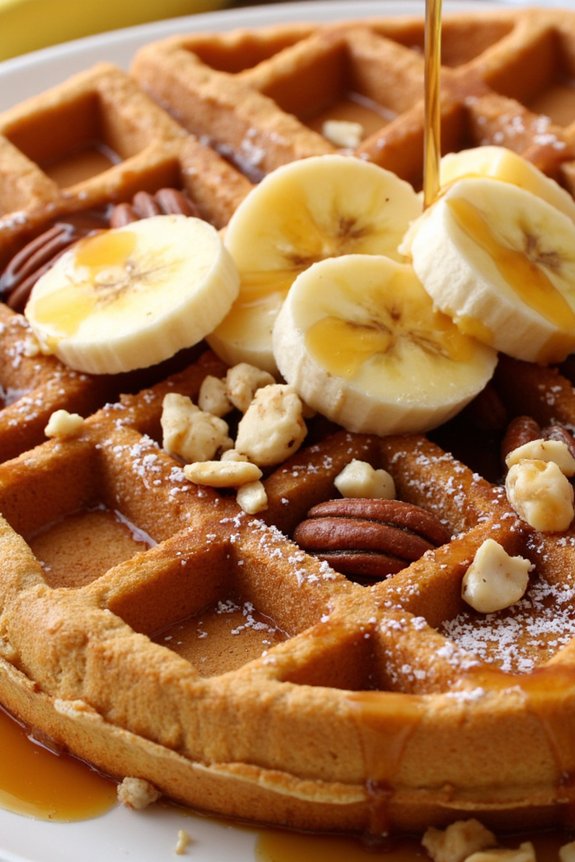
Banana Nut Waffles with Maple Syrup are a delightful and hearty option for those who enjoy breakfast for dinner. These waffles are a perfect blend of sweet bananas and crunchy nuts, offering a satisfying texture and flavor profile. The addition of maple syrup provides the perfect touch of sweetness, elevating the waffles to a comforting meal that can be enjoyed any time of day.
Whether you’re serving them up for a family dinner or treating yourself to a cozy night in, these waffles are bound to please. The key to making these waffles extra special is the ripe bananas and quality nuts that add a natural sweetness and crunch. Using a waffle iron guarantees they’re crispy on the outside while remaining fluffy on the inside.
This recipe serves 4-6 people, allowing everyone to indulge in a generous portion. Serve them warm with a drizzle of maple syrup and perhaps a dollop of whipped cream or a handful of fresh fruit for an added touch of elegance.
Ingredients:
- 2 cups all-purpose flour
- 2 tablespoons sugar
- 1 tablespoon baking powder
- 1/2 teaspoon salt
- 2 large eggs
- 1 3/4 cups milk
- 1/2 cup melted butter
- 1 teaspoon vanilla extract
- 2 ripe bananas, mashed
- 1/2 cup chopped nuts (such as walnuts or pecans)
- Maple syrup, for serving
Cooking Instructions:
- Preheat the Waffle Iron: Begin by preheating your waffle iron according to the manufacturer’s instructions. This guarantees the waffles cook evenly and develop a nice, crispy exterior.
- Mix Dry Ingredients: In a large mixing bowl, whisk together the flour, sugar, baking powder, and salt. This will be the base of your waffle batter.
- Combine Wet Ingredients: In a separate bowl, beat the eggs and then whisk in the milk, melted butter, and vanilla extract. Stir until the mixture is well combined.
- Incorporate Bananas and Nuts: Add the mashed bananas and chopped nuts to the wet ingredients, stirring gently to combine. The bananas should be well distributed throughout the mixture.
- Combine Wet and Dry Mixtures: Pour the wet ingredients into the bowl of dry ingredients. Gently fold the mixtures together until just combined. Be careful not to overmix, as this can lead to tough waffles.
- Cook the Waffles: Lightly grease the preheated waffle iron. Pour the batter onto the center of the iron, using a ladle or measuring cup, and spread it out evenly. Close the lid and cook according to your waffle iron’s instructions until the waffles are golden brown and crispy.
- Serve Warm: Carefully remove the waffles from the iron and serve immediately with maple syrup. Optionally, top with whipped cream or fresh fruit for added flavor and presentation.
Extra Tips:
To guarantee the best results, use ripe bananas as they provide natural sweetness and moisture to the waffles. If you prefer a stronger banana flavor, you can add an extra half banana to the batter.
For a nut-free version, simply omit the nuts or substitute with chocolate chips for a different flavor twist. When cooking, avoid opening the waffle iron too early to prevent the waffles from sticking or tearing.
If you’re making a larger batch, keep the cooked waffles warm in an oven set to a low temperature until ready to serve. Enjoy your delicious Banana Nut Waffles with a generous pour of maple syrup!
Creamy Scrambled Eggs With Chives

Creamy Scrambled Eggs With Chives make a delightful and satisfying option for breakfast at dinner. This dish is perfect for those nights when you crave comfort food without spending too much time in the kitchen. The rich texture of the scrambled eggs combined with the subtle, fresh flavor of chives creates a deliciously indulgent meal.
Ideal for families or small gatherings, this recipe is designed to serve 4-6 people, ensuring everyone at the table can enjoy a warm, homemade meal together.
The key to achieving the perfect creamy scrambled eggs lies in the technique and the quality of the ingredients. Using fresh eggs and a bit of patience as you cook them slowly over low heat allows the eggs to develop a luscious consistency without drying out. The addition of chives not only enhances the flavor but also adds a touch of color and brightness to the dish.
Whether you’re serving these eggs with toast, bacon, or simply on their own, they’re sure to be a hit at your dinner table.
Ingredients:
- 12 large eggs
- 1/2 cup whole milk or heavy cream
- Salt and freshly ground black pepper to taste
- 3 tablespoons unsalted butter
- 1/4 cup chopped fresh chives
Cooking Instructions:
- Prepare the Ingredients: Crack the eggs into a large mixing bowl. Add the milk or cream, salt, and pepper, and whisk together until well combined and slightly frothy.
- Heat the Pan: Place a non-stick skillet over low heat and add the butter. Allow the butter to melt completely, coating the bottom of the pan.
- Cook the Eggs: Pour the egg mixture into the skillet. Let it sit undisturbed for a few seconds before gently stirring with a spatula. Continue to stir occasionally, allowing the eggs to slowly cook and form soft curds. Be careful not to over-stir, as this can cause the eggs to become dry.
- Add the Chives: When the eggs are nearly set but still slightly runny, sprinkle the chopped chives over the top. Gently fold them into the eggs, ensuring even distribution.
- Finish Cooking: Continue cooking the eggs until they reach your desired level of doneness. For creamy scrambled eggs, remove them from heat while they’re still slightly soft, as they’ll continue to cook from residual heat.
- Serve: Transfer the scrambled eggs to a serving dish immediately to prevent overcooking. Garnish with additional chives if desired, and serve hot.
Extra Tips:
For the best results, use the freshest eggs you can find, as they’ll have the most vibrant color and flavor. If chives aren’t available, you can substitute them with green onions or parsley for a different but still delicious flavor profile.
To keep the eggs creamy, avoid cooking them over high heat, as this can lead to a rubbery texture. Finally, feel free to experiment by adding other ingredients like cheese, cooked bacon, or sautéed mushrooms to make the dish your own.
Sausage and Potato Breakfast Skillet

Breakfast for dinner is always a delightful treat, and this Sausage and Potato Breakfast Skillet is no exception. It’s a hearty, comforting dish that combines savory sausage with tender potatoes, all cooked together in a single skillet. Not only is this recipe incredibly delicious, but it also allows for a quick and easy cleanup, making it perfect for busy weeknights when you want a satisfying meal without the hassle.
The combination of flavors from the sausage, seasoned potatoes, and a hint of aromatic herbs will make this meal a family favorite. This skillet meal is versatile and can be customized to suit your taste preferences. You can add vegetables like bell peppers or spinach for a pop of color and nutrition, or top it with a fried egg for an extra layer of richness.
Whether you’re serving it for breakfast, lunch, or dinner, this dish is sure to please everyone at the table. Plus, with a serving size of 4-6 people, it’s great for feeding a family or having leftovers for the next day.
Ingredients (Serving size: 4-6 people):
- 1 pound breakfast sausage
- 4 medium potatoes, diced
- 1 large onion, diced
- 1 bell pepper, diced (optional)
- 2 tablespoons olive oil
- 1 teaspoon garlic powder
- 1 teaspoon paprika
- Salt and pepper to taste
- Fresh parsley, chopped (for garnish)
Instructions:
- Prepare the Ingredients: Begin by dicing the potatoes, onion, and bell pepper (if using). Having all ingredients ready before you start cooking helps streamline the process.
- Cook the Sausage: In a large skillet over medium heat, cook the breakfast sausage until it’s fully browned and cooked through. Use a spatula to break the sausage into crumbles as it cooks. Once done, remove the sausage from the skillet and set it aside, leaving the fat in the pan for added flavor.
- Cook the Potatoes: Add the olive oil to the same skillet and increase the heat to medium-high. Add the diced potatoes to the skillet and season with garlic powder, paprika, salt, and pepper. Cook the potatoes for about 10-15 minutes, stirring occasionally, until they’re golden brown and tender.
- Add Vegetables: Add the diced onion and bell pepper (if using) to the skillet with the potatoes. Sauté for an additional 5 minutes, or until the vegetables have softened and the onions are translucent.
- Combine and Serve: Return the cooked sausage to the skillet, stirring to combine it with the potatoes and vegetables. Cook for another 2-3 minutes to heat everything through. Taste and adjust the seasoning if necessary. Garnish with freshly chopped parsley before serving.
Extra Tips:
To guarantee your potatoes cook evenly, try to dice them into uniform pieces. This will help them brown evenly and cook at the same rate.
If you prefer a bit of heat, consider adding red pepper flakes or a dash of hot sauce to the skillet. Additionally, if you’re short on time, parboiling the potatoes before adding them to the skillet can speed up the cooking process.
Finally, serve the skillet directly from the pan to keep it warm, and enjoy this comforting meal with a side of toast or a fresh salad for a complete dinner experience.
Blueberry and Lemon Ricotta Pancakes

Blueberry and Lemon Ricotta Pancakes are a delightful twist on classic pancakes, perfect for those nights when breakfast for dinner is on the menu. These pancakes are light, fluffy, and bursting with the fresh flavors of blueberries and zesty lemon. The addition of ricotta cheese adds a creamy texture and richness that elevates this dish to something truly special.
Whether you’re cooking for your family or hosting a casual dinner with friends, these pancakes are sure to impress. The combination of sweet blueberries and tart lemon creates a perfect balance of flavors, making these pancakes not only delicious but also invigorating. The ricotta cheese not only enhances the texture but also adds protein, making the meal more satisfying.
These pancakes are quick to prepare and can easily be doubled if you’re expecting more guests. Serve them with a drizzle of maple syrup, a dollop of whipped cream, or a sprinkle of powdered sugar for a complete meal that everyone will love.
Ingredients (Serves 4-6):
- 1 cup ricotta cheese
- 1 cup all-purpose flour
- 2 tablespoons sugar
- 1 teaspoon baking powder
- 1/2 teaspoon baking soda
- 1/4 teaspoon salt
- 3/4 cup milk
- 2 large eggs
- 1 teaspoon vanilla extract
- Zest of 1 lemon
- Juice of 1 lemon
- 1 cup fresh blueberries
- Butter or oil for cooking
Cooking Instructions:
- Prepare the Dry Ingredients: In a large mixing bowl, whisk together the flour, sugar, baking powder, baking soda, and salt. This will guarantee that all the dry ingredients are well combined and evenly distributed.
- Mix the Wet Ingredients: In another bowl, combine the ricotta cheese, milk, eggs, vanilla extract, lemon zest, and lemon juice. Whisk until the mixture is smooth and the ricotta is fully incorporated.
- Combine the Mixtures: Pour the wet ingredients into the dry ingredients. Stir gently until just combined, being careful not to overmix. The batter should be lumpy but without any dry streaks of flour.
- Fold in Blueberries: Gently fold in the fresh blueberries into the batter. Be careful not to crush the berries.
- Heat the Pan: Preheat a non-stick skillet or griddle over medium heat. Lightly grease with butter or oil to prevent sticking.
- Cook the Pancakes: Pour about 1/4 cup of batter onto the skillet for each pancake. Cook for 2-3 minutes on one side, or until bubbles form on the surface and the edges look set. Flip and cook for an additional 1-2 minutes or until golden brown.
- Serve Warm: Remove pancakes from the skillet and keep them warm while you cook the remaining batter. Serve with your choice of toppings.
Extra Tips:
To guarantee the pancakes are light and fluffy, avoid overmixing the batter; this can lead to tough pancakes. If you prefer a sweeter pancake, add a bit more sugar to the batter.
Feel free to substitute the blueberries with raspberries or blackberries for a different flavor profile. These pancakes can also be made ahead of time and kept warm in a 200°F oven until ready to serve. If you have leftovers, they can be stored in the refrigerator and reheated in a toaster or skillet for a quick breakfast or snack.
Ham and Cheese Croissant Sandwiches

One of the great things about Ham and Cheese Croissant Sandwiches is their versatility. You can easily customize them to suit your taste by adding different types of cheese, incorporating some fresh vegetables, or even trying out different types of ham.
The croissants provide a rich base that pairs beautifully with the warm, melted cheese and savory ham, creating a deliciously comforting meal. Serve them with a simple green salad or a bowl of soup to round out the dinner.
Ingredients (Serves 4-6):
- 6 large croissants
- 12 slices of deli ham
- 12 slices of Swiss cheese
- 2 tablespoons Dijon mustard
- 2 tablespoons mayonnaise
- 1 tablespoon butter, melted
- Salt and pepper to taste
Cooking Instructions:
- Preheat the Oven: Begin by preheating your oven to 350°F (175°C). This guarantees the oven is hot enough to properly melt the cheese and warm the sandwiches throughout.
- Prepare the Croissants: Slice each croissant in half horizontally. Place the bottom halves on a baking sheet lined with parchment paper for easy cleanup.
- Mix the Spread: In a small bowl, combine the Dijon mustard and mayonnaise. Stir until well blended. This spread will add a nice tangy flavor to your sandwiches.
- Assemble the Sandwiches: Spread a thin layer of the Dijon-mayo mixture on each croissant half. Layer two slices of ham and two slices of Swiss cheese on the bottom half of each croissant. Season with a little salt and pepper for added flavor. Place the top half of the croissant over the filling.
- Brush with Butter: Using a pastry brush, lightly brush the tops of the assembled sandwiches with melted butter. This will help the croissants become golden brown and add extra flavor.
- Bake the Sandwiches: Place the baking sheet in the preheated oven and bake for about 10-15 minutes, or until the cheese is melted and the croissants are heated through and golden brown.
- Serve Immediately: Once baked, remove from the oven and serve the sandwiches hot. They pair wonderfully with a side salad or soup.
Extra Tips:
For an extra layer of flavor, consider adding a few slices of ripe tomato or some fresh spinach leaves to the sandwiches before baking.
You can also experiment with different cheeses, such as Gruyère or cheddar, for a unique twist. If you like a bit of sweetness, a dollop of honey mustard or a spoonful of fig jam can be spread on the croissants before adding the ham and cheese.
To guarantee even melting, make sure the cheese slices are evenly distributed and not overlapping excessively. Enjoy these sandwiches as a hearty breakfast for dinner option that everyone will love!
Sweet Potato Hash With Poached Eggs
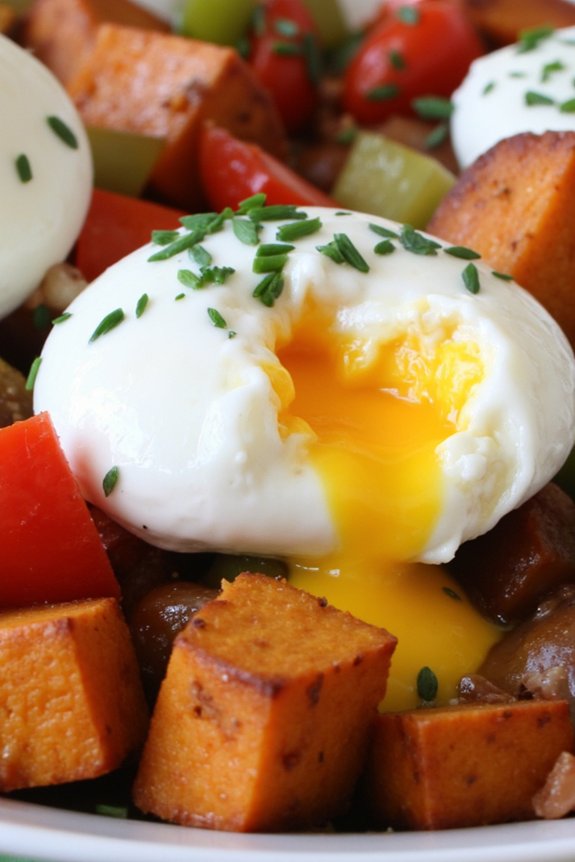
Sweet Potato Hash With Poached Eggs is a delightful twist on a classic breakfast dish that brings warmth and comfort to your dinner table. This vibrant and nutritious meal combines the earthy sweetness of sweet potatoes with the savory kick of bell peppers and onions, all topped with perfectly poached eggs. It’s not only an easy dinner option but also a wholesome meal that offers a satisfying balance of flavors and textures.
Whether you’re serving it to your family or enjoying it alone, this dish promises to be a hit with its rich flavors and nourishing ingredients.
The beauty of Sweet Potato Hash With Poached Eggs lies in its simplicity and versatility. You can easily adapt the recipe to include your favorite vegetables or add a sprinkle of cheese for an extra touch of indulgence.
The key to this dish is making certain the sweet potatoes are cooked to perfection, with a slightly crispy exterior and tender interior, which pairs beautifully with the creamy, runny yolk of the poached eggs. This meal is perfect for those evenings when you crave breakfast but want something hearty and fulfilling.
Ingredients (Serves 4-6)
- 2 large sweet potatoes, peeled and diced
- 1 red bell pepper, diced
- 1 green bell pepper, diced
- 1 large onion, finely chopped
- 2 tablespoons olive oil
- 1 teaspoon smoked paprika
- Salt and pepper to taste
- 1 tablespoon apple cider vinegar
- 6 large eggs
- Fresh parsley or chives for garnish
Cooking Instructions
- Prepare the Sweet Potatoes: Begin by peeling and dicing the sweet potatoes into small, uniform cubes. This guarantees they cook evenly.
- Cook the Vegetables: In a large skillet, heat the olive oil over medium heat. Add the diced sweet potatoes, red and green bell peppers, and chopped onion. Sauté for about 10-15 minutes, stirring occasionally, until the sweet potatoes are tender and the vegetables are slightly caramelized.
- Season the Hash: Sprinkle the smoked paprika over the vegetables, and season with salt and pepper to taste. Stir well to combine and cook for an additional 2-3 minutes to allow the flavors to meld.
- Prepare the Poaching Liquid: In a separate saucepan, bring about 3 inches of water to a simmer. Add the apple cider vinegar to the water, which helps the egg whites coagulate more easily.
- Poach the Eggs: Crack each egg into a small bowl or cup. Gently slide the eggs, one at a time, into the simmering water. Poach the eggs for about 3-4 minutes, or until the whites are set and the yolks are still runny.
- Assemble the Dish: Divide the sweet potato hash among plates. Use a slotted spoon to carefully remove the poached eggs from the water, letting any excess water drip off, and place one or two eggs on top of each serving of hash.
- Garnish and Serve: Garnish with freshly chopped parsley or chives, and serve immediately while the eggs are warm and the yolks are deliciously runny.
Extra Tips
When cooking sweet potato hash, make certain the skillet isn’t overcrowded to allow even cooking and prevent steaming. If necessary, cook in batches.
For perfectly poached eggs, maintain the water at a gentle simmer to avoid breaking the eggs. If you’re new to poaching, try using a fine mesh sieve to strain the watery part of the egg whites before poaching for neater results.
Additionally, feel free to add other ingredients like bacon or sausage for a meatier version, or swap out herbs and spices to suit your taste preferences.
Cinnamon Roll Pancakes
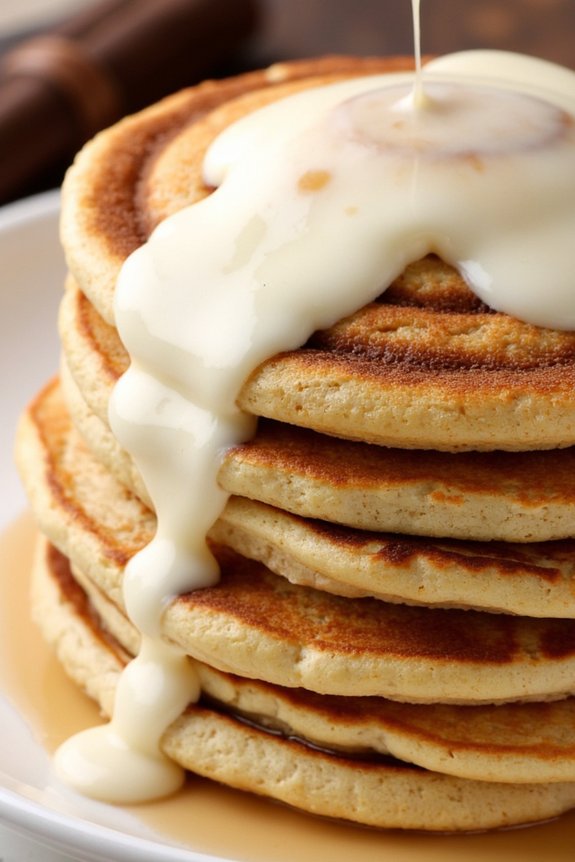
Cinnamon Roll Pancakes merge the delightful flavors of cinnamon rolls with the fluffy texture of pancakes, making it a perfect breakfast-for-dinner option that will satisfy everyone’s sweet tooth.
Imagine a stack of airy pancakes, swirled with a cinnamon sugar mixture, and topped with a luscious cream cheese glaze. These pancakes aren’t only visually appealing but also incredibly delicious, offering the warm and comforting taste of cinnamon rolls in a fraction of the time.
Ideal for a family of 4-6, this recipe allows you to enjoy the decadence of cinnamon rolls without the lengthy preparation process. Whether you’re serving it as a special treat on a weekday evening or as a centerpiece for a leisurely weekend breakfast-for-dinner, these Cinnamon Roll Pancakes are sure to impress.
With the perfect balance of sweetness and spice, this dish will quickly become a household favorite.
Ingredients (Serves 4-6):
- 2 cups all-purpose flour
- 2 tablespoons granulated sugar
- 1 tablespoon baking powder
- 1/2 teaspoon salt
- 2 large eggs
- 1 1/2 cups milk
- 1/4 cup unsalted butter, melted
- 1 teaspoon vanilla extract
For the Cinnamon Swirl:
- 1/2 cup unsalted butter, melted
- 3/4 cup packed brown sugar
- 1 tablespoon ground cinnamon
For the Cream Cheese Glaze:
- 4 ounces cream cheese, softened
- 1 cup powdered sugar
- 1 teaspoon vanilla extract
- 2-4 tablespoons milk
Instructions:
- Prepare the Pancake Batter: In a large mixing bowl, combine the flour, granulated sugar, baking powder, and salt. In another bowl, whisk together the eggs, milk, melted butter, and vanilla extract. Gently fold the wet ingredients into the dry ingredients until just combined; small lumps are okay. Let the batter rest while you prepare the cinnamon swirl and glaze.
- Make the Cinnamon Swirl: In a medium bowl, mix the melted butter, brown sugar, and cinnamon until smooth. Transfer the mixture into a zip-top bag or piping bag for easy swirling.
- Prepare the Cream Cheese Glaze: In a small bowl, beat the softened cream cheese until smooth. Gradually add the powdered sugar, vanilla extract, and enough milk to achieve a pourable consistency. Set aside.
- Cook the Pancakes: Heat a non-stick skillet or griddle over medium heat. Lightly grease with cooking spray or a little bit of butter. Pour about 1/4 cup of pancake batter onto the skillet. Snip a small corner of the zip-top bag with the cinnamon swirl mixture and pipe a swirl onto the batter starting from the center. Cook until bubbles form on the surface, about 2-3 minutes, then carefully flip and cook for another 1-2 minutes until golden brown. Repeat with remaining batter and cinnamon swirl.
- Serve: Stack the pancakes on a plate and drizzle generously with the cream cheese glaze. Serve warm and enjoy the delightful blend of cinnamon and cream cheese flavors.
Extra Tips:
For the best results, verify that the cinnamon swirl mixture isn’t too runny; it should be thick enough to hold its shape when piped. If it’s too runny, refrigerate it for a few minutes to thicken.
When cooking the pancakes, keep the heat on medium to prevent the sugar in the cinnamon swirl from burning. If the cinnamon swirl starts to spread too much, try chilling it for a bit longer.
The cream cheese glaze can be adjusted in thickness by varying the amount of milk you add, so feel free to play around with the consistency to suit your preference.
Bacon and Cheddar Frittata

There’s something incredibly comforting about breakfast for dinner, and nothing epitomizes that more than a delicious Bacon and Cheddar Frittata. This dish is perfect for those nights when you’re craving something hearty yet simple. With its golden-brown crust and cheesy, bacon-filled interior, this frittata is bound to become a family favorite.
It’s easy to prepare, requiring just a few ingredients you might already have in your kitchen, and can be on the table in under an hour. Frittatas are wonderfully versatile and can be customized to suit your taste. This particular recipe combines the smoky flavor of bacon with the sharpness of cheddar cheese, creating a dish that’s both satisfying and full of flavor.
The eggs provide a fluffy base, while the bacon and cheese add a delightful richness. Serve it with a side salad or some crusty bread, and you’ve got a meal that’s perfect for any time of day.
Ingredients for 4-6 servings:
- 8 large eggs
- 1/3 cup milk
- Salt and pepper to taste
- 6 slices of bacon
- 1 cup shredded cheddar cheese
- 1 small onion, finely chopped
- 1 tablespoon olive oil
- 1/4 cup chopped fresh parsley
Cooking Instructions:
- Preheat the Oven: Begin by preheating your oven to 350°F (175°C). This guarantees that the frittata will cook evenly once it’s transferred to the oven.
- Cook the Bacon: In a large, oven-safe skillet, cook the bacon over medium heat until it’s crispy. This should take about 5-7 minutes. Once done, remove the bacon and let it drain on a paper towel-lined plate. Once cooled, crumble the bacon into small pieces.
- Sauté the Onion: Using the same skillet with the bacon drippings, add the chopped onion. Sauté over medium heat until the onion becomes translucent and soft, approximately 3-4 minutes.
- Prepare the Egg Mixture: In a large mixing bowl, whisk together the eggs, milk, salt, and pepper until well combined. Stir in the crumbled bacon, shredded cheddar cheese, and chopped parsley.
- Combine and Cook: Pour the egg mixture into the skillet with the sautéed onions. Stir gently to evenly distribute the ingredients. Cook on the stovetop over medium heat for about 5 minutes, or until the edges start to set.
- Bake the Frittata: Transfer the skillet to the preheated oven and bake for 15-20 minutes, or until the frittata is puffed and the center is set. You can test this by inserting a toothpick into the center; it should come out clean.
- Serve: Remove the frittata from the oven and let it rest for a few minutes before slicing. Serve warm, garnished with additional parsley if desired.
Extra Tips:
For a lighter frittata, consider replacing some of the whole eggs with egg whites. You can also swap the cheddar cheese for another type of cheese like feta or Swiss if you prefer.
If you want to add more vegetables, sautéed mushrooms, spinach, or bell peppers can be great additions. Remember, the key to a fluffy frittata isn’t overbeating the eggs, as well as confirming the oven is fully preheated before baking. Enjoy your breakfast-for-dinner delight!
Veggie-Packed Breakfast Quesadillas

Veggie-Packed Breakfast Quesadillas are a delightful twist on the traditional breakfast, perfect for those nights when you’re craving breakfast for dinner. These quesadillas aren’t only easy to make but also packed with colorful vegetables, making them both nutritious and delicious.
The combination of melted cheese, scrambled eggs, and sautéed veggies, all enclosed within a crispy tortilla, creates a satisfying meal that will please everyone at the table. This recipe is versatile and allows for creativity; you can swap in your favorite veggies or add some spicy salsa for a kick.
It’s a great way to use up leftover vegetables and can be customized to suit any taste preference. Whether you’re a seasoned chef or a kitchen novice, these quesadillas are simple to prepare and sure to become a family favorite.
Ingredients (Serves 4-6):
- 8 large flour tortillas
- 8 eggs
- 1 cup shredded cheddar cheese
- 1 red bell pepper, diced
- 1 green bell pepper, diced
- 1 small onion, diced
- 1 cup fresh spinach, chopped
- 2 tablespoons olive oil
- Salt and pepper, to taste
- Optional: salsa, sour cream, or avocado for serving
Instructions:
1. Prepare the Vegetables: Begin by washing and dicing the red and green bell peppers and the onion. Chop the fresh spinach and set all the vegetables aside.
2. Cook the Vegetables: In a large skillet, heat 1 tablespoon of olive oil over medium heat. Add the diced onion and bell peppers to the skillet, cooking until they’re soft, about 5 minutes.
Add the chopped spinach and cook for an additional 2 minutes until the spinach is wilted. Season with salt and pepper to taste.
3. Scramble the Eggs: In a separate bowl, whisk the eggs with a pinch of salt and pepper. In another skillet, heat the remaining tablespoon of olive oil over medium heat.
Pour the eggs into the skillet and cook, stirring occasionally, until they’re just set, about 3-4 minutes. Remove from heat and set aside.
4. Assemble the Quesadillas: Lay out the flour tortillas on a clean surface. Evenly distribute the scrambled eggs and cooked vegetables across one half of each tortilla.
Sprinkle shredded cheddar cheese over the eggs and vegetables, then fold the tortilla in half.
5. Cook the Quesadillas: Wipe out the skillet used for the eggs and heat it over medium heat. Place the assembled quesadillas in the skillet, cooking for 2-3 minutes on each side until the tortillas are golden brown and the cheese is melted.
6. Serve: Slice the quesadillas into wedges and serve with your choice of salsa, sour cream, or avocado.
Extra Tips:
For added flavor, consider adding a bit of cumin or smoked paprika to the vegetables during cooking. If you prefer a spicier dish, include some chopped jalapeños or a dash of hot sauce to the eggs.
To guarantee the quesadillas are crispy, don’t overload them with too many fillings, as this can make them soggy. Additionally, if you have a panini press, it can be used to cook the quesadillas evenly and quickly.
Enjoy your Veggie-Packed Breakfast Quesadillas with a fresh side salad or some tortilla chips for a complete meal.
Apple Cinnamon Oatmeal Pancakes
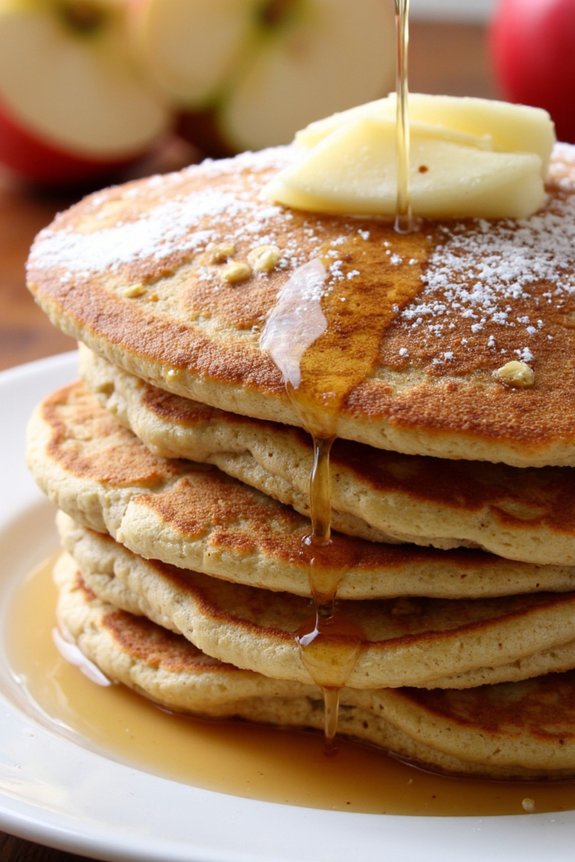
Apple Cinnamon Oatmeal Pancakes are a delightful twist on a breakfast classic, perfect for a comforting dinner option. These pancakes blend the warmth of cinnamon with the sweet, tangy flavor of apples, turning a simple meal into a cozy and satisfying dining experience.
By using oatmeal in the batter, not only do you add a hearty texture, but you also create a nutritious dish that’s both filling and delicious. Ideal for a family meal, this recipe caters to 4-6 people, making it an excellent choice for a weeknight dinner or a special brunch.
These pancakes are simple to prepare and can be easily customized with your favorite toppings, such as maple syrup, whipped cream, or additional apple slices. Whether you’re an experienced home cook or a beginner in the kitchen, you’ll find this recipe straightforward and rewarding.
Ingredients:
- 1 1/2 cups all-purpose flour
- 1 cup rolled oats
- 2 teaspoons baking powder
- 1 teaspoon baking soda
- 1 teaspoon ground cinnamon
- 1/4 teaspoon salt
- 2 large eggs
- 1 1/2 cups buttermilk
- 1/4 cup unsalted butter, melted
- 1/4 cup brown sugar
- 1 teaspoon vanilla extract
- 1 large apple, peeled, cored, and grated
- Cooking spray or additional butter for the skillet
Instructions:
- Prepare Dry Ingredients: In a large mixing bowl, combine the all-purpose flour, rolled oats, baking powder, baking soda, ground cinnamon, and salt. Whisk these ingredients together until they’re well mixed.
- Mix Wet Ingredients: In a separate bowl, beat the eggs with the buttermilk, melted butter, brown sugar, and vanilla extract. Stir until the mixture is smooth and the sugar is dissolved.
- Combine Ingredients: Gradually add the wet ingredients to the dry ingredients, stirring gently until just combined. Be careful not to overmix, as this can make the pancakes dense. Fold in the grated apple, confirming it’s evenly distributed throughout the batter.
- Heat the Skillet: Preheat a large non-stick skillet or griddle over medium heat. Lightly coat the surface with cooking spray or a small amount of butter to prevent sticking.
- Cook Pancakes: Pour 1/4 cup of the batter onto the skillet for each pancake. Cook until bubbles form on the surface and the edges look set, about 2-3 minutes. Carefully flip the pancakes and cook for another 2-3 minutes until golden brown and cooked through.
- Serve: Transfer the cooked pancakes to a warm plate and continue with the remaining batter. Serve hot with your choice of toppings.
Extra Tips:
For an extra burst of apple flavor, consider adding finely chopped apple pieces to the batter along with the grated apple. If you’re looking for a dairy-free option, substitute the buttermilk with almond milk and use coconut oil instead of butter.
Confirm that your skillet or griddle is properly heated before adding the batter to achieve the perfect golden brown color. Don’t forget to keep the cooked pancakes warm in an oven set to low heat if you’re making a large batch. Enjoy your Apple Cinnamon Oatmeal Pancakes with a drizzle of maple syrup or a dollop of yogurt for a delightful meal.