

As a busy mom who adores cooking, I’ve gathered a collection of easy and budget-friendly recipes perfect for those nights when time is tight. These dishes are not only light on the wallet but also a breeze to prepare. From comforting one-pot meals to classic family favorites, there’s something for everyone here. Let me share some of my top recipes that make hectic evenings feel a little more special. What’s my number one pick?
One-Pot Spaghetti and Meatballs
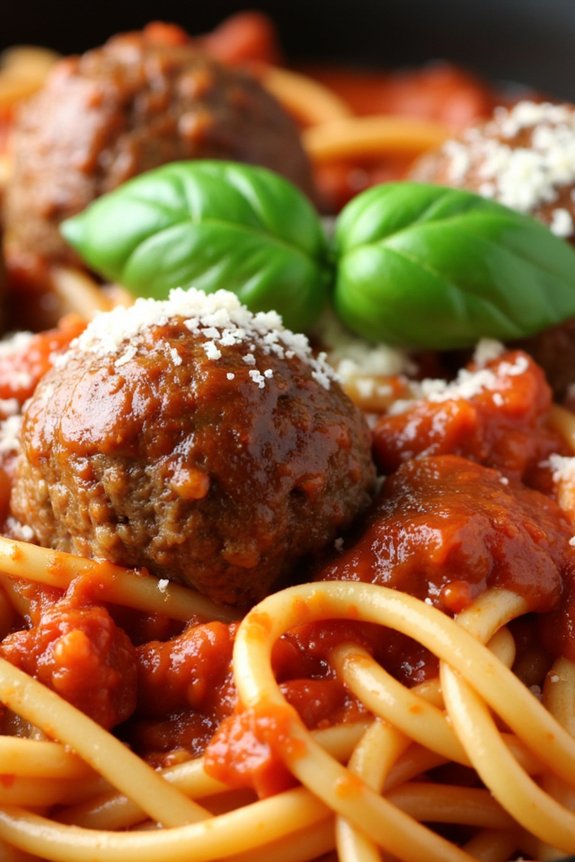
Looking for a simple, budget-friendly meal that doesn’t skimp on flavor? One-Pot Spaghetti and Meatballs is the perfect solution! This dish combines the classic comfort of spaghetti and meatballs with the convenience of a one-pot meal, making it an ideal choice for busy weeknights. With minimal cleanup and ingredients that are easy to find, you’ll have a delicious homemade dinner on the table in no time.
One-Pot Spaghetti and Meatballs brings together tender, juicy meatballs and perfectly cooked spaghetti in a rich, savory tomato sauce. The beauty of this recipe lies in its simplicity and the way the pasta absorbs the flavors of the sauce while cooking. Whether you’re serving a family of four to six or looking to impress guests, this dish is sure to become a staple in your dinner rotation.
Ingredients (serving size: 4-6 people):
- 1 pound ground beef
- 1/2 cup breadcrumbs
- 1/4 cup grated Parmesan cheese
- 1 egg
- 2 cloves garlic, minced
- 1 teaspoon dried oregano
- Salt and pepper, to taste
- 2 tablespoons olive oil
- 1 onion, finely chopped
- 1 (28-ounce) can crushed tomatoes
- 4 cups chicken broth
- 12 ounces spaghetti
- Fresh basil, for garnish
- Additional grated Parmesan cheese, for serving
Cooking Instructions:
- Prepare the Meatballs: In a large bowl, combine the ground beef, breadcrumbs, Parmesan cheese, egg, minced garlic, oregano, salt, and pepper. Mix well until all ingredients are thoroughly combined. Form the mixture into approximately 1-inch meatballs.
- Brown the Meatballs: In a large pot or Dutch oven, heat the olive oil over medium heat. Add the meatballs in batches, making sure not to overcrowd the pot. Cook until the meatballs are browned on all sides, about 5-7 minutes. Remove the meatballs from the pot and set aside.
- Cook the Aromatics: In the same pot, add the chopped onion and sauté until translucent, about 3-4 minutes. Stir in the crushed tomatoes and chicken broth, ensuring to scrape up any browned bits from the bottom of the pot for extra flavor.
- Combine and Cook: Return the browned meatballs to the pot and bring the mixture to a simmer. Add the spaghetti, making sure it’s submerged in the liquid. Cover the pot and cook for 10-12 minutes, stirring occasionally, until the spaghetti is al dente and the meatballs are cooked through.
- Serve: Once cooked, remove the pot from heat. Garnish with fresh basil and additional Parmesan cheese before serving. Enjoy your One-Pot Spaghetti and Meatballs hot!
Extra Tips:
For an even richer flavor, consider adding a splash of red wine to the sauce while it simmers. If you prefer a spicier kick, add a pinch of red pepper flakes along with the dried oregano.
Be sure to stir the pasta occasionally to prevent it from sticking together or to the bottom of the pot. This recipe is versatile, so feel free to substitute ground turkey or pork for the beef if desired. To save time, you can also use pre-made meatballs from the store.
Quick Chicken Stir-Fry
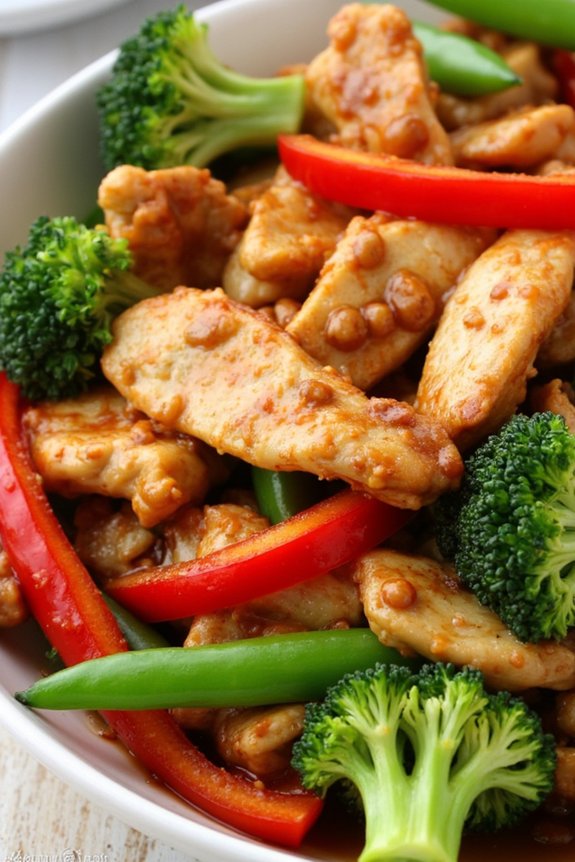
Looking for a simple yet delicious dinner option that doesn’t take hours to prepare? Quick Chicken Stir-Fry might just be your answer. This dish is a fantastic way to enjoy a healthy meal without compromising on taste.
It’s a perfect blend of tender chicken pieces, colorful vegetables, and a savory sauce that comes together in less than 30 minutes. Ideal for busy weeknights, this stir-fry will quickly become a family favorite.
Not only is this recipe quick and easy, but it’s also incredibly versatile. You can switch up the vegetables or even add some tofu or shrimp for variety. Serve it over a bed of steamed rice or noodles, and you’ll have a complete meal that satisfies both your taste buds and your schedule.
Let’s explore the ingredients and the step-by-step process to make this delightful dish.
Ingredients (Serves 4-6):
- 1.5 pounds boneless, skinless chicken breast, sliced into thin strips
- 2 tablespoons vegetable oil
- 1 red bell pepper, sliced
- 1 green bell pepper, sliced
- 1 cup broccoli florets
- 1 cup snap peas
- 3 cloves garlic, minced
- 1 tablespoon fresh ginger, minced
- 1/4 cup soy sauce
- 2 tablespoons oyster sauce
- 1 tablespoon cornstarch
- 1/4 cup water
- Salt and pepper to taste
- Cooked rice or noodles, for serving
Cooking Instructions:
- Prepare the Sauce: In a small bowl, combine the soy sauce, oyster sauce, cornstarch, and water. Mix well until the cornstarch is fully dissolved and set aside.
- Heat the Oil: In a large skillet or wok, heat the vegetable oil over medium-high heat. Once the oil is hot, add the garlic and ginger, sautéing for about 30 seconds until fragrant.
- Cook the Chicken: Add the sliced chicken to the skillet, seasoning with salt and pepper. Stir-fry the chicken for about 4-5 minutes, or until it’s cooked through and no longer pink. Remove the chicken from the skillet and set aside.
- Stir-Fry the Vegetables: In the same skillet, add a little more oil if necessary, and throw in the bell peppers, broccoli, and snap peas. Stir-fry the vegetables for about 3-4 minutes, or until they’re tender-crisp.
- Combine Everything: Return the cooked chicken to the skillet with the vegetables. Give the sauce a quick stir to confirm the cornstarch hasn’t settled, then pour it over the chicken and vegetables. Stir well to coat everything evenly with the sauce.
- Finish Cooking: Cook for another 2-3 minutes, allowing the sauce to thicken and everything to heat through. Adjust the seasoning with more soy sauce or salt if needed.
- Serve: Serve the stir-fry hot over a bed of steamed rice or your choice of noodles.
Extra Tips:
For a richer flavor, consider adding a dash of sesame oil to the stir-fry just before serving. If you want to add some heat, sprinkle in red pepper flakes or add sliced fresh chili peppers along with the vegetables.
Always verify that your skillet or wok is hot enough before adding ingredients to achieve that perfect stir-fry texture. Additionally, cutting the chicken and vegetables into uniform sizes ensures even cooking.
Vegetable Fried Rice
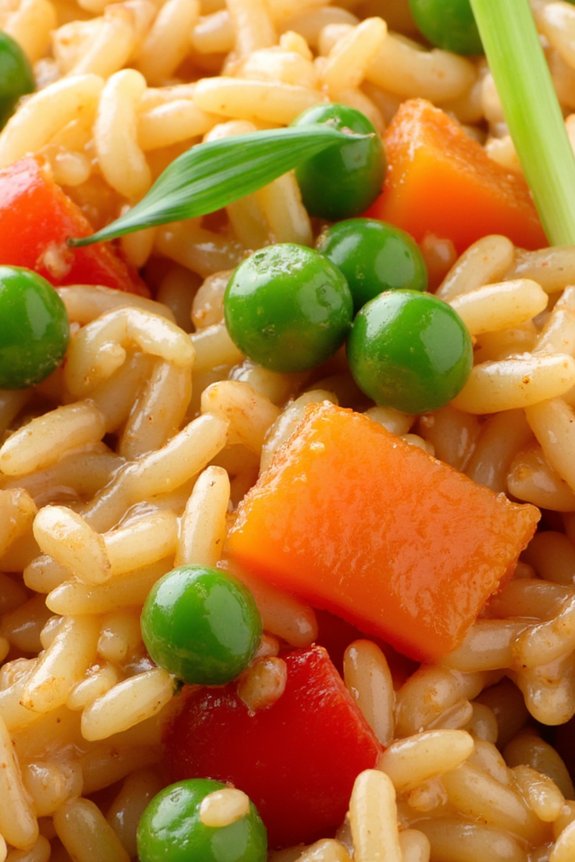
Vegetable Fried Rice is a delicious and satisfying dish that’s both budget-friendly and simple to prepare. This flavorful meal is perfect for busy weeknights when you want something quick and easy without sacrificing taste. By using a mix of colorful vegetables and day-old rice, you can create a delightful dish that will please the whole family. It’s a great way to make use of leftover rice while incorporating a healthy dose of vegetables into your diet.
The beauty of Vegetable Fried Rice lies in its versatility. You can customize it with your favorite vegetables or whatever you have on hand, making it an excellent option for reducing food waste. The dish is quick to cook, requiring only a few ingredients and minimal preparation. With its aromatic blend of soy sauce, ginger, and garlic, this recipe delivers a burst of Asian-inspired flavors that are sure to impress.
Ingredients for Vegetable Fried Rice (serves 4-6):
- 3 cups cooked white or brown rice (preferably day-old)
- 2 tablespoons vegetable oil
- 1 cup chopped onion
- 2 cloves garlic, minced
- 1 tablespoon fresh ginger, grated
- 1 cup peas and carrots (frozen or fresh)
- 1 red bell pepper, diced
- 3 green onions, chopped
- 3 tablespoons soy sauce
- 2 teaspoons sesame oil
- 2 eggs, beaten
- Salt and pepper to taste
Cooking Instructions:
- Prepare the Rice:
- Begin by making sure your rice is cold and separated; day-old rice works best for fried rice as it’s less sticky. If using freshly cooked rice, spread it on a baking sheet and let it cool before using.
- Cook the Vegetables:
- Heat 1 tablespoon of vegetable oil in a large frying pan or wok over medium-high heat. Add the chopped onion and sauté for 2-3 minutes until translucent. Add the minced garlic and grated ginger, cooking for another minute until fragrant.
- Add the Remaining Vegetables:
- Stir in the peas and carrots, along with the red bell pepper. Cook for about 5 minutes, stirring occasionally, until the vegetables are tender but still crisp.
- Scramble the Eggs:
- Push the vegetables to one side of the pan and add the remaining tablespoon of vegetable oil to the empty side. Pour the beaten eggs into the pan, scrambling them until fully cooked. Once cooked, mix the eggs with the vegetables.
- Combine with Rice:
- Add the cold rice to the pan, breaking up any clumps with a spatula. Stir everything together and cook for 3-4 minutes, allowing the rice to heat through.
- Season the Fried Rice:
- Pour the soy sauce and sesame oil over the rice mixture, stirring well to combine and evenly coat the rice. Season with salt and pepper to taste, and continue cooking for another 2 minutes.
- Finish and Serve:
- Add the chopped green onions, giving the fried rice a final stir. Remove from heat and serve immediately, garnished with additional green onions if desired.
Extra Tips:
For the best Vegetable Fried Rice, make sure your pan is hot before adding the ingredients to achieve a nice sear on the vegetables and rice. Avoid overcrowding the pan to make certain even cooking.
Feel free to add protein such as tofu, chicken, or shrimp for a heartier meal. Adjust the soy sauce and sesame oil to your taste preference, and consider adding a dash of sriracha or chili paste for a spicy kick.
Creamy Tomato Soup and Grilled Cheese

If you’re searching for a comforting, classic meal that won’t break the bank, seek no further than a warm bowl of creamy tomato soup paired with a perfectly grilled cheese sandwich. This delightful combination isn’t only a favorite for its nostalgic flavors but also for its simplicity and affordability. The creamy tomato soup, rich with the flavors of ripe tomatoes and a hint of basil, is the perfect companion to the crisp, buttery, and gooey grilled cheese. Together, they create a meal that’s satisfying, delicious, and easy to prepare.
This recipe serves 4-6 people, making it an ideal choice for a family dinner or a cozy gathering with friends. With just a few ingredients and minimal cooking time, you can whip up this hearty meal in no time. The creamy tomato soup is made with fresh or canned tomatoes, heavy cream, and a few herbs, while the grilled cheese sandwiches are crafted with your choice of bread and cheese, grilled to perfection for a crunchy exterior and a melty interior.
Ingredients for Creamy Tomato Soup:
- 2 tablespoons olive oil
- 1 medium onion, chopped
- 3 cloves garlic, minced
- 2 cans (28 ounces each) whole peeled tomatoes
- 2 cups chicken or vegetable broth
- 1/2 cup heavy cream
- 1 teaspoon sugar
- Salt and pepper to taste
- 1/4 cup fresh basil leaves, chopped
Ingredients for Grilled Cheese Sandwiches:
- 8 slices of bread
- 8 slices of cheese (such as cheddar, American, or Swiss)
- 4 tablespoons butter, softened
Cooking Instructions:
- Prepare the Soup Base:
- In a large pot, heat the olive oil over medium heat. Add the chopped onion and cook until translucent, about 5 minutes. Stir in the minced garlic and cook for an additional minute until fragrant.
- Simmer the Tomatoes:
- Add the whole peeled tomatoes (including their juice) to the pot, breaking them up with a spoon. Pour in the chicken or vegetable broth and bring the mixture to a simmer. Allow it to cook for about 20 minutes, stirring occasionally.
- Blend the Soup:
- Remove the pot from heat and use an immersion blender to puree the soup until smooth. Alternatively, you can transfer the soup to a blender in batches, then return it to the pot.
- Add Cream and Seasonings:
- Stir in the heavy cream, sugar, salt, and pepper. Return the pot to low heat and let it heat through, but don’t boil. Mix in the chopped basil just before serving.
- Prepare Grilled Cheese Sandwiches:
- While the soup is simmering, heat a non-stick skillet over medium heat. Butter one side of each slice of bread. Place a slice of cheese between two slices of bread, with the buttered sides facing out.
- Grill the Sandwiches:
- Place the sandwiches in the skillet and cook until the bread is golden brown and the cheese is melted, about 3-4 minutes per side. Adjust the heat as necessary to avoid burning.
- Serve and Enjoy:
- Ladle the creamy tomato soup into bowls and serve alongside the grilled cheese sandwiches for dipping.
Extra Tips:
For an extra layer of flavor, consider adding a pinch of red pepper flakes to the soup for a bit of heat. If you prefer a thicker soup, reduce the amount of broth or simmer it longer to allow it to reduce.
When making the grilled cheese sandwiches, feel free to experiment with different types of cheese or add extras like sliced tomatoes or cooked bacon for added flavor. To guarantee the sandwiches stay crispy, keep the heat at medium and press gently with a spatula while cooking.
Loaded Baked Potato Bar
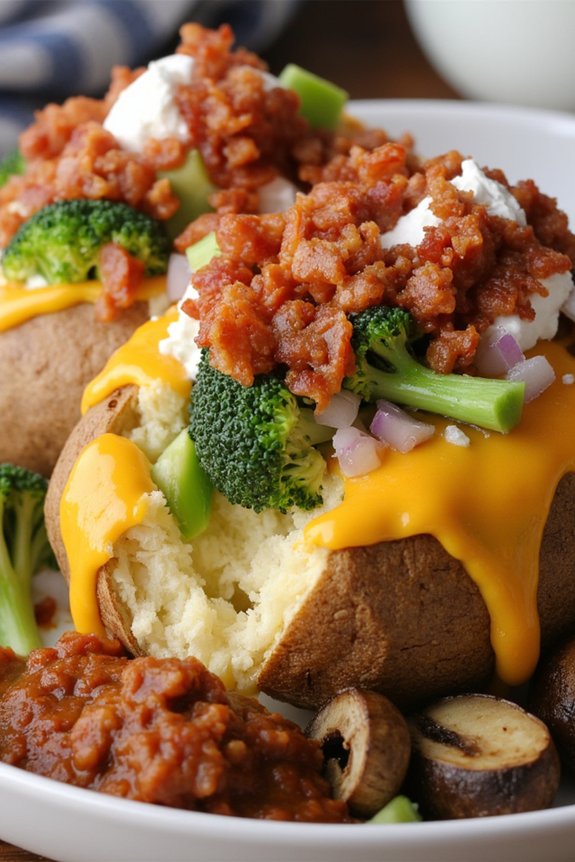
Loaded Baked Potato Bar is a delicious and customizable meal that’s perfect for feeding a crowd or a hungry family of four to six.
It’s an ideal choice for those who want a quick yet satisfying dinner that allows everyone to choose their own toppings. This dish offers a hearty base of baked potatoes that can be topped with a variety of ingredients to suit different tastes, from classic cheese and bacon to more adventurous additions like chili or sautéed vegetables.
The beauty of a Loaded Baked Potato Bar is in its simplicity and versatility. You can prepare the potatoes ahead of time and set out an array of toppings, allowing each person to create their own perfect potato.
This not only makes for a fun dining experience but also guarantees that everyone gets exactly what they want. Whether you’re hosting a casual dinner party or just looking for an easy weeknight meal, this recipe is sure to please.
Ingredients (serving size: 4-6 people):
- 6 large russet potatoes
- Olive oil
- Kosher salt
- 1 cup shredded cheddar cheese
- 1 cup sour cream
- 1/2 cup crumbled cooked bacon
- 1/2 cup chopped green onions
- 1 cup steamed broccoli florets
- 1 cup chili (optional)
- 1/2 cup sautéed mushrooms (optional)
- Butter
- Salt and pepper to taste
Cooking Instructions:
- Prepare the Potatoes: Preheat your oven to 400°F (200°C). Scrub the potatoes under running water to remove any dirt, then dry them thoroughly with a towel. Using a fork, poke several holes in each potato to allow steam to escape during baking.
- Bake the Potatoes: Rub each potato with a light coating of olive oil and sprinkle with kosher salt. Place the potatoes directly on the oven rack and bake for about 45-60 minutes, or until they’re tender when pierced with a fork.
- Prepare the Toppings: While the potatoes are baking, prepare your toppings. Shred the cheddar cheese, chop the green onions, cook and crumble the bacon, and steam the broccoli. If using, sauté the mushrooms in a bit of olive oil and cook the chili.
- Assemble the Potato Bar: Once the potatoes are done, remove them from the oven and let them cool slightly. Slice each potato lengthwise and gently fluff the insides with a fork. Set up a serving station with all the toppings in separate bowls.
- Serve: Allow each person to top their potato with their desired ingredients. Common combinations include cheese and bacon, sour cream and green onions, or chili and cheese. Be creative!
Extra Tips: To guarantee your Loaded Baked Potato Bar is a hit, consider preparing some toppings ahead of time, such as cooking the bacon or sautéing the mushrooms.
For an extra crispy skin, you can bake the potatoes on a wire rack placed over a baking sheet. Additionally, feel free to add more topping options like diced tomatoes, jalapeños, or different cheese varieties to cater to everyone’s preferences.
Enjoy your meal as a standalone dish or pair it with a side salad for a more balanced dinner.
Easy Beef Tacos

Looking for a quick and budget-friendly dinner idea? These Easy Beef Tacos are the perfect solution for a delicious meal that won’t break the bank. Ready in just under 30 minutes, this recipe is ideal for busy weeknights when time is of the essence. The seasoned beef filling is packed with flavor, and when combined with fresh toppings and soft taco shells, it creates a satisfying dish that will please the entire family.
These tacos aren’t only simple to prepare but also customizable to suit everyone’s taste. You can add your favorite toppings like cheese, lettuce, tomatoes, and salsa to make them your own. Whether you’re feeding a crowd or just a few people, this recipe is scalable and versatile, making it an excellent choice for any occasion.
Ingredients (Serves 4-6):
- 1 pound ground beef
- 1 small onion, finely chopped
- 2 cloves garlic, minced
- 1 tablespoon olive oil
- 1 packet taco seasoning mix
- 1/2 cup water
- 8-12 soft taco shells
- 1 cup shredded lettuce
- 1 cup diced tomatoes
- 1 cup shredded cheese (cheddar or Mexican blend)
- 1/2 cup sour cream
- 1/2 cup salsa
Cooking Instructions:
- Prepare the Beef Filling: In a large skillet, heat olive oil over medium heat. Add the chopped onion and minced garlic, sautéing until the onion becomes translucent and fragrant, about 2-3 minutes.
- Cook the Ground Beef: Add the ground beef to the skillet, breaking it up with a spatula or wooden spoon. Cook the beef until it’s browned and fully cooked through, about 5-7 minutes. Drain any excess fat if necessary.
- Season the Beef: Sprinkle the taco seasoning mix over the cooked beef, then pour in the water. Stir everything together until the beef is evenly coated with the seasoning. Allow the mixture to simmer for 2-3 minutes, or until the sauce thickens slightly.
- Warm the Taco Shells: While the beef is simmering, warm the taco shells according to package instructions, usually by microwaving them for about 30 seconds or heating them in a skillet for a few seconds on each side.
- Assemble the Tacos: Once the shells are warm and the beef is ready, start assembling your tacos. Spoon a generous portion of the beef mixture into each taco shell. Top with shredded lettuce, diced tomatoes, shredded cheese, a dollop of sour cream, and a spoonful of salsa.
- Serve and Enjoy: Arrange the tacos on a serving platter and enjoy them immediately while they’re warm and fresh. Consider serving with a side of rice or beans for a complete meal.
Extra Tips:
For extra flavor, consider adding a squeeze of lime juice to your assembled tacos. If you prefer a spicier kick, you can add sliced jalapeños or a dash of hot sauce.
To save time, you can prepare the beef filling in advance and reheat it when you’re ready to serve. Additionally, consider using whole grain or low-carb taco shells for a healthier alternative. Topping ideas are endless, so feel free to get creative and use what you have on hand.
Cheesy Broccoli and Rice Casserole
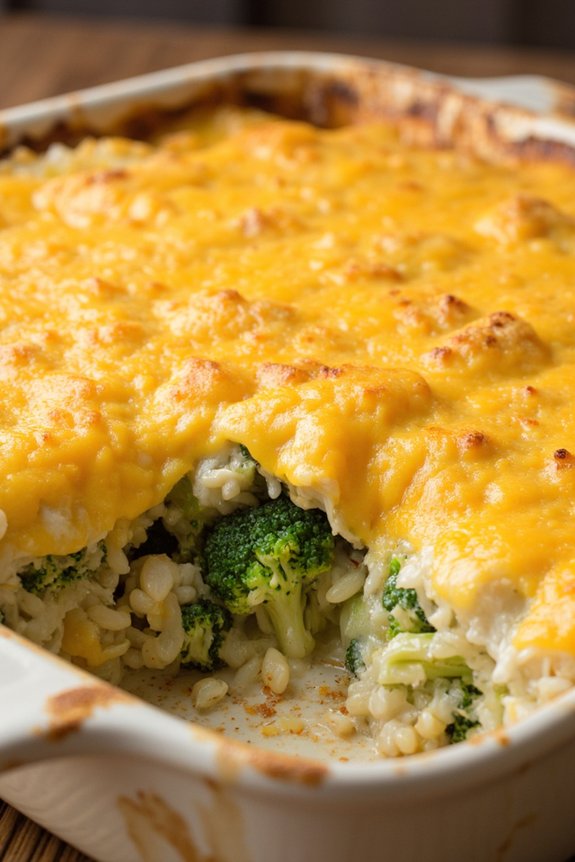
Cheesy Broccoli and Rice Casserole is a comforting and satisfying dish that combines the goodness of fresh broccoli with the creamy richness of cheese and rice. Perfect for a quick weeknight dinner or a cozy family meal, this casserole isn’t only delicious but also budget-friendly.
The combination of flavors and textures in this dish can please even the pickiest eaters, making it an ideal choice for a family gathering or potluck.
Preparing this casserole is straightforward and requires minimal ingredients, making it an excellent option for those days when you want something hearty and homemade without spending hours in the kitchen. The broccoli adds a nutritious touch, while the melted cheese and perfectly cooked rice provide a creamy and indulgent experience.
This recipe serves 4-6 people, making it perfect for a small group or for leftovers that can easily be reheated for a quick meal the next day.
Ingredients:
- 2 cups of broccoli florets
- 1 cup of uncooked white rice
- 2 cups of shredded cheddar cheese
- 1 can (10.5 oz) of condensed cream of mushroom soup
- 1 1/2 cups of water or chicken broth
- 1/2 cup of milk
- 1 small onion, chopped
- 2 tablespoons of butter
- Salt and pepper to taste
- 1/2 teaspoon of garlic powder
- 1/4 teaspoon of paprika (optional)
Cooking Instructions:
- Preheat the Oven: Start by preheating your oven to 350°F (175°C). This will guarantee your casserole cooks evenly and thoroughly.
- Cook the Rice: In a medium saucepan, bring 1 1/2 cups of water or chicken broth to a boil. Add the rice, reduce heat to low, cover, and simmer for about 15-18 minutes, or until the rice is tender and the liquid is absorbed.
- Prepare the Broccoli: While the rice is cooking, steam the broccoli florets for about 5 minutes, or until they’re just tender. You can do this by placing them in a steamer basket over boiling water or microwaving them with a little bit of water.
- Sauté the Onions: In a skillet, melt the butter over medium heat. Add the chopped onions and sauté until they’re translucent, about 5 minutes.
- Mix the Ingredients: In a large mixing bowl, combine the cooked rice, steamed broccoli, sautéed onions, cream of mushroom soup, milk, garlic powder, salt, pepper, and 1 1/2 cups of the shredded cheddar cheese. Stir until everything is well combined.
- Assemble the Casserole: Pour the mixture into a greased 9×13 inch baking dish. Spread it out evenly. Sprinkle the remaining 1/2 cup of cheddar cheese over the top, and add a sprinkle of paprika if using.
- Bake the Casserole: Place the baking dish in the preheated oven and bake for 25-30 minutes, or until the cheese is melted and bubbly, and the casserole is heated through.
- Serve: Remove the casserole from the oven and let it cool for a few minutes before serving. This will help it set and make it easier to serve.
Extra Tips:
For an added crunch, top the casserole with breadcrumbs or crushed crackers before baking. You can also experiment with different types of cheese for a varied flavor profile.
If you prefer a bit of spice, consider adding a dash of cayenne pepper or red pepper flakes to the mix. This dish can be made ahead of time and stored in the refrigerator for up to two days before baking. Just confirm it’s covered tightly with plastic wrap or foil.
Enjoy the flexibility and flavor of this simple yet delectable casserole!
Sausage and Peppers Pasta

Sausage and Peppers Pasta is a delightful and hearty meal that’s perfect for any night of the week. This recipe combines the robust flavors of Italian sausage with the vibrant taste of bell peppers and onions, all tossed with your favorite pasta. It’s a quick and easy dish that doesn’t compromise on taste, making it ideal for busy families or anyone looking for a satisfying dinner without much fuss.
Plus, it’s budget-friendly, using simple ingredients that are often already in your pantry. The combination of savory sausage and sweet peppers creates a balanced taste that will appeal to both kids and adults alike. With just a few steps and minimal prep time, you can have this meal ready and on the table in about 30 minutes.
This Sausage and Peppers Pasta serves 4-6 people, making it perfect for family dinners or for leftovers that taste just as good the next day. Pair it with a side salad or some crusty bread to complete your meal.
Ingredients:
- 1 pound Italian sausage (mild or spicy, based on preference)
- 2 tablespoons olive oil
- 1 red bell pepper, sliced
- 1 yellow bell pepper, sliced
- 1 green bell pepper, sliced
- 1 large onion, sliced
- 3 cloves garlic, minced
- 1 teaspoon dried oregano
- 1 teaspoon dried basil
- Salt and pepper to taste
- 1 can (14.5 oz) diced tomatoes
- 1/4 cup tomato paste
- 12 ounces pasta (such as penne or rigatoni)
- 1/4 cup grated Parmesan cheese
- Fresh parsley, chopped, for garnish
Cooking Instructions:
- Cook the Pasta: Begin by bringing a large pot of salted water to a boil. Add the pasta and cook according to the package instructions until al dente. Drain the pasta and set it aside.
- Prepare the Sausage: In a large skillet, heat 1 tablespoon of olive oil over medium heat. Remove the sausage from its casing and crumble it into the skillet. Cook until browned and cooked through, about 5-7 minutes. Remove the sausage from the skillet and set aside on a plate lined with paper towels to drain excess fat.
- Sauté the Vegetables: In the same skillet, add the remaining tablespoon of olive oil. Add the sliced peppers and onion. Sauté for about 5 minutes, until the vegetables start to soften. Stir in the minced garlic, oregano, basil, salt, and pepper, and cook for another 1-2 minutes until fragrant.
- Combine Ingredients: Return the cooked sausage to the skillet with the vegetables. Stir in the diced tomatoes and tomato paste, mixing well to combine. Let the mixture simmer on low heat for about 5 minutes, allowing the flavors to meld together.
- Mix with Pasta: Add the cooked pasta to the skillet, tossing everything together until the pasta is well coated with the sauce and the ingredients are evenly distributed. If the mixture seems too thick, you can add a little pasta water to reach your desired consistency.
- Serve: Serve the Sausage and Peppers Pasta hot, garnished with grated Parmesan cheese and chopped fresh parsley.
Extra Tips: When choosing sausages, opt for high-quality Italian sausage for the best flavor. You can adjust the spiciness of the dish by selecting either mild or spicy sausage. For added depth, consider using a splash of red wine when sautéing the vegetables.
Ultimately, this dish can be made ahead of time and reheated, although you may need to add a bit of water or broth to loosen the sauce. Enjoy your meal with a sprinkle of extra Parmesan cheese if desired!
Simple Bean and Cheese Quesadillas

Simple Bean and Cheese Quesadillas are a perfect choice for a quick and satisfying meal. They’re not only budget-friendly but also incredibly easy to prepare, making them an ideal option for busy weeknights or when you’re in need of a fuss-free dinner.
The combination of creamy, melted cheese and hearty beans wrapped in a crispy tortilla is sure to please both kids and adults alike. Plus, with just a few ingredients, you can whip up these quesadillas in no time and customize them to suit your taste preferences.
This recipe yields enough for 4-6 people, making it a great option for family meals or small gatherings. With a balance of protein and carbohydrates, these quesadillas can be a complete meal on their own, but they pair wonderfully with salsa, guacamole, or a simple side salad for added flavor and nutrition.
Whether you’re a seasoned cook or a kitchen novice, you’ll find this recipe straightforward and rewarding.
Ingredients:
- 8 large flour tortillas
- 2 cups shredded cheddar or Monterey Jack cheese
- 1 can (15 oz) black beans, drained and rinsed
- 1 small onion, finely chopped
- 1 tablespoon olive oil
- 1 teaspoon ground cumin
- Salt and pepper to taste
- Optional toppings: sour cream, salsa, guacamole
Instructions:
1. Prepare the Filling: In a medium skillet, heat the olive oil over medium heat. Add the chopped onion and sauté for about 3-4 minutes until it becomes translucent.
Stir in the ground cumin, salt, and pepper, followed by the black beans. Cook for another 2-3 minutes, stirring occasionally, until the mixture is heated through. Remove from heat.
2. Assemble the Quesadillas: Lay out the flour tortillas on a clean surface. Evenly distribute about 1/4 cup of the shredded cheese on one half of each tortilla.
Spoon the bean mixture over the cheese, then sprinkle another layer of cheese on top.
3. Cook the Quesadillas: Fold each tortilla in half over the filling. Heat a large non-stick skillet or griddle over medium heat.
Place one or two quesadillas in the skillet, depending on what fits comfortably. Cook for about 3-4 minutes on each side or until the tortillas are golden brown and the cheese has melted.
4. Serve: Remove from the skillet and let cool slightly before cutting into wedges. Serve with your choice of toppings like sour cream, salsa, or guacamole.
For extra crispy quesadillas, make sure not to overcrowd the skillet, as this can cause them to steam rather than crisp up. You can also brush a little extra olive oil on the outside of the tortillas before cooking them.
If you’re looking to add some heat, consider adding chopped jalapeños or a dash of hot sauce to the filling. For a more nutritious option, whole wheat tortillas can be used in place of flour tortillas, and feel free to experiment with different types of cheese or add some veggies like spinach or bell peppers for extra flavor and nutrients.
Chicken and Vegetable Sheet Pan Dinner
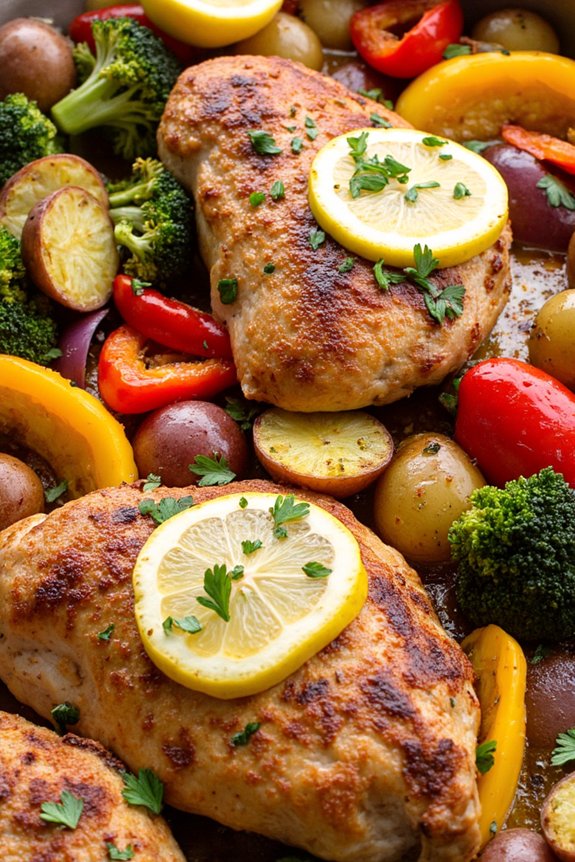
This recipe serves 4-6 people and highlights the versatility of sheet pan dinners, allowing you to customize the vegetables and seasonings according to your preference. The chicken comes out juicy with crispy skin, while the vegetables are tender and caramelized. It’s a complete meal that’s both nutritious and delicious, providing a well-balanced combination of protein and vegetables.
Ingredients:
- 6 bone-in, skin-on chicken thighs
- 2 tablespoons olive oil
- 1 teaspoon garlic powder
- 1 teaspoon onion powder
- 1 teaspoon paprika
- Salt and pepper to taste
- 1 pound baby potatoes, halved
- 1 red bell pepper, sliced
- 1 yellow bell pepper, sliced
- 1 red onion, cut into wedges
- 2 cups broccoli florets
- 1 lemon, sliced
- 2 tablespoons fresh parsley, chopped (for garnish)
Instructions:
- Preheat the Oven: Set your oven to 425°F (220°C) and allow it to preheat while you prepare the ingredients.
- Prepare the Chicken: In a small bowl, mix the garlic powder, onion powder, paprika, salt, and pepper. Rub this spice mixture evenly over the chicken thighs.
- Prepare the Vegetables: In a large mixing bowl, combine the baby potatoes, bell peppers, red onion, and broccoli florets. Drizzle with olive oil and season with salt and pepper. Toss until all the vegetables are well coated.
- Arrange on the Sheet Pan: Line a large sheet pan with parchment paper for easy cleanup. Arrange the chicken thighs skin-side up on one side of the pan. Spread the prepared vegetables around the chicken, ensuring a single layer for even cooking.
- Add Lemon Slices: Distribute lemon slices over the chicken and vegetables. The lemon will add a revitalizing citrus aroma and flavor to the dish.
- Roast in the Oven: Place the sheet pan in the preheated oven and roast for 35-40 minutes. Check that the chicken is cooked through and reaches an internal temperature of 165°F (75°C), and the vegetables are tender and slightly crispy at the edges.
- Serve and Garnish: Remove from the oven and let it rest for a few minutes. Sprinkle with freshly chopped parsley before serving.
Extra Tips:
For crispier chicken skin, you can broil the sheet pan dinner for the last 2-3 minutes of cooking. Keep a close eye on it to prevent burning.
Feel free to substitute or add other vegetables like carrots or zucchini based on what you have available. If you prefer boneless chicken, adjust the cooking time as they generally cook faster.
This dish pairs wonderfully with a side of crusty bread or a simple green salad.
Classic Tuna Casserole
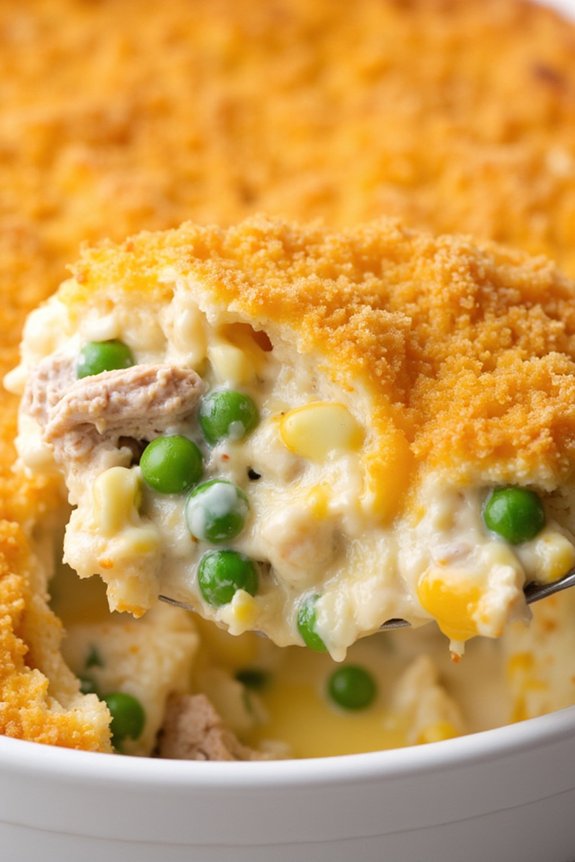
Classic Tuna Casserole is a timeless, budget-friendly dish that brings comfort and satisfaction to the dinner table. It’s a delightful blend of tender pasta, savory tuna, and creamy sauce, all baked to perfection with a golden crust.
Whether you’re a busy parent looking for a quick meal to feed the family or a novice cook seeking an easy recipe to try, this dish fits the bill. Not only is it simple to prepare, but it also makes use of pantry staples, guaranteeing you can whip it up without a special trip to the grocery store.
This recipe serves 4-6 people, making it perfect for family dinners or small gatherings. The casserole is versatile, allowing you to add your personal touch with various ingredients you might’ve on hand. From a hint of spice to melted cheese, you can make it your own while maintaining its classic appeal.
Let’s plunge into creating this delicious and hearty dish, a sure crowd-pleaser that will have everyone coming back for seconds.
Ingredients:
- 8 oz (about 2 cups) egg noodles
- 2 (5 oz) cans of tuna, drained
- 1 can (10.5 oz) of condensed cream of mushroom soup
- 1 cup frozen peas
- 1 cup shredded cheddar cheese
- 1/2 cup milk
- 1/4 cup finely chopped onion
- 1/4 cup mayonnaise
- 1 tablespoon lemon juice
- 1/2 teaspoon garlic powder
- Salt and pepper to taste
- 1/2 cup crushed potato chips or breadcrumbs for topping
Cooking Instructions:
- Preheat the Oven: Begin by preheating your oven to 375°F (190°C). This guarantees that the casserole will cook evenly and develop a nice crust on top.
- Cook the Noodles: In a large pot, bring water to a boil and cook the egg noodles according to the package instructions until al dente. Drain and set aside.
- Mix the Ingredients: In a large mixing bowl, combine the drained tuna, condensed cream of mushroom soup, milk, mayonnaise, lemon juice, garlic powder, and chopped onion. Stir until well mixed.
- Add Noodles and Peas: Gently fold in the cooked noodles and frozen peas into the tuna mixture. Season with salt and pepper to taste, guaranteeing everything is evenly coated.
- Assemble the Casserole: Transfer the mixture into a greased 9×13 inch baking dish. Spread it out evenly for consistent cooking.
- Top with Cheese and Chips: Sprinkle the shredded cheddar cheese over the casserole. Then, evenly distribute the crushed potato chips or breadcrumbs on top for a crispy texture.
- Bake: Place the casserole in the preheated oven and bake for about 25-30 minutes, or until the top is golden brown and the casserole is bubbly.
- Serve: Allow the casserole to cool for a few minutes before serving. This helps the dish set and makes it easier to serve.
Extra Tips:
For a richer flavor, consider using sharp cheddar cheese or adding a bit of Dijon mustard to the mixture. If you prefer a healthier version, substitute the mayonnaise with Greek yogurt and use whole wheat noodles.
Adding a pinch of red pepper flakes can give the dish a subtle kick. Feel free to customize with additional vegetables like mushrooms or bell peppers to enhance the nutritional content.
Finally, if you have leftovers, store them in an airtight container in the refrigerator for up to three days. Reheat in the oven to retain the crispy topping.
Homemade Sloppy Joes
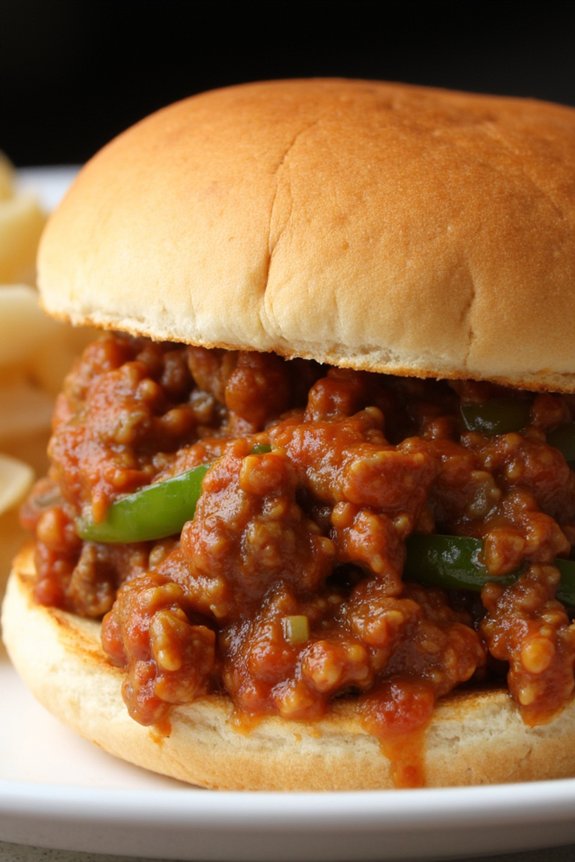
Homemade Sloppy Joes are a classic and affordable comfort food perfect for a busy weeknight dinner. This dish combines ground beef with a sweet and tangy tomato-based sauce, served on soft hamburger buns. It’s a meal that’s loved by both kids and adults alike, offering a delicious taste of nostalgia.
With just a few pantry staples, you can whip up this satisfying meal in no time, making it an ideal choice for those looking to save time and money without compromising flavor.
Sloppy Joes aren’t only easy to make but also very versatile. You can easily adjust the ingredients to suit your taste preferences or dietary needs. Whether you like them spicy, sweet, or somewhere in between, this recipe is a perfect base to start from.
It serves 4-6 people, making it great for family dinners or casual gatherings. Pair it with a side of coleslaw or potato chips for a complete meal that everyone will enjoy.
Ingredients:
- 1 1/2 pounds ground beef
- 1 medium onion, finely chopped
- 1/2 cup green bell pepper, finely chopped
- 1 cup ketchup
- 2 tablespoons brown sugar
- 1 tablespoon Worcestershire sauce
- 1 tablespoon yellow mustard
- 1 teaspoon garlic powder
- 1/2 teaspoon salt
- 1/4 teaspoon black pepper
- 6 hamburger buns
Instructions:
- Prepare the Ingredients: Begin by gathering all necessary ingredients. Chop the onion and green bell pepper finely to make sure they cook evenly and blend well with the ground beef.
- Cook the Beef: In a large skillet over medium-high heat, add the ground beef. Cook until browned, breaking it apart with a spatula as it cooks to avoid large chunks. This should take about 5-7 minutes.
- Sauté Vegetables: Reduce the heat to medium and add the chopped onion and green bell pepper to the skillet. Cook for an additional 4-5 minutes or until the vegetables have softened, stirring occasionally.
- Mix the Sauce: In a small bowl, combine the ketchup, brown sugar, Worcestershire sauce, yellow mustard, garlic powder, salt, and pepper. Stir until fully mixed.
- Combine and Simmer: Pour the sauce mixture into the skillet with the beef and vegetables. Stir everything together until well combined. Reduce the heat to low and let the mixture simmer for about 10-15 minutes. This will allow the flavors to meld together and the sauce to thicken.
- Prepare the Buns: While the mixture is simmering, split the hamburger buns in half. You can toast them lightly on a skillet or in the oven if desired for extra texture.
- Assemble: Once the sauce has thickened and warmed through, spoon the beef mixture evenly onto the bottom half of each bun. Top with the other half of the bun and serve immediately.
Extra Tips:
For an extra kick, consider adding a dash of hot sauce or a pinch of red pepper flakes to the sauce mixture. If you prefer a leaner dish, substitute ground turkey or chicken for the beef.
You can also make this meal more nutritious by adding finely chopped carrots or zucchini. Always taste the sauce before serving and adjust the seasoning as needed to achieve the perfect balance of sweet and savory flavors.
Sloppy Joes are best enjoyed fresh, but leftovers can be stored in an airtight container in the fridge for up to 3 days.
Veggie-Packed Omelette
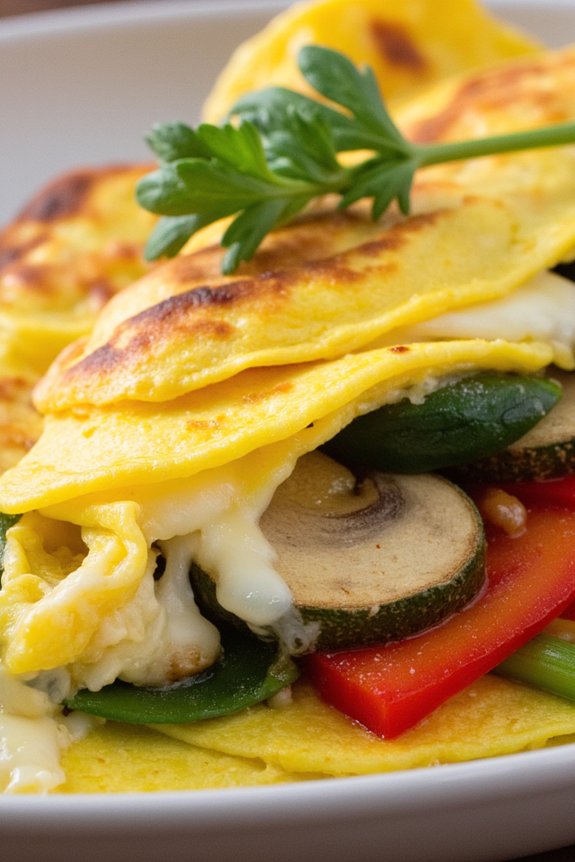
Veggie-Packed Omelette is a delicious, nutritious, and budget-friendly dinner option that’s perfect for any night of the week. This omelette is loaded with colorful vegetables, offering a hefty dose of vitamins and minerals, while still being easy on your wallet.
It’s a great way to use up leftover vegetables in your fridge while putting a wholesome meal on the table in less than 30 minutes. Whether you’re a seasoned cook or a beginner in the kitchen, this recipe is simple yet flavorful, making it an ideal choice for a quick dinner.
Not only is this Veggie-Packed Omelette easy to prepare, but it also caters to various dietary preferences. You can customize it with your favorite vegetables or whatever you have on hand. The combination of sautéed vegetables and fluffy eggs makes for a satisfying meal that’s high in protein and fiber.
Perfect for a family dinner, this recipe serves 4-6 people, ensuring everyone gets their fill of this tasty, veggie-loaded delight.
Ingredients (Serves 4-6):
- 8 large eggs
- 1/4 cup milk
- 1 tablespoon olive oil
- 1 red bell pepper, diced
- 1 small onion, diced
- 1 zucchini, diced
- 1 cup mushrooms, sliced
- 1 cup spinach leaves
- 1 cup shredded cheese (cheddar or your choice)
- Salt and pepper to taste
- Fresh herbs (such as parsley or chives) for garnish
Instructions:
- Prepare the Egg Mixture: In a large bowl, crack the eggs and add the milk. Whisk together until the mixture is well combined and slightly frothy. Season with a pinch of salt and pepper.
- Sauté the Vegetables: Heat the olive oil in a large non-stick skillet over medium heat. Add the diced onion and cook until translucent, about 2-3 minutes. Then, add the red bell pepper, zucchini, and mushrooms. Sauté for another 5-7 minutes, or until the vegetables are tender. Stir in the spinach leaves and cook until just wilted.
- Cook the Omelette: Pour the egg mixture over the sautéed vegetables in the skillet. Reduce the heat to medium-low and let the eggs cook undisturbed until they start to set around the edges.
- Add Cheese and Fold: Sprinkle the shredded cheese evenly over the omelette. Using a spatula, gently lift the edges of the omelette to allow the uncooked eggs to flow to the bottom of the skillet. Once the eggs are mostly set and the cheese has melted, carefully fold the omelette in half.
- Serve: Slide the omelette onto a large serving plate. Garnish with fresh herbs like parsley or chives before slicing and serving.
Extra Tips:
For the best results, use a non-stick skillet to prevent the omelette from sticking and breaking apart. If you’re looking to add more protein, consider including cooked chicken or turkey slices.
Feel free to experiment with different cheeses and herbs to suit your taste. If you have leftovers, store them in an airtight container in the refrigerator for up to two days, and reheat gently on the stovetop or microwave.