

As a busy mom balancing work, school, and extracurricular activities, I totally get how crazy family evenings can be. Finding the time to prepare a delicious dinner sometimes seems like an uphill battle. That’s why I’ve put together 13 smart, quick, and easy recipes that can transform mealtime into a breeze. Picture dishes like One-Pot Chicken Alfredo or Quick Beef Tacos that you can whip up in under 30 minutes. Ready to make dinnertime both stress-free and satisfying?
One-Pot Chicken Alfredo
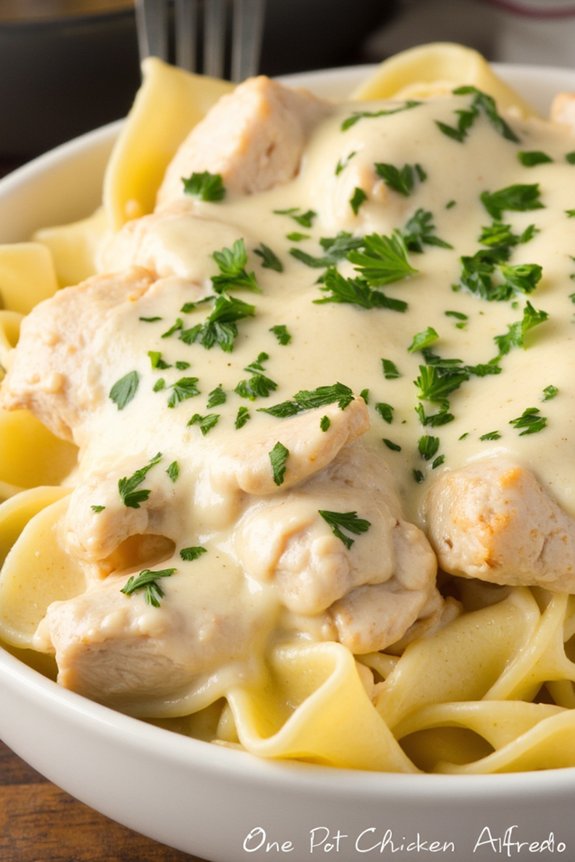
One-Pot Chicken Alfredo is the perfect recipe for those busy weeknights when you need a delicious dinner that comes together with minimal effort and cleanup. This dish combines tender chicken, creamy Alfredo sauce, and al dente pasta all cooked in one pot, making it a convenient and satisfying meal for the whole family.
The rich and creamy Alfredo sauce is made from scratch using simple ingredients, ensuring a fresh and flavorful dish that rivals any restaurant version. This recipe serves 4-6 people and is designed to make your cooking experience as easy and enjoyable as possible.
With everything cooked in one pot, you save time on both cooking and cleaning, allowing you to focus on enjoying the meal with your loved ones. Whether you’re a seasoned cook or just beginning to explore the culinary world, this One-Pot Chicken Alfredo is sure to impress and become a staple in your dinner rotation.
Ingredients:
- 1 pound boneless, skinless chicken breasts
- Salt and pepper, to taste
- 2 tablespoons olive oil
- 3 cloves garlic, minced
- 4 cups chicken broth
- 1 cup heavy cream
- 12 ounces fettuccine pasta
- 1 cup grated Parmesan cheese
- 2 tablespoons chopped fresh parsley
Instructions:
- Prepare the Chicken: Begin by cutting the chicken breasts into bite-sized pieces. Season them with salt and pepper to your preference.
- Cook the Chicken: Heat the olive oil in a large pot over medium-high heat. Add the chicken pieces and cook until they’re browned on all sides and cooked through, about 6-8 minutes. Remove the chicken from the pot and set it aside.
- Sauté the Garlic: In the same pot, add the minced garlic and sauté for about 1 minute, or until fragrant. Be careful not to burn the garlic as it can become bitter.
- Add Liquids and Pasta: Pour in the chicken broth and heavy cream, stirring to combine. Bring the mixture to a gentle simmer. Add the fettuccine pasta, ensuring that it’s submerged in the liquid. Cook the pasta, stirring occasionally to prevent sticking, until it’s al dente and the liquid has reduced slightly, about 10-12 minutes.
- Incorporate Chicken and Cheese: Return the cooked chicken to the pot and stir in the Parmesan cheese until melted and the sauce is creamy. Adjust seasoning with additional salt and pepper if needed.
- Serve: Garnish the One-Pot Chicken Alfredo with chopped fresh parsley before serving. Enjoy it hot for the best flavor and texture.
Extra Tips:
For an even richer flavor, consider adding a pinch of nutmeg to the sauce as it complements the creaminess of the Alfredo beautifully.
For those who enjoy a bit of heat, a dash of red pepper flakes can be added when sautéing the garlic. If you find the sauce too thick, simply add a splash of chicken broth or reserved pasta water to reach your desired consistency.
Finally, feel free to customize the dish by tossing in some steamed broccoli or spinach for added nutrition and color.
Quick Beef Tacos

If you’re in need of a fast and delicious dinner option that will satisfy the whole family, these Quick Beef Tacos are the answer. Packed with flavor and ready in less than 30 minutes, these tacos are perfect for busy weeknights. The seasoned ground beef, fresh toppings, and warm tortillas come together to create a mouthwatering meal that everyone will love.
Plus, they’re customizable, so each family member can create their perfect taco.
These Quick Beef Tacos aren’t only easy to prepare but also budget-friendly. Using ingredients you likely already have in your pantry, you can whip up a meal that’s not only tasty but also nutritious.
Whether you’re serving a family of four or six, this recipe can easily be adjusted to fit your needs. Pair these tacos with a side of Mexican rice or a simple salad to complete the meal.
Ingredients (Serves 4-6):
- 1 tablespoon olive oil
- 1 pound ground beef
- 1 packet taco seasoning mix
- 1/4 cup water
- 8-12 small corn or flour tortillas
- 1 cup shredded lettuce
- 1 cup diced tomatoes
- 1 cup shredded cheddar cheese
- 1/2 cup sour cream
- 1/2 cup salsa
- Optional toppings: sliced jalapeños, chopped cilantro, sliced avocado, lime wedges
Cooking Instructions:
- Prepare the Beef: Heat olive oil in a large skillet over medium-high heat. Add the ground beef and cook until browned, breaking it up with a wooden spoon as it cooks, about 6-8 minutes.
- Season the Beef: Drain any excess fat from the skillet. Add the taco seasoning mix and 1/4 cup of water to the beef. Stir well to combine and let it simmer for about 2-3 minutes, or until the sauce thickens slightly.
- Warm the Tortillas: While the beef is cooking, warm the tortillas. You can do this by wrapping them in a damp paper towel and microwaving for 30 seconds or heating them individually in a dry skillet over medium heat for about 30 seconds on each side.
- Assemble the Tacos: To assemble the tacos, place a spoonful of the seasoned beef on each tortilla. Top with shredded lettuce, diced tomatoes, shredded cheddar cheese, a dollop of sour cream, and a spoonful of salsa.
- Serve and Enjoy: Serve the tacos immediately while the beef is hot and the tortillas are warm. Provide optional toppings like sliced jalapeños, chopped cilantro, sliced avocado, and lime wedges on the side for additional flavor enhancements.
Extra Tips:
For even more flavor, consider using a mix of ground beef and ground turkey or chicken. This not only adds a unique taste but also reduces the fat content of the dish.
If you want to add some heat, mix a pinch of cayenne pepper or a dash of hot sauce into the beef as it cooks. For a healthier option, use whole wheat tortillas and low-fat cheese and sour cream.
Finally, if you have leftovers, the beef mixture can be stored in an airtight container in the refrigerator for up to 3 days, making it perfect for a quick lunch the next day.
Veggie Stir-Fry With Tofu
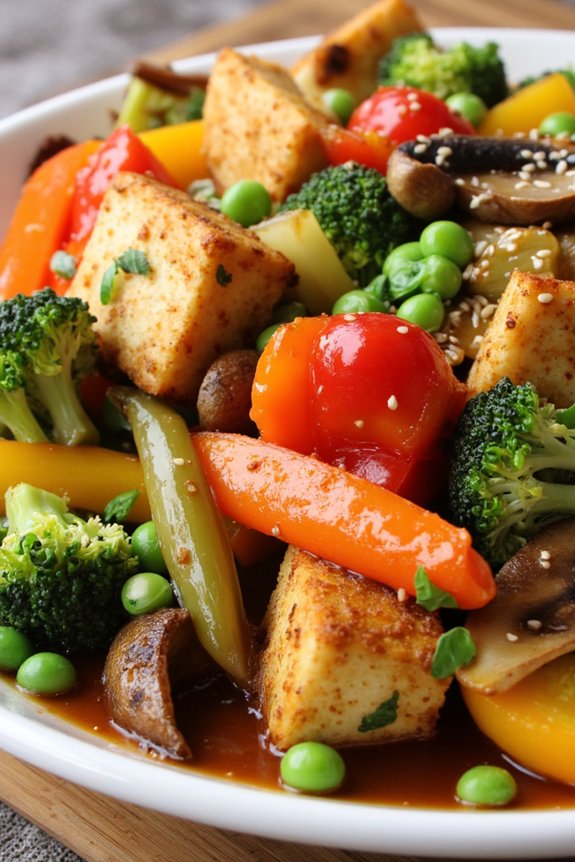
Veggie Stir-Fry With Tofu is a delightful and nutritious dish that isn’t only quick to prepare but also bursts with vibrant flavors and textures. Perfect for a weeknight dinner, this recipe combines a colorful array of fresh vegetables and protein-packed tofu, all tossed in a savory sauce that has just the right amount of tang and sweetness.
Whether you’re a seasoned cook or just starting out, this dish is easy to master and is sure to become a household favorite. This stir-fry is incredibly versatile, allowing you to use whatever vegetables you have on hand. The tofu absorbs the flavors beautifully, creating a satisfying and wholesome meal that’s both filling and healthy.
Serve it over a bed of steamed rice or noodles for a complete dinner that can be prepared in under 30 minutes. With its burst of colors and fresh ingredients, it’s not just a meal, but an experience that will please both the eyes and the palate.
Ingredients (Serves 4-6):
- 1 block (14 ounces) firm tofu, drained and pressed
- 2 tablespoons soy sauce
- 1 tablespoon sesame oil
- 3 tablespoons vegetable oil, divided
- 2 cloves garlic, minced
- 1 tablespoon fresh ginger, minced
- 1 red bell pepper, sliced
- 1 yellow bell pepper, sliced
- 1 cup broccoli florets
- 1 cup snap peas
- 1 carrot, julienned
- 1 cup mushrooms, sliced
- 1/4 cup soy sauce
- 1 tablespoon oyster sauce
- 1 tablespoon rice vinegar
- 1 tablespoon honey
- 1 teaspoon cornstarch mixed with 2 tablespoons water
- Salt and pepper to taste
- 2 tablespoons green onions, chopped
- 1 tablespoon sesame seeds for garnish
Cooking Instructions:
- Prepare the Tofu: Cut the pressed tofu into bite-sized cubes. In a large bowl, mix the cubes with 2 tablespoons of soy sauce and 1 tablespoon of sesame oil. Allow to marinate for at least 10 minutes.
- Cook the Tofu: Heat 1 tablespoon of vegetable oil in a large non-stick skillet or wok over medium-high heat. Add the marinated tofu and cook until golden brown on all sides, about 8-10 minutes. Remove the tofu from the pan and set aside.
- Stir-Fry the Vegetables: In the same skillet, add the remaining vegetable oil. Add the minced garlic and ginger, stirring for about 30 seconds until fragrant. Add the bell peppers, broccoli, snap peas, carrot, and mushrooms. Stir-fry for 5-7 minutes or until the vegetables are just tender yet still crispy.
- Make the Sauce: In a small bowl, whisk together 1/4 cup soy sauce, oyster sauce, rice vinegar, honey, and the cornstarch mixture until smooth.
- Combine and Serve: Return the tofu to the skillet with the vegetables. Pour the sauce over the tofu and vegetables. Stir well to coat everything evenly. Cook for an additional 2-3 minutes, allowing the sauce to thicken. Season with salt and pepper to taste. Garnish with green onions and sesame seeds before serving.
Extra Tips:
For an extra crispy texture, consider coating the tofu in a light layer of cornstarch before frying to achieve a crispier exterior.
Feel free to experiment with different vegetables such as zucchini, asparagus, or baby corn to suit your taste or seasonal availability. To save time, you can prepare and chop all the vegetables in advance and store them in the refrigerator.
This dish is perfect for meal prep and can be stored in airtight containers for up to three days in the fridge. Adjust the sauce to your taste by adding more honey for sweetness or a dash of chili flakes for a spicy kick.
Instant Pot Chili

Looking for a hearty, comforting dinner that can be ready in a fraction of the time it usually takes? Instant Pot Chili is your answer. This recipe combines the rich, savory flavors of traditional chili with the convenience of modern cooking technology. Perfect for busy weeknights or a cozy weekend meal, this chili is packed with protein, fiber, and a robust mix of spices that will delight your taste buds.
The Instant Pot not only speeds up the cooking process but also enhances the flavors, making your chili taste as if it has been simmering for hours. This Instant Pot Chili is perfect for feeding a family or a group of friends, serving 4-6 people with generous portions. It’s a versatile dish that you can adjust to suit different dietary needs or preferences by tweaking the ingredients.
Whether you’re a seasoned chef or a beginner in the kitchen, this recipe is simple, quick, and guarantees a delicious result. Pair it with a crusty bread or serve it with a dollop of sour cream and a sprinkle of cheese for an irresistible meal.
Ingredients:
- 2 tablespoons olive oil
- 1 large onion, diced
- 4 cloves garlic, minced
- 1 pound ground beef (or turkey)
- 1 red bell pepper, chopped
- 1 green bell pepper, chopped
- 2 tablespoons chili powder
- 1 tablespoon ground cumin
- 1 teaspoon smoked paprika
- 1 teaspoon dried oregano
- 1/4 teaspoon cayenne pepper (optional, for heat)
- 1 (28-ounce) can diced tomatoes
- 1 (15-ounce) can kidney beans, drained and rinsed
- 1 (15-ounce) can black beans, drained and rinsed
- 1 cup beef broth
- Salt and pepper to taste
Instructions:
- Prepare the Instant Pot: Set your Instant Pot to the sauté function and let it heat up. Add the olive oil, followed by the diced onion and minced garlic. Sauté for about 3-4 minutes until the onions become translucent.
- Cook the Meat: Add the ground beef (or turkey) to the pot. Cook it until it’s browned, breaking it apart with a wooden spoon as it cooks. This should take about 5-7 minutes.
- Add Vegetables and Spices: Add the chopped bell peppers to the pot. Stir in the chili powder, ground cumin, smoked paprika, dried oregano, and cayenne pepper. Cook for another 2-3 minutes until the spices are fragrant.
- Incorporate Tomatoes and Beans: Pour in the diced tomatoes, kidney beans, and black beans. Stir everything together to make sure the spices and vegetables are evenly distributed.
- Add Liquid: Pour in the beef broth. Stir well to combine all the ingredients. Season with salt and pepper according to your taste preference.
- Pressure Cook: Secure the lid on the Instant Pot and confirm the valve is set to the sealing position. Cancel the sauté function and select the manual or pressure cook setting. Set the timer for 20 minutes on high pressure.
- Release Pressure: Once the cooking time is complete, let the pressure release naturally for about 10 minutes, then turn the valve to the venting position to release any remaining pressure.
- Serve: Open the lid carefully. Give the chili a good stir and taste for seasoning adjustments. Serve hot, garnished with your choice of toppings like shredded cheese, sour cream, or chopped cilantro.
Extra Tips:
For an extra layer of flavor, you can toast the spices in a dry pan before adding them to the chili, which helps to release their oils and aromas.
If you prefer a spicier chili, increase the amount of cayenne pepper or add a chopped jalapeño. This chili also freezes well, so consider making a double batch and storing half for a quick and easy meal in the future.
Adjust the thickness by adding more beef broth if you prefer a soupier consistency, or letting it sauté for a few extra minutes after pressure cooking to thicken it up.
Sheet Pan Salmon and Asparagus
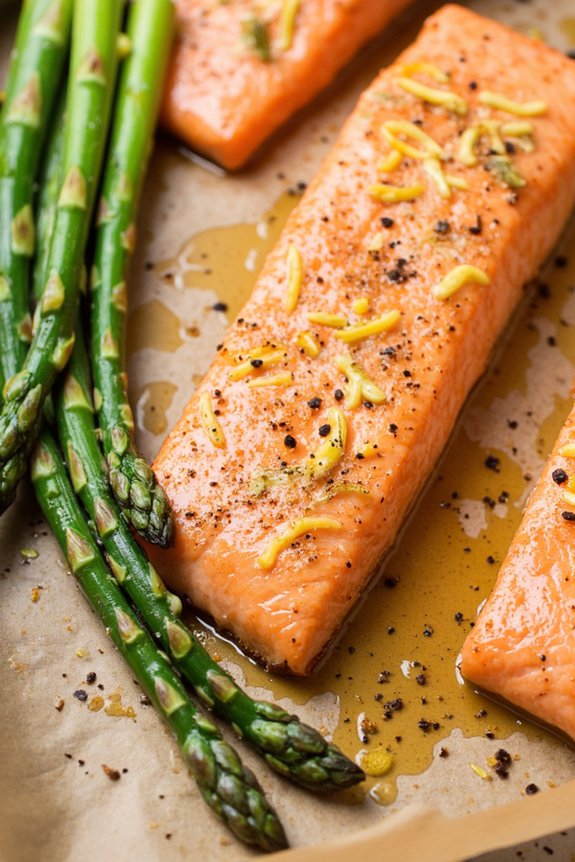
Sheet Pan Salmon and Asparagus is a fantastic choice for a quick and easy dinner, perfect for busy weeknights or when you’re craving something healthy yet satisfying. This dish combines tender, flaky salmon fillets with crisp-tender asparagus, all roasted together on a single sheet pan for minimal cleanup.
The beauty of this recipe is in its simplicity and the way the flavors meld together during roasting. With just a few basic ingredients and a short cooking time, you can have a delicious meal on the table in under 30 minutes.
This recipe serves 4-6 people, making it ideal for family dinners or small gatherings. The salmon is lightly seasoned to let its natural flavors shine, while the asparagus adds a vibrant pop of green and a pleasant crunch. A drizzle of olive oil and a sprinkling of lemon zest enhance the dish with freshness and a subtle tang.
Whether you’re a seasoned cook or a kitchen novice, this sheet pan dinner is sure to become a staple in your meal rotation.
Ingredients:
- 4-6 salmon fillets (about 6 oz each)
- 1 lb asparagus, trimmed
- 3 tablespoons olive oil
- 1 lemon, zested and juiced
- 3 cloves garlic, minced
- Salt and pepper to taste
- 1 teaspoon dried dill (optional)
- Lemon wedges, for serving
Cooking Instructions:
- Preheat the Oven: Begin by preheating your oven to 400°F (200°C). This guarantees that the salmon and asparagus cook evenly and develop a nice, roasted flavor.
- Prepare the Sheet Pan: Line a large sheet pan with parchment paper or aluminum foil for easy cleanup. Arrange the salmon fillets on one side of the pan, leaving space for the asparagus.
- Season the Salmon: Drizzle the salmon fillets with 1 tablespoon of olive oil, and sprinkle them with salt, pepper, and minced garlic. Add the lemon zest and a squeeze of lemon juice over the top for added flavor. If using dried dill, sprinkle it over the salmon as well.
- Prepare the Asparagus: On the other side of the sheet pan, place the trimmed asparagus. Drizzle with the remaining olive oil and season with salt and pepper. Toss the asparagus gently to guarantee it’s evenly coated with oil and seasoning.
- Roast the Dish: Place the sheet pan in the preheated oven and roast for 12-15 minutes, or until the salmon is cooked through and flakes easily with a fork, and the asparagus is tender yet crisp.
- Serve: Remove the sheet pan from the oven and let it rest for a couple of minutes. Serve the salmon and asparagus with additional lemon wedges on the side for squeezing over the top.
Extra Tips:
For the best results, choose salmon fillets that are of even thickness to guarantee they cook uniformly. Feel free to experiment with herbs and spices to suit your taste; fresh dill or parsley can be excellent additions.
When selecting asparagus, opt for medium-sized stalks, as they provide a good balance between tenderness and flavor. If the asparagus stalks are particularly thick, consider peeling the lower part to guarantee they cook evenly with the salmon.
This dish pairs wonderfully with a side of rice or quinoa for a complete meal.
Spaghetti Aglio E Olio
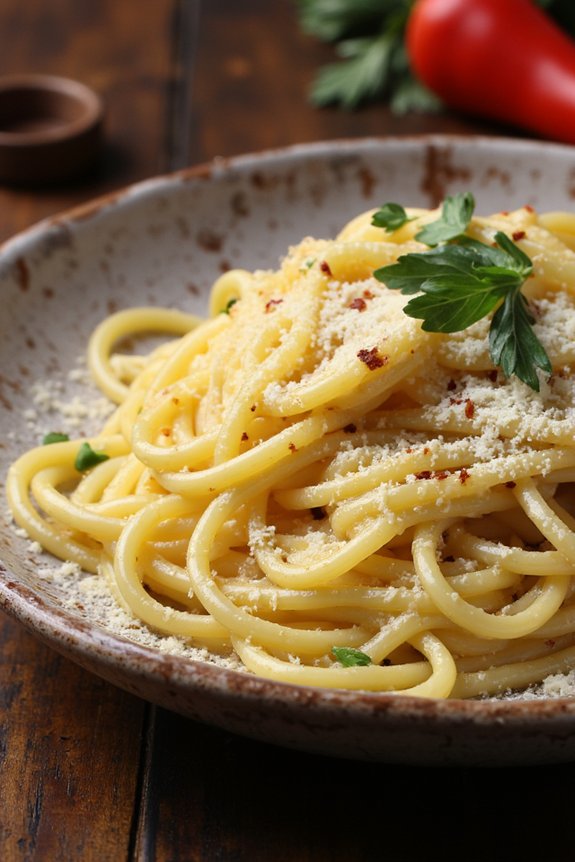
Spaghetti Aglio E Olio is a classic Italian pasta dish that’s known for its simplicity and bold flavors. It’s the perfect choice for a quick and easy dinner, requiring just a few basic ingredients and minimal preparation time. This dish features spaghetti tossed in a fragrant mixture of garlic, olive oil, and red pepper flakes, creating a savory and slightly spicy sauce that clings perfectly to the pasta.
With its rich aroma and satisfying taste, Spaghetti Aglio E Olio is a delightful option for busy weeknights or when you need to whip up something delicious in a hurry.
This recipe serves 4-6 people and can be prepared in under 30 minutes, making it ideal for family dinners or small gatherings. The key to mastering this dish lies in using high-quality olive oil and fresh garlic, as these ingredients are the stars of the dish. The heat from the red pepper flakes adds just the right amount of kick, while fresh parsley and grated Parmesan cheese provide the perfect finishing touch.
Whether you’re a seasoned cook or a novice in the kitchen, you’ll find this recipe to be both straightforward and rewarding.
Ingredients:
- 1 pound (450g) spaghetti
- 1/2 cup extra-virgin olive oil
- 8 cloves garlic, thinly sliced
- 1 teaspoon red pepper flakes
- Salt, to taste
- 1/4 cup fresh parsley, chopped
- Grated Parmesan cheese, for serving (optional)
Instructions:
- Cook the Spaghetti: Bring a large pot of salted water to a boil. Add the spaghetti and cook according to the package instructions until al dente. Reserve about 1 cup of the pasta cooking water, then drain the spaghetti.
- Prepare the Garlic Oil: While the pasta is cooking, heat the olive oil in a large skillet over medium heat. Add the sliced garlic and sauté until it’s golden brown, being careful not to burn it, as this can make the garlic bitter.
- Add Spice: Stir in the red pepper flakes, allowing them to infuse the oil for about 30 seconds to a minute. This will release their heat and flavor into the oil.
- Combine Pasta and Sauce: Add the drained spaghetti to the skillet, tossing it well to coat with the garlic oil. If the pasta seems dry, gradually add some of the reserved pasta cooking water until you reach the desired consistency.
- Finish and Serve: Remove the skillet from heat and stir in the chopped parsley. Season with salt to taste. Transfer the pasta to a serving dish, sprinkle with grated Parmesan cheese if desired, and serve immediately.
Extra Tips:
For a richer flavor, you can use a combination of olive oil and butter. Be sure to monitor the garlic closely while cooking, as it can go from golden to burnt quickly.
If you prefer a milder dish, reduce the amount of red pepper flakes. Adding a squeeze of lemon juice before serving can also brighten the flavors. Finally, always taste the pasta before serving to adjust seasoning as per your preference.
15-Minute Shrimp Scampi
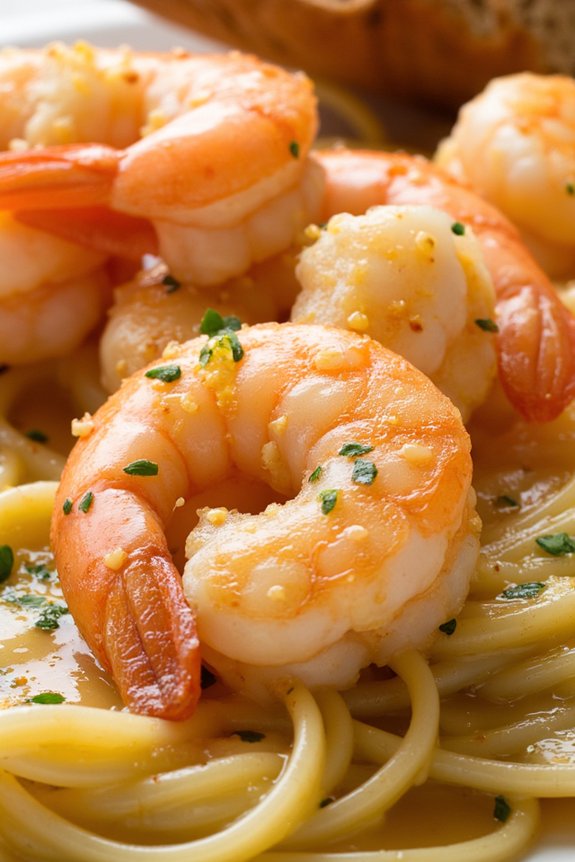
If you’re looking for a quick yet delicious dinner option, Minute Shrimp Scampi is the perfect solution. This classic dish boasts a delightful combination of succulent shrimp, aromatic garlic, and zesty lemon, all tossed in a buttery, white wine sauce.
It’s a dish that feels fancy enough for a special occasion yet easy enough to whip up on a weeknight. Best of all, it can be prepared in under 30 minutes, making it an ideal choice for those busy evenings when you need something fast and flavorful.
Minute Shrimp Scampi pairs beautifully with pasta or crusty bread, allowing you to soak up all the delicious sauce. The key to this recipe’s success is using high-quality shrimp and fresh ingredients to guarantee maximum flavor. This recipe serves 4-6 people, making it perfect for a family dinner or a small gathering.
Ingredients (Serves 4-6)
- 1 1/2 pounds large shrimp, peeled and deveined
- 2 tablespoons olive oil
- 4 tablespoons unsalted butter
- 4 cloves garlic, minced
- 1/2 cup dry white wine
- 1/4 cup fresh lemon juice
- Zest of 1 lemon
- 1/4 cup chopped fresh parsley
- Salt and pepper to taste
- 1/4 teaspoon red pepper flakes (optional)
Instructions
- Prepare the Shrimp: Rinse the shrimp under cold water and pat them dry with paper towels. Season them lightly with salt and pepper to enhance their natural flavor.
- Cook the Shrimp: In a large skillet, heat the olive oil and 2 tablespoons of butter over medium-high heat. Once the butter is melted and the oil is shimmering, add the shrimp in a single layer. Cook for about 2-3 minutes on each side until they turn pink and opaque. Remove the shrimp from the skillet and set them aside.
- Make the Sauce: In the same skillet, add the remaining 2 tablespoons of butter. Once melted, add the minced garlic and sauté for about 1 minute until fragrant, being careful not to burn it.
- Add the Wine and Lemon: Pour in the white wine and lemon juice, scraping up any browned bits from the bottom of the skillet. Allow the mixture to simmer for about 2 minutes to let the alcohol cook off and the flavors meld.
- Combine Ingredients: Return the shrimp to the skillet, along with any juices that have accumulated. Toss them in the sauce to coat well. Add the lemon zest, chopped parsley, and red pepper flakes (if using). Stir to combine all the ingredients.
- Finish and Serve: Taste the scampi and adjust the seasoning with additional salt and pepper if necessary. Serve immediately over cooked pasta or with crusty bread to enjoy every bit of the flavorful sauce.
Extra Tips
When cooking shrimp, it’s essential not to overcook them, as they can become rubbery. They’re done as soon as they turn pink and opaque.
If you prefer a non-alcoholic version, you can substitute the white wine with chicken broth for a similar depth of flavor. Additionally, feel free to adjust the amount of garlic and lemon to suit your taste preferences.
For added richness, you can sprinkle a bit of grated Parmesan cheese over the finished dish. Enjoy your Minute Shrimp Scampi with a side salad or steamed vegetables for a complete meal.
Chicken Quesadillas

If you’re looking for a delicious and satisfying meal that can be whipped up in no time, chicken quesadillas are an excellent choice. These crispy, cheesy, and flavor-packed delights are a crowd-pleaser and perfect for a quick weeknight dinner. With just a few simple ingredients and minimal prep work, chicken quesadillas can be on your table in under 30 minutes.
Whether you’re catering to a family of picky eaters or impressing guests at a casual get-together, this recipe is sure to be a hit.
Chicken quesadillas are versatile and can be customized to suit your taste preferences. You can experiment with different fillings, adding vegetables or spices to suit your palate. Pair these quesadillas with a side of salsa, guacamole, or sour cream, and you’ve got a complete meal that’s both filling and flavorful.
This recipe serves 4-6 people, making it perfect for family dinners or small gatherings.
Ingredients (Serves 4-6):
- 2 tablespoons olive oil
- 1 pound boneless, skinless chicken breasts, diced
- 1 teaspoon chili powder
- 1 teaspoon cumin powder
- Salt and pepper, to taste
- 1 large onion, thinly sliced
- 1 red bell pepper, thinly sliced
- 2 cups shredded cheese (cheddar, Monterey Jack, or a blend)
- 8 large flour tortillas
- Cooking spray or additional olive oil for grilling
Instructions:
- Prepare the Chicken: Heat 1 tablespoon of olive oil in a large skillet over medium-high heat. Add the diced chicken, chili powder, cumin, salt, and pepper. Cook the chicken for 5-7 minutes until it’s fully cooked through and no longer pink inside. Remove from the skillet and set aside.
- Sauté the Vegetables: In the same skillet, add the remaining tablespoon of olive oil. Add the sliced onion and bell pepper, and sauté them for 4-5 minutes until they’re soft and slightly caramelized. Remove from the skillet and set aside with the chicken.
- Assemble the Quesadillas: On a clean surface, lay out 4 tortillas. Evenly distribute the cooked chicken and vegetables over each tortilla. Top with 1/2 cup of shredded cheese per tortilla. Place another tortilla on top of each, pressing down gently to secure the fillings.
- Cook the Quesadillas: Heat a non-stick skillet or griddle over medium heat. Lightly spray with cooking spray or add a small amount of olive oil. Place one quesadilla in the skillet and cook for 2-3 minutes on each side, or until the tortillas are golden brown and the cheese has melted. Repeat with the remaining quesadillas.
- Serve: Once cooked, remove the quesadillas from the skillet and let them cool for a minute. Cut each quesadilla into wedges and serve with salsa, guacamole, or sour cream.
Extra Tips: For an added burst of flavor, try marinating the chicken in lime juice and garlic for 30 minutes before cooking. To make the quesadillas even crispier, brush a little melted butter on the outside of the tortillas before grilling.
If you prefer a spicier kick, add some sliced jalapeños or a dash of hot sauce to the filling. Remember to keep the heat at medium to avoid burning the tortillas while ensuring the cheese melts perfectly. Enjoy your quick and easy chicken quesadillas!
Easy Vegetable Curry
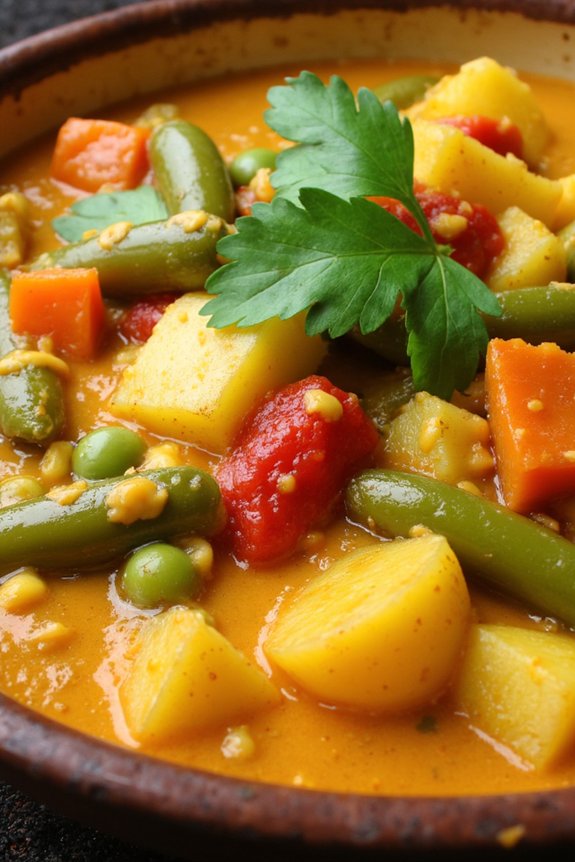
Vegetable curry is a vibrant and flavorful dish that can be whipped up in no time, making it perfect for busy weeknights. Packed with a variety of fresh vegetables and aromatic spices, this dish isn’t only nutritious but also incredibly satisfying.
Whether you’re a seasoned cook or a kitchen novice, this easy vegetable curry recipe is designed to be simple yet delicious, providing a hearty meal for 4-6 people. This recipe is adaptable, allowing you to use whatever vegetables you have on hand, and can be tailored to suit your taste preferences.
The creamy coconut milk base balances the spices beautifully, creating a rich and comforting dish that can be served with rice or naan bread for a complete meal. Let’s explore the ingredients and steps needed to create this delightful dish.
Ingredients (serves 4-6):
- 2 tablespoons vegetable oil
- 1 large onion, chopped
- 3 cloves garlic, minced
- 1 tablespoon grated fresh ginger
- 2 tablespoons curry powder
- 1 teaspoon ground cumin
- 1 teaspoon ground coriander
- 1 teaspoon turmeric powder
- 1 can (14 oz) coconut milk
- 2 cups vegetable broth
- 2 medium potatoes, peeled and diced
- 2 carrots, sliced
- 1 red bell pepper, chopped
- 1 cup green beans, trimmed and cut into 1-inch pieces
- 1 cup frozen peas
- Salt and pepper to taste
- Juice of 1 lime
- Fresh cilantro, chopped (for garnish)
Cooking Instructions:
- Prepare the Aromatics: Heat the vegetable oil in a large pot over medium heat. Add the chopped onion and sauté for about 5 minutes until it becomes soft and translucent. Stir in the minced garlic and grated ginger, cooking for an additional 1-2 minutes until fragrant.
- Add the Spices: Sprinkle the curry powder, ground cumin, ground coriander, and turmeric over the onion mixture. Stir well to coat the onions, allowing the spices to toast slightly and release their aromas.
- Create the Base: Pour in the coconut milk and vegetable broth, stirring to combine everything. Bring the mixture to a gentle simmer.
- Cook the Vegetables: Add the diced potatoes and sliced carrots to the pot. Cover and cook for about 10 minutes, or until the potatoes and carrots begin to soften.
- Finish with More Vegetables: Stir in the chopped red bell pepper, green beans, and frozen peas. Continue to simmer for another 10-15 minutes, until all the vegetables are tender and the flavors have melded together.
- Season and Serve: Taste the curry and season with salt and pepper as needed. Stir in the lime juice before serving. Garnish with fresh cilantro for a burst of freshness.
Extra Tips:
For a richer flavor, you can use full-fat coconut milk, but light coconut milk works well if you’re looking to reduce calories. Feel free to swap in seasonal vegetables or those you have at hand, making this dish versatile and perfect for using up leftover produce.
If you prefer a spicier curry, add a pinch of cayenne pepper or a chopped chili alongside the spices. This curry can be stored in the refrigerator for up to three days and often tastes even better the next day as the flavors develop further.
Enjoy your easy vegetable curry with warm naan or a side of fluffy basmati rice for a complete meal!
Lemon Garlic Pasta
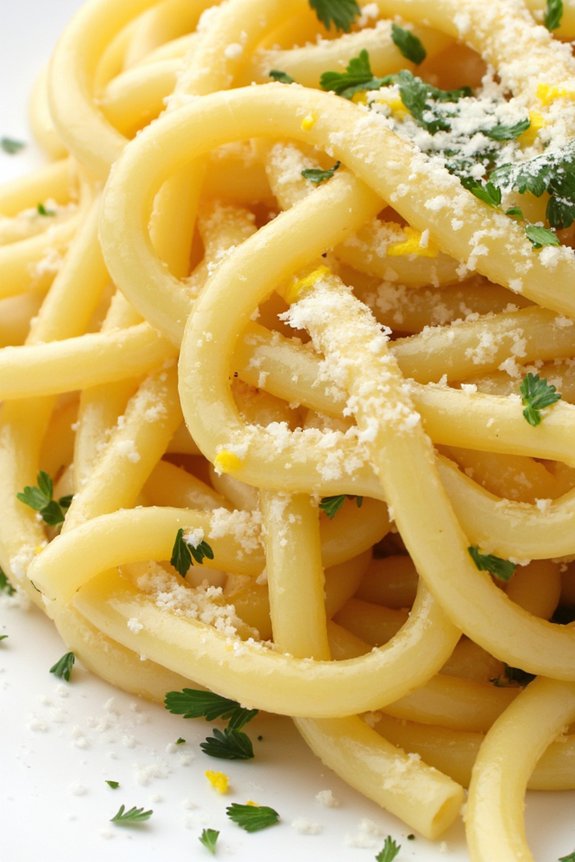
Lemon Garlic Pasta is a delightful and invigorating dish that’s perfect for a quick and easy dinner. This recipe combines the bright flavors of lemon with the savory notes of garlic, creating a mouthwatering dish that’s both simple and satisfying. It’s perfect for those evenings when you want something delicious but don’t have hours to spend in the kitchen.
With just a few ingredients, you can whip up this pasta dish in no time, making it an ideal choice for busy weeknights. This lemon garlic pasta isn’t only easy to make, but it’s also versatile enough to serve as a main course or a side dish. The fresh lemon juice and zest provide a citrusy brightness, while the garlic adds depth and warmth to the dish.
The pasta is tossed with olive oil, Parmesan cheese, and fresh parsley, creating a silky sauce that coats every strand. Whether you’re cooking for your family or hosting a dinner party, this dish is sure to impress.
Ingredients (Serves 4-6):
- 1 pound spaghetti or your preferred pasta
- 4 tablespoons olive oil
- 6 cloves garlic, minced
- Zest and juice of 2 lemons
- 1 cup grated Parmesan cheese
- Salt and pepper to taste
- 1/4 cup fresh parsley, chopped
- Optional: red pepper flakes for a bit of heat
Cooking Instructions:
- Cook the Pasta: Bring a large pot of salted water to a boil. Add the pasta and cook according to the package instructions until al dente. Reserve 1 cup of pasta water and then drain the pasta.
- Prepare the Sauce: In a large skillet, heat the olive oil over medium heat. Add the minced garlic and sauté for about 1-2 minutes until fragrant but not browned.
- Add Lemon: Stir in the lemon zest and juice, and let it cook for another minute, allowing the flavors to meld together.
- Combine Pasta and Sauce: Add the drained pasta to the skillet, tossing to coat the pasta with the lemon and garlic mixture. Gradually add the reserved pasta water, a little at a time, until the pasta is well coated and the sauce reaches your desired consistency.
- Finish with Cheese and Seasoning: Remove the skillet from the heat and stir in the grated Parmesan cheese. Season with salt and pepper to taste. If you like a bit of heat, sprinkle in some red pepper flakes.
- Garnish and Serve: Sprinkle the chopped fresh parsley over the pasta, toss to combine, and serve immediately.
Extra Tips:
For the best flavor, use freshly squeezed lemon juice and freshly grated Parmesan cheese. If you want to add more protein to the dish, consider tossing in some grilled chicken or shrimp.
Also, feel free to experiment with different types of pasta—linguine and fettuccine work particularly well. Remember, the key to a silky sauce is to gradually add the pasta water until you achieve the perfect consistency. Enjoy your Lemon Garlic Pasta with a side salad or some crusty bread for a complete meal.
Beef and Broccoli Stir-Fry
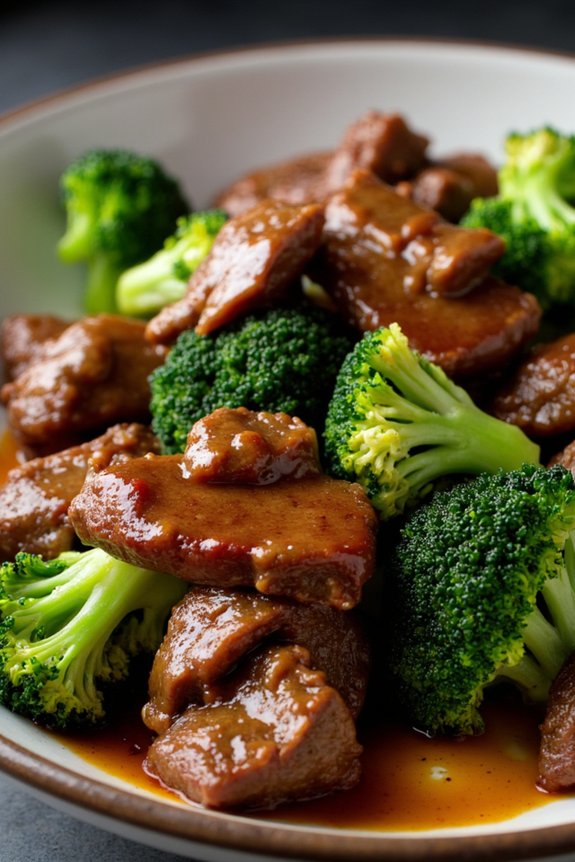
Beef and Broccoli Stir-Fry is a flavorful and satisfying dish that’s perfect for a quick and easy dinner. This classic Asian-inspired recipe combines tender strips of beef with crisp broccoli florets, all tossed in a savory sauce that perfectly balances salty, sweet, and umami flavors.
It’s an excellent option for busy weeknights, as it can be prepared in under 30 minutes and requires minimal ingredients. Plus, it’s a great way to incorporate vegetables into your meal without compromising on taste.
This dish isn’t only delicious but also highly versatile. You can serve it over a bed of steamed rice or noodles to make it more filling, or enjoy it on its own for a lighter meal. The key to a successful Beef and Broccoli Stir-Fry lies in the technique of quickly cooking the ingredients over high heat to maintain their texture and flavor.
With a few simple steps, you can have a restaurant-quality meal ready in no time.
Ingredients (serves 4-6 people):
- 1 lb (450 g) flank steak, thinly sliced against the grain
- 1 tablespoon cornstarch
- 3 tablespoons soy sauce
- 2 tablespoons oyster sauce
- 1 tablespoon hoisin sauce
- 1 tablespoon sesame oil
- 1 tablespoon vegetable oil
- 2 cloves garlic, minced
- 1 teaspoon ginger, minced
- 4 cups broccoli florets
- 1/4 cup water
- 2 tablespoons green onions, chopped (optional)
- Salt and pepper to taste
Cooking Instructions:
- Prepare the Beef: In a medium bowl, combine the sliced flank steak with cornstarch and 1 tablespoon of soy sauce. Mix well to coat the beef evenly and let it marinate for about 15 minutes. This will help tenderize the beef and create a nice crust when cooked.
- Make the Sauce: In a small bowl, whisk together the remaining soy sauce, oyster sauce, hoisin sauce, and sesame oil. Set aside for later use.
- Cook the Beef: Heat the vegetable oil in a large skillet or wok over medium-high heat. Once the oil is hot, add the marinated beef in a single layer. Cook for 2-3 minutes on each side until the beef is browned and just cooked through. Remove the beef from the pan and set aside.
- Stir-Fry the Broccoli: In the same skillet, add the garlic and ginger, and sauté for about 30 seconds until fragrant. Add the broccoli florets and stir-fry for 3-4 minutes until they’re bright green and slightly tender.
- Combine Ingredients: Return the cooked beef to the skillet with the broccoli. Pour the prepared sauce over the mixture and add the water. Stir well to combine all ingredients and cook for another 2-3 minutes until the sauce thickens and coats the beef and broccoli evenly.
- Serve: Remove the stir-fry from heat and season with salt and pepper to taste. Garnish with chopped green onions if desired. Serve immediately over steamed rice or noodles.
Extra Tips:
For the best results, make certain the beef is sliced thinly and uniformly, as this will help it cook quickly and evenly.
If you prefer your broccoli to be more tender, you can blanch it in boiling water for 2 minutes before stir-frying. Additionally, you can customize the dish by adding other vegetables like bell peppers or snap peas for added color and nutrition.
Remember to keep the wok or skillet hot throughout the cooking process to achieve that perfect stir-fry texture.
Baked Chicken Thighs With Potatoes
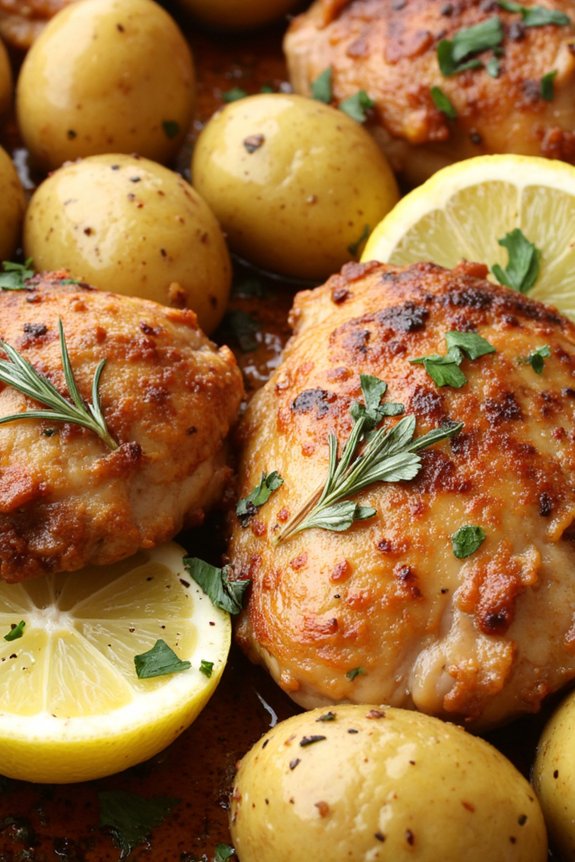
Baked Chicken Thighs With Potatoes is a hearty and flavorful dish perfect for busy weeknights. This recipe combines juicy chicken thighs with tender potatoes, all seasoned with a blend of herbs and spices that infuse the dish with irresistible aromas. The entire meal is prepared in one baking dish, making clean-up a breeze.
This dish isn’t only quick and easy to prepare but also packed with nutrients, making it a wholesome option for family dinners. Chicken thighs are known for their rich flavor and tenderness, which makes them an ideal choice for baking. When paired with potatoes, they create a comforting and satisfying meal that everyone will love.
The recipe is designed for 4-6 servings, making it perfect for a family meal or for meal prepping for the week. Whether you’re a seasoned cook or a beginner in the kitchen, this recipe is straightforward and requires minimal effort, yet it delivers maximum flavor.
Ingredients (Serves 4-6):
- 8 bone-in, skin-on chicken thighs
- 1.5 pounds of baby potatoes, halved
- 3 tablespoons olive oil
- 1 tablespoon dried rosemary
- 1 tablespoon dried thyme
- 1 teaspoon garlic powder
- Salt and pepper to taste
- 1 lemon, sliced into rounds
- Fresh parsley, chopped (for garnish, optional)
Cooking Instructions:
- Preheat the Oven: Begin by preheating your oven to 400°F (200°C). This guarantees that the chicken and potatoes cook evenly and achieve a golden, crispy exterior.
- Prepare the Baking Dish: Lightly grease a large baking dish with olive oil. This prevents the chicken and potatoes from sticking and makes for easier clean-up.
- Season the Chicken Thighs: In a large bowl, combine the chicken thighs with 2 tablespoons of olive oil, rosemary, thyme, garlic powder, salt, and pepper. Toss until the thighs are well coated.
- Prepare the Potatoes: In a separate bowl, toss the halved potatoes with the remaining olive oil, a pinch of salt, and pepper. Mix well to guarantee even coating.
- Arrange in the Baking Dish: Place the seasoned chicken thighs skin-side up in the prepared baking dish. Arrange the potatoes around the chicken thighs, ensuring they’re in a single layer for even cooking.
- Add Lemon Slices: Distribute the lemon slices over the chicken and potatoes. The lemon will add a zesty flavor that complements the herbs.
- Bake: Place the baking dish in the preheated oven and bake for 35-40 minutes, or until the chicken is fully cooked (internal temperature should reach 165°F/75°C) and the potatoes are tender.
- Broil for Crispiness (Optional): If desired, switch to broil mode for the final 2-3 minutes of cooking to achieve extra crispy skin on the chicken.
- Garnish and Serve: Once out of the oven, let the dish rest for a few minutes. Garnish with freshly chopped parsley before serving, if desired.
Extra Tips:
For the best results, make sure the chicken thighs are at room temperature before seasoning them. This helps them cook more evenly.
You can also experiment with different herbs such as oregano or basil to suit your taste preferences. If you prefer more vegetables, consider adding chopped carrots or bell peppers to the dish.
Confirm that the potatoes are cut into uniform sizes to guarantee even cooking. Finally, using fresh lemons rather than bottled lemon juice will greatly enhance the flavor profile of the dish.
Caprese Stuffed Avocados
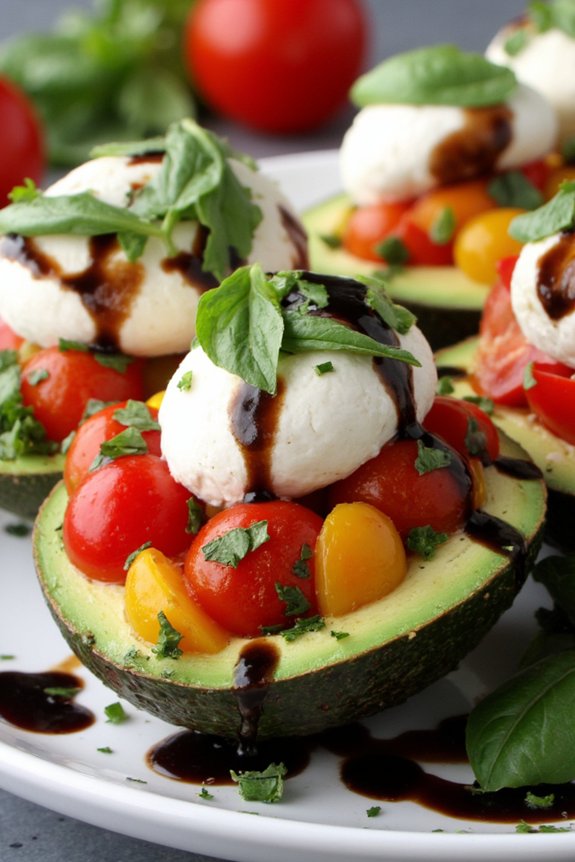
Caprese Stuffed Avocados are a fresh and delicious twist on the classic Caprese salad, perfect for a quick and easy dinner. This dish combines the creamy texture of ripe avocados with the vibrant flavors of fresh mozzarella, juicy tomatoes, and fragrant basil.
It’s a perfect light meal or appetizer option that can be prepared in just a few minutes. The combination of fresh ingredients not only makes it visually appealing but also delivers a burst of flavors in every bite.
This recipe is ideal for those who enjoy a healthy yet satisfying dish with minimal cooking required. It serves 4-6 people, making it great for small gatherings or family dinners. The preparation is simple, requiring only basic chopping and mixing skills.
With its beautiful presentation and delightful taste, Caprese Stuffed Avocados are sure to impress your guests and become a favorite in your recipe collection.
Ingredients for 4-6 servings:
- 4 large ripe avocados
- 1 cup cherry tomatoes, halved
- 1 cup fresh mozzarella balls (bocconcini), halved
- 1/4 cup fresh basil leaves, chopped
- 2 tablespoons balsamic glaze
- 2 tablespoons extra virgin olive oil
- Salt and pepper to taste
Cooking Instructions:
- Prepare the Avocados: Slice the avocados in half lengthwise and remove the pits. Use a spoon to carefully scoop out a small portion of the flesh from each half to create a larger cavity for the filling. Set the avocado halves aside on a serving platter.
- Prepare the Filling: In a medium-sized bowl, combine the halved cherry tomatoes, mozzarella balls, and chopped basil leaves. Drizzle with the extra virgin olive oil and season with salt and pepper. Gently toss the ingredients together to guarantee they’re well mixed and coated with the oil.
- Stuff the Avocados: Spoon the tomato and mozzarella mixture into the cavity of each avocado half, filling them generously.
- Drizzle with Balsamic Glaze: Finish the dish by drizzling balsamic glaze over the stuffed avocados. This adds a touch of sweetness and acidity that complements the other flavors beautifully.
- Serve Immediately: These Caprese Stuffed Avocados are best served fresh. Place them on the table and allow everyone to enjoy the vibrant flavors and textures.
Extra Tips: To keep the avocados from browning too quickly, you can brush the exposed flesh with a bit of lemon juice after cutting them. This will help maintain their bright green color.
Additionally, feel free to experiment with different types of tomatoes or mozzarella for a unique twist. If you prefer a bit of crunch, add pine nuts or toasted seeds to the filling. Enjoy this dish as a standalone meal or as a side dish to complement a grilled main course.